IaC in the Cloud: Installing Terraform and Running Your First Script
Posted By: Todd Sharp on 3/1/2021 1:00 GMT
Tagged: Cloud, Cloud, Cloud Native, Cloud Native

In our last post, we took a high-level look at the basics of Terraform for developers. Hopefully you’ve read that (or are already familiar with Terraform) because in this post we’re going to install Terraform and get started creating modules to interact with an Oracle Cloud Infrastructure tenancy. We will just be working with Terraform locally in this post, so the first thing we’ll need to do is download and install Terraform. Find the proper binary and install it from Hashicorp’s download page. Once it’s installed, test the installation by checking the version number. As of the date this blog post was published, this gave me the following:
The OCI Terraform Provider - Installation & Authentication
You can manually download the provider, but it’s easier to let Terraform download it for you. It’ll do so if you configure a provider block, so let’s skip the manual installation for now. Before we move into the provider, be sure to bookmark the OCI Terraform Provider documentation on the Terraform registry as you’ll be using it often!
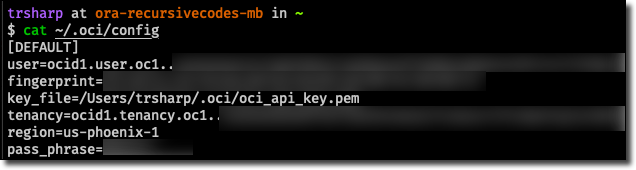
There are a few options for authenticating with the OCI Terraform Provider, but we’ll use the API Key Authentication option in this post. I like this option because if you already have the OCI CLI installed locally (and you totally should) then getting all of the required info is just a matter of reading your CLI config file.
No CLI? No problem. See the docs for where to find all of the information that you need.
Here are the bits we need to collect:
-
tenancy_ocid -
user_ocid -
private_key_path -
private_key_password(Optional - if private key is password protected) -
fingerprint -
region
I got these from my local machine like so:
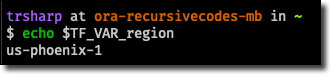
An easy way to get these values into Terraform is to set them as environment variables prefixed with TF_VAR_. This special prefix will ensure they are available within our script, so depending on your OS, make sure they are set in your environment before proceeding. For example, on my Mac, I set them inside of my .zshrc file so they are always available in my terminal. You could also create a bash script and source it as necessary. Here are the variables you’ll need to set:
Confirm they are set with an echo:
Now we can create our first .tf file! Move to an empty directory and create a file called provider.tf and open it with the IDE of your choice.
Populate provider.tf and save:
Next, create a file called variables.tf in the same directory. We’ll use this file to declare variables in our project. Any variables that we set via environment variables won’t be accessible unless there is a corresponding declaration somewhere in our project, so declare all of the variables that we set as TF_VAR above.
Open up a new terminal in your IDE (or back in your OS terminal) and run terraform init. The first time that you run this, Terraform will notice that you’re using the OCI Terraform provider and automatically download it for you. The output will look similar to this:
Creating & Applying Terraform Execution Plans
There are a handful of commands available in the Terraform CLI, but the three that you’ll probably use most are plan, apply and destroy (with destroy probably used least often of the three). During development, console is a handy way to evaluate and experiment with expressions (console docs).
What’s the Plan, Stan?
The plan command compares the desired state to the current state and generates an execution plan to get from current to desired. It doesn’t actually do anything - just creates a plan. You typically run a plan to validate your scripts and confirm the plan is going to do what you want it to do. In fact, run it now:
Right, so since we’ve got no resources defined, there’s nothing (yet) in our plan! Let’s open up variables.tf in the same directory and define a variable called bucket_namespace with a value equal to your Object Storage namespace.
What’s My Namespace? It’s easy to figure out.
Let’s take a quick look to see if our variable is set:
Excellent - just as we expected! Let’s exit the terminal and create another new file. Call this one test.tf.
Oh no, I’m stuck! In the Terraform console, type help for help. Type exit to exit, or use CTRL+D or CTRL+C.
Let’s use an object storage data source to list all of the Object Storage buckets in our tenancy. In test.tf, add the following:
Now check the value of this data source in the console. Remember from our last post, data source output must be prefixed with data and then the operation type and local label.
Ahh, so we can’t grab this info just yet. To get the data, we must apply the plan.
How does it Apply, Guy?
It’s certainly not an impressive plan, but it’s a plan nevertheless, so let’s try to apply it. But before we do that, add an output block to print out our bucket summaries.
If we apply this plan (with terraform apply) we will see a list of bucket summary objects for each bucket in our tenancy/namespace. Let’s make it a bit easier to read by collecting a list of bucket names by using the splat syntax of Terraform:
Running the apply again, this time we get a more readable output.
So far, we’ve still not done any actual resource creation - just some basic variable declaration, provider config, data source reading and output. Let’s get in to resource creation by adding a resource block to test.tf that will create a new bucket and output the result. We’ll also remove the data source call to list the bucket summaries since we don’t need that anymore.
If we run terraform plan, we can see the generated plan.
This is expected - the bucket summary list is removed from the output and the plan to create a new bucket and output the result is laid out. Check out that last note though. We can choose to save our plan to disk by specifying an -out param - let’s give that a shot.
So the plan was saved - let’s try to read it.
Hmm…looks like it’s binary, so, it’s no good for us to read. But, we can however apply this saved plan.
Excellent! It looks like our bucket was created. Let’s confirm with the OCI CLI.
We can confirm in the OCI console as well.
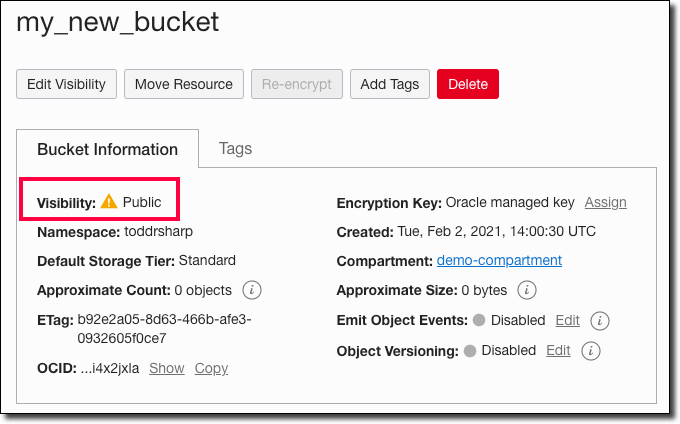
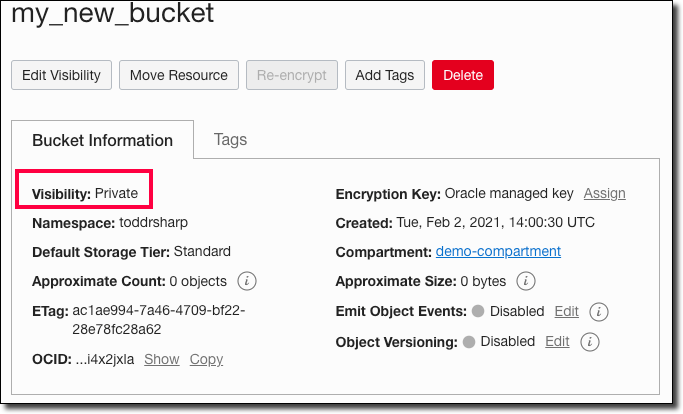
Oh, wait! We accidentally made this new bucket a public bucket! That won’t do - we’ll need to change this to private. Head back to our Terraform script, update the property and re-run our apply job.
Run it again and notice that Terraform knows our state (the bucket exists) so it decides to update the bucket instead of creating a new bucket. It also points out the change in access type and tells us what it’s going to do.
Confirm that the change was applied in the console.
How Can I Destroy, Roy?
If for some reason you would like to remove all of the infrastructure that was created with your Terraform project, you can run terraform destroy.
Summary
In this post, we installed Terraform and the Terraform OCI Provider and created, planned and applied our first Terraform script to manage infrastructure in the Oracle Cloud. It should be noted that the OCI Provider has full support for all infrastructure elements in the Oracle Cloud. Refer to the documentation for specific implementation details on the operation(s) that you need to perform in your tenancy. In our next post, we’ll get started with using Terraform in the Oracle Cloud instead of locally!
Photo by Daniel Páscoa on Unsplash
Related Posts

Querying Autonomous Database from an Oracle Function (The Quick, Easy & Completely Secure Way)
I've written many blog posts about connecting to an Autonomous DB instance in the past. Best practices evolve as tools, services, and frameworks become...

Brain to the Cloud - Part III - Examining the Relationship Between Brain Activity and Video Game Performance
In my last post, we looked at the technical aspects of my Brain to the Cloud project including much of the code that was used to collect and analyze the...

Brain to the Cloud - Part II - How I Uploaded My Brain to the Cloud
In my last post, we went over the inspiration, objectives, and architecture for my Brain to the Cloud project. In this post, we'll look in-depth at the...