Enterprise Messaging via Oracle Advanced Queuing with Autonomous DB & Micronaut
Posted By: Todd Sharp on 6/7/2021 12:00 GMT
Tagged: Cloud, Java

I’ve written about messaging many, many times on this blog. And for good reason, too. It’s a popular subject that developers can’t seem to get enough of. In this world of distributed architectures, it’s critical that services communicate with each other to ensure the application's business logic is implemented properly. It’s well established that messaging is crucial for modern applications, so let’s look at a messaging solution that exists in the Oracle Cloud that you may not be aware of. In fact, if you’re already using Autonomous DB, then this solution is available to you at no additional charge! Allow me to introduce you to Oracle Advanced Queuing (AQ).
What’s AQ? It’s exactly what it sounds like - a full-featured messaging solution right inside the database. Point-to-point, pub/sub, persistent and non-persistent messaging - all supported. There are tons of ways to interact - including via PL/SQL, JMS, JDBC, .NET, Python, Node.JS - pretty much any popular language can interface with AQ. Demos tend to be the best way to understand concepts like this, so in this post we’re going to look at how to enable AQ in your Autonomous DB instance, create a queue, and enqueue and dequeue messages with PL/SQL. To complete the demo, we’ll look at publishing and consuming messages from AQ from a very simple Java application written with Micronaut.
Set Up Advance Queuing
To set up AQ, we need to create a few users: an admin and a queue user. In the admin schema, we’ll create a queue table, create and start a queue and grant the queue user permission to access it. Then we’ll test out enqueuing and dequeuing a message with the queue user. All of this work will be done with PL/SQL. I like to use the old school SQL Developer desktop client for this, but you can use whichever tool you prefer for querying against your DB instance. It may be a bit older, but I found Tim Hall’s article helpful for getting started with AQ.
Create AQ Users
Connect to your Autonomous instance as admin to create two users. One will be an AQ “admin” and the other will be a “user”.
Create Queue Table and Queue
Now connect up as the aqdemoadmin user that we just created. The first step here is to create a queue table. If we wanted to, we could create a custom type for our queue payload, but since my intention for this demo is to pass JSON messages, we’ll set the queue_payload_type to SYS.AQ$_JMS_TEXT_MESSAGE (docs) which will support a simple JSON string.
Now, let’s create the queue and start it.
Don’t forget to grant aqdemouser permissions to use the queue!
That’s it. That’s all the set up that we need to do before we can start sending messages. Let’s do that now!
Enqueue and Dequeue Messages with PL/SQL
Next, connect up via your query tool of choice as the aqdemouser user. Using PL/SQL, enqueue (or produce) a message containing a bit of information as a JSON string.
Now we can dequeue (or consume) the message, parse the string as a JSON object and print one of the keys from that JSON object.
Interact with AQ with Java & Micronaut
So far, we’ve created a simple queue and tested producing and consuming messages via PL/SQL. While that’s useful, many developers will need to take the next step and integrate the queue into their applications. That’s why it’s handy to have interfaces to AQ via Python, Node, etc. If you read many of my posts, you’ll know that I often use the Micronaut framework with Java because it tends to make difficult tasks quite easy to accomplish. It’s no different when it comes to connecting and interacting with AQ thanks to AQ’s JMS support and Micronaut’s JMS module. Let’s create a demo app that works with the queue we just created.
Create a Micronaut App
If you don’t have an existing Micronaut application that you’d like to work with for this demo, create a new one. It’s easy to create a new app via the Micronaut CLI, like so:
Add Dependencies
Open the new application in your favorite editor and open build.gradle to add a few dependencies. I prefer Gradle, but if you’re more comfortable with Maven, then by all means use Maven. We're going to add some dependencies to our application. The first one that we need to add is micronaut-jms-core which is a module that provides integration between Micronaut and JMS. Micronaut has several dependencies for various JMS implementations (ActiveMQ Classic/Artemis, etc) but we just need the core dependency so we can create a generic broker, producer and consumer. We'll also need the Java Transaction API.
We'll need the AQ api to be able to create connections to AQ via JMS.
To create a connection to AQ via JMS, we'll eventually use an instance of AQjmsFactory. The easiest way to create a connection via AQjmsFactory is to use a java.sql.DataSource that points to our Autonomous DB instance, so let's include some dependencies that will create that DataSource for us based on a bit of configuration that we'll look at in just a bit.
Modify Configuration
We're going to use Micronaut's support for automatic Autonomous DB wallet download to configure our DataSource, so we need to configure the OCI SDK in our application.yml file. This isn't mandatory, and if you'd like to manually configure your datasource it will work just the same, but I find this method the easiest since I don't have to mess with wallet downloads and distributing that wallet to test/QA/prod environments. Using this method means Micronaut will take care of the wallet download and JDBC URL creation and store the wallet in memory - nice!
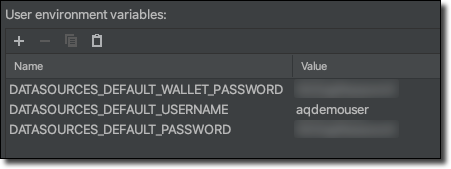
Next, create the very basic datasource configuration. This config tells Micronaut the OCID of the Autonomous DB instance that we want to connect to so it knows which wallet to download. Also, since we're using UCP for connection pooling, we need to specify the connection factory class name. Finally, we need to configure a walletPassword, username, and password. Note that I'm not specifying the credentials in my YAML file - rather, I like to include them as environment properties in my run configuration so that I don't mistakenly check them in to source control!
I use Intelli-J IDEA, so I set my credentials into a run configuration that passes them to the application at runtime.
Confirm DataSource
Now we can fire up the app and make sure Datasource is configured. You should see output similar to this in your console at this point:
Excellent! Looks like our wallet was downloaded and a connection was properly established. We'll use the newly configured DataSource in the next step.
Configure JMS
Now that our app is created and configured, let's configure the JMS broker. The AQ broker is considered "unsupported" by Micronaut, but that's quite OK since we just need to call getConnectionFactory() on AQjmsFactory to get a broker. To use this, we just need to create a configuration class with a connectionFactory() method that is annotated with @JMSConnectionFactory. We'll create this class and inject our DataSource into it so that we can pass that to the getConnectionFactory() method. Sounds tricky, but it's not:
@JMSConnectionFactory. We'll use this string to refer back to the factory later on.
Create JMS Consumer
Now we can specify a consumer which will have a receive() method. This method will be called every time a new message is published to AQ, kind of like our dequeue example in PL/SQL above, but in this case we don't have to manually invoke the consumer - it will be called automatically! Things worthy of note: the class is annotated with @JMSListener which uses the name that we assigned in the previous step. Also, the receive() method is annotated with @Queue to tell it which specific queue to use in AQ. Here we pass the name of the queue (AQDEMOADMIN.EVENT_QUEUE) that we created above. Each time a message is received, we deserialize the JSON string into a simple POJO gives us some structure to the message instead of working with an arbitrary object.
Here's the simple POJO that we can use to represent the incoming message. Take note that we're going to need to publish an Object with two keys: a name and a num.
Create JMS Producer
Finally, we can create a producer interface. This class is annotated with @JMSProducer, and has a send() method signature. This interface will be implemented at compile time and available to be injected where we need it in our application.
Create a Controller to Expose a Publish Message Endpoint
Let's create an endpoint that we can use to publish some test messages.
Here we can inject our AqProducer, and create an endpoint that receives a DemoType (which we can represent as a JSON string) and produces that message.
Before we launch the app, open up logback.xml and configure logging to gain insight into the JMS module.
Now we can startup the application! This time, notice that the JMS module creates the necessary bean, registers the binders and queue listeners.
We can produce a message using cURL to send a POST to the endpoint we just created.
And observe that the AqConsumer receives and logs the message!
Enhanced Debugging for AQ
If things happen to go wrong, we can enable verbose logging for the AQ JMS API. The “proper” way to enable debugging is to set the oracle.jms.traceLevel system property, but that didn’t seem to work for me. Instead, to enable debugging I added the following to Application.java:
Here’s an example of the rather verbose output when debugging is enabled and a message is received:
Summary
In this post, we looked at how to get started with Oracle Advanced Queueing for messaging. We saw how to configure AQ, which is included at no charge with our Autonomous DB instances in the Oracle Cloud. We also saw how to create a simple Java application with Micronaut that uses JMS to publish/subscribe to and from our AQ. If you'd like to see the full code used in this example, feel free to check it out on GitHub.
Photo by Liao Je Wei on Unsplash
Related Posts

Querying Autonomous Database from an Oracle Function (The Quick, Easy & Completely Secure Way)
I've written many blog posts about connecting to an Autonomous DB instance in the past. Best practices evolve as tools, services, and frameworks become...
Sending Email With OCI Email Delivery From Micronaut
Email delivery is a critical function of most web applications in the world today. I've managed an email server in the past - and trust me - it's not fun...

Brain to the Cloud - Part III - Examining the Relationship Between Brain Activity and Video Game Performance
In my last post, we looked at the technical aspects of my Brain to the Cloud project including much of the code that was used to collect and analyze the...