Adventures In CI/CD [#1]: Intro & Getting Started With GitHub Actions
Posted By: Todd Sharp on 4/20/2020 12:00 GMT
Tagged: Cloud, Containers, Microservices, APIs, Integration, Open Source

One of the topics that I have been meaning to spend some time and attention this year is CI/CD. It’s a topic that many developers are often interested in learning more about and there are always new tools to play with and learn about in the CI/CD world. And of course, as a developer advocate focused on cloud and cloud DBs, there is a natural tie that I can take advantage of. With that in mind, join me on a long journey of short walks through the world of CI/CD over the next handful of blog posts. We’re going to look at building a simple microservice using some well-known technologies. Of course, we’ll look at database migrations and testing our microservice as we go and we’ll ultimately end up deploying the app to Oracle Cloud. At first, we’ll deploy to a VM instance, then we’ll look at bundling our microservice in a Docker container and deploying it on Kubernetes (also in the Oracle Cloud). We’ll handle all of these operations with GitHub Actions as our tool to manage our build pipelines.
I know that I’ve laid out a long list of steps, but as I said we’re going to look at each step one at a time in a long series of posts on this blog. In fact, let’s start out in this very post by creating our simple microservice using the Micronaut. You may already be familiar with the popular framework for creating performant and responsive microservices, but if not you will soon see how easy it is to work with. That said, this series is more about the CI/CD than it is about the microservice framework I’m using to demonstrate things. There are some specific features of Micronaut that I will take advantage of to make life easier, but nothing I’m going to show you won’t be applicable in some manner to your applications regardless of the framework or language you’re using.
Creating The Service
Let’s create a service. With Micronaut, that’s a matter of using the provided CLI to scaffold out a basic service. My package name will be codes.recursive and the project name will be cicd-demo.
This results in the following application structure being created for us:
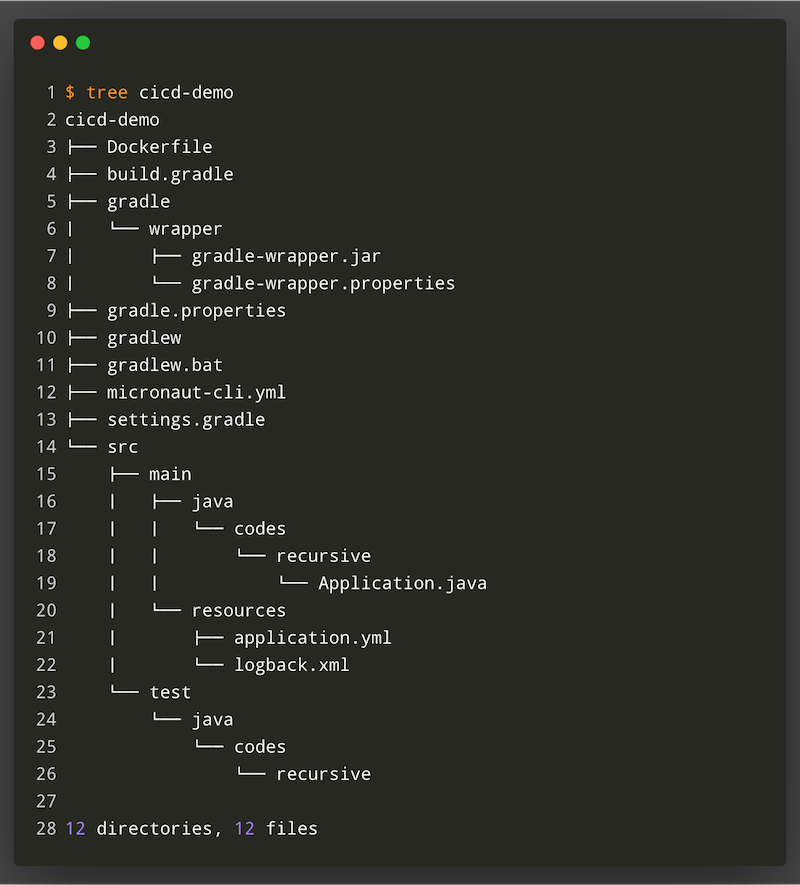
You’ll notice that by default the CLI gives us Gradle as our build tool. If you’re more comfortable with Maven, simply add --build maven to the CLI command and you’ll end up with a pom.xml file instead of a build.gradle file. Please note though that if you use Maven instead of Gradle you’ll have to make some adjustments if you’re following along with this series.
Before we move forward, open up the gradle.properties file in the root of the project and check the micronautVersion. If it’s anything less than 2.0.0.M2, update it to at least that version.
Running The App
At this point, we’ve not written a single line of code and yet we have an application ready to build. We can launch the application with ./gradlew run which results in the application running on localhost:8080.

Adding Support For GitHub Actions
Let’s add our workflow configuration so that GitHub knows that we’re going to manage our builds with GitHub actions.
Note: I’m not going to cover the basics of GitHub Actions in this blog series, but rather I’ll assume that you have a basic level understanding of what it is and what it does. Please refer to the GitHub documentation if you want to learn more.
Now we’ll create our workflow configuration file. It can be named whatever you’d like but must end in .yml or .yaml and must reside in the .github/workflows directory at the root of your project. The basic hierarchy with GitHub Actions is Workflow -> Job -> Step. Workflows have at least one job and jobs contain steps to perform tasks like ‘build, test, package’ - essentially whatever you need to do to deploy your application. Let’s create our config file and call it cicd-workflow.yaml. We’ll populate it with a single step that just echos a message to the console.
I’m using a wildcard (*) so that all branches are built in this example because I’m going to store each part of this blog series in a different branch. Now let’s initialize a Git repo, add our files and make our first commit.
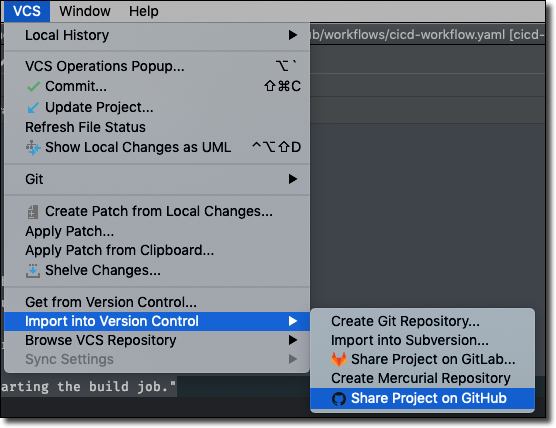
Next, we need to push the project to GitHub. I like to use IntelliJ’s built-in support for this, so click on VCS -> Import Into Version Control -> Share Project On GitHub.
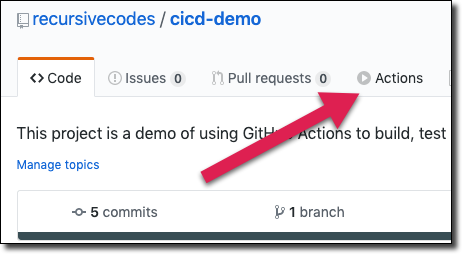
At this point, you can head to the project on GitHub and click on the ‘Actions’ tab.
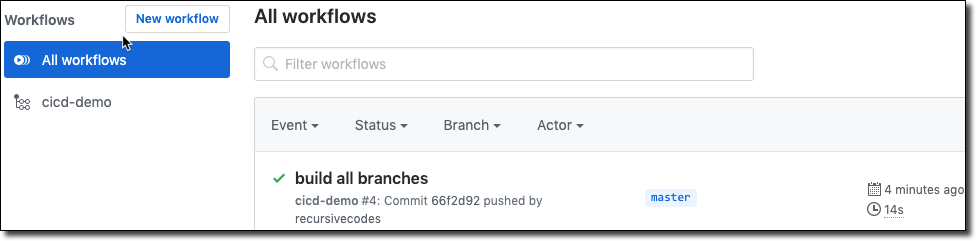
Which will list all of the project workflows and status of the latest runs for each:
If you click on the commit message you can see a detailed log of the build output (which includes a live view while the build is running). Click on each step for more information:
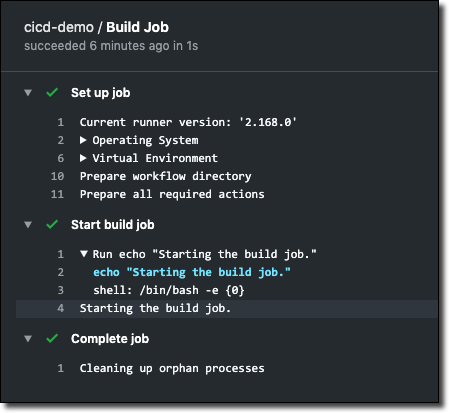
And with that, our very simple example has succeeded and we have completed our very first build with GitHub Actions! Granted, it didn’t do much in the way of building, testing or deploying anything and the application had no meaningful code in it, but that’s OK! We’ve taken the very first step and we will build upon this foundation as we go forward adding relevant and helpful actions with each step.
Bling
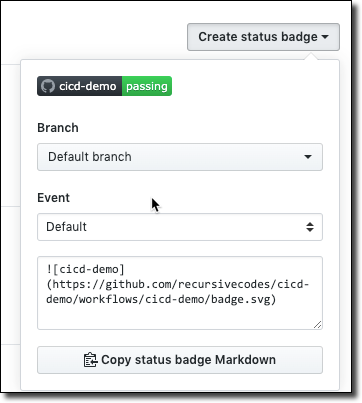
I would be remiss if I didn’t mention the fact that you can generate a super awesome status badge for your builds that can be included in your README file, your team wiki or wherever you’d like to include it. On the ‘Actions’ tab, click ‘Create status badge’ and copy the generated markup.
TL;DR
In this post, we created a Micronaut project, checked it into GitHub and created a basic GitHub Actions workflow configuration file. We pushed our code to GitHub and observed our first successful build.
Next
In our next post, we will dig deeper with GitHub Actions and install Java in our job runner and build and publish our project artifacts.
Source Code
For this post can be found at https://github.com/recursivecodes/cicd-demo/tree/part-1
Photo by Nik Shuliahin on Unsplash