Microservices From Dev To Deploy, Part 1: Getting Started With Helidon
Posted By: Todd Sharp on 10/3/2018 4:27 GMT
Tagged: Containers, Microservices, APIs, DevOps, Developers, Java

Microservices are undoubtedly popular. There have been plenty of great posts on this blog that explain the advantages of using a microservice approach to building applications (or “why you should use them”). And the reasons are plentiful: flexibility to allow your teams to implement different services with their language/framework of choice, independent deployments, and scalability, and improved build and test times are among the many factors that make a microservice approach preferable to many dev teams nowadays. It’s really not much of a discussion anymore as studies have shown that nearly 86% of respondents believe that a microservice approach will be their default architecture within the next 5 years. As I mentioned, the question of “why microservices” has long been answered, so in this short blog series, I’d like to answer the question of “how” to implement microservices in your organization. Specifically, how Oracle technologies can help your dev team implement a maintainable, scalable and easy to test, develop, and deploy solution for your microservice applications.
To keep things interesting I thought I’d come up with a fictional scenario that we can follow as we take this journey. Let’s imagine that a completely fabricated startup called TechCorp has just secured $150M in seed funding for their brilliant new project. TechCorp’s founder Lydia is very nostalgic and she longs for the “good old days” when 56k modems screeched and buzzed their way down the on-ramp to the “interwebs” and she’s convinced BigCity Venture Capital that personalized homepages are about to make a comeback in a major way. You remember those, right? Weather, financials, news – even inspiring quotes and funny cat pictures to brighten your day. With funding secured Lydia set about creating a multinational corporation with several teams of “rock star” developers across the globe. Lydia and her CTO Raj know all about microservices and plan on having their teams split up and tackle individual portions of the backend to take advantage of their strengths and ensure a flexible and reliable architecture.
Team #1:
Location: London
Team Lead: Chris
Focus: Weather Service
Language: Groovy
Framework: Oracle Helidon SE with Gradle
Team #2:
Location: Tokyo
Team Lead: Michiko
Focus: Quote Service
Language: Java
Framework: Oracle Helidon MP with Maven
Team #3:
Location: Bangalore
Team Lead: Murielle
Focus: Stock Service
Language: JavaScript/Node
Framework: Express
Team #4:
Location: Melbourne
Team Lead: Dominic
Focus: Cat Picture Service
Language: Java
Framework Oracle Fn (Serverless)
Team #5
Location: Atlanta
Team Lead: Ava
Focus: Frontend
Language: JavaScript/TypeScript
Framework: Angular 6
As you can see, Lydia has put together quite a globally diverse group of teams with a wide-ranging set of skills and experience. You’ll also notice some non-Oracle technologies in their selections which you might find odd in a blog post focused on Oracle technology, but that’s indicative of many software companies these days. Rarely do teams focus solely on a single company’s stack anymore. While we’d love it if they did, the reality is that teams typically have strengths and preferences that come into play. I’ll show you in this series how Oracle’s new open source Helidon framework and Fn Serverless project can be leveraged to build microservices and serverless functions, but also how a team can deploy their entire stack to Oracle’s cloud regardless of the language or framework used to build the services that comprise their application. We'll dive slightly deeper into Helidon than an introductory post, so you might want to first read this introductory blog post and the tutorial before you read the rest of this post.
Let’s begin with Team #1 who has been tasked with building out the backend for retrieving a user’s local weather. They’re a Groovy team, but they’ve heard good things about Oracle’s new microservice framework Helidon so they’ve chosen to use this new project as an opportunity to learn the new framework and see how well it works with Groovy and Gradle as a build tool. Team lead Chris has read through the Helidon tutorial and created a new application using the quickstart examples so his first task is to transform the Java application that was created into a Groovy application. The first step for Chris, in this case, is to create a Gradle build file and make sure that it includes all of the necessary Helidon dependencies as well as a Groovy dependency. Chris also adds a ‘copyLibs’ task to make sure that all of the dependencies end up where they need to when the project is built. The build.gradle file looks like this:
apply plugin: 'java'
apply plugin: 'maven'
apply plugin: 'groovy'
apply plugin: 'application'

mainClassName = 'codes.recursive.weather.Main'

group = 'codes.recursive.weather'
version = '1.0-SNAPSHOT'

description = """A simple weather microservice"""

sourceSets.main.resources.srcDirs = [ "src/main/groovy", "src/main/resources" ]

sourceCompatibility = 1.8
targetCompatibility = 1.8
tasks.withType(JavaCompile) {
    options.encoding = 'UTF-8'
}

ext {
    helidonversion = '0.10.0'
}

repositories {
    maven { url "http://repo.maven.apache.org/maven2" }
    mavenLocal()
    mavenCentral()
}

configurations {
    localGroovyConf
}

dependencies {
    localGroovyConf localGroovy()
    compile 'org.codehaus.groovy:groovy-all:3.0.0-alpha-3'
    compile "io.helidon:helidon-bom:${project.helidonversion}"
    compile "io.helidon.webserver:helidon-webserver-bundle:${project.helidonversion}"
    compile "io.helidon.config:helidon-config-yaml:${project.helidonversion}"
    compile "io.helidon.microprofile.metrics:helidon-metrics-se:${project.helidonversion}"
    compile "io.helidon.webserver:helidon-webserver-prometheus:${project.helidonversion}"
    compile group: 'com.mashape.unirest', name: 'unirest-java', version: '1.4.9'
    testCompile 'org.junit.jupiter:junit-jupiter-api:5.1.0'
}

// define a custom task to copy all dependencies in the runtime classpath
// into build/libs/libs
// uses built-in Copy
task copyLibs(type: Copy) {
  from configurations.runtime
  into 'build/libs/libs'
}

// add it as a dependency of built-in task 'assemble'
copyLibs.dependsOn jar
copyDocker.dependsOn jar
copyK8s.dependsOn jar
assemble.dependsOn copyLibs
assemble.dependsOn copyDocker
assemble.dependsOn copyK8s

// default jar configuration
// set the main classpath
jar {
  archiveName = "${project.name}.jar"
    manifest {
        attributes ('Main-Class': "${mainClassName}",
                'Class-Path': configurations.runtime.files.collect { "libs/$it.name" }.join(' ')
               )
    }
}
With the build script set up Chris’ team goes about building the application. Helidon SE makes it pretty easy to build out a simple service. To get started you only really need a few classes: A Main.groovy (notice that the Gradle script indentifies the mainClassName with a path to Main.groovy) which creates the server, sets up routing, configures error handling and optionally sets up metrics for the server. Here’s the entire Main.groovy:
final class Main {

    private Main() { }

    private static Routing createRouting() {
        MetricsSupport metricsSupport = MetricsSupport.create()

        MetricRegistry registry = RegistryFactory
                .getRegistryFactory()
                .get()
                .getRegistry(MetricRegistry.Type.APPLICATION)
        return Routing.builder()
                .register("/weather", new WeatherService())
                .register(metricsSupport)
                .error( NotFoundException.class, {req, res, ex ->
                    res.headers().contentType(MediaType.APPLICATION_JSON)
                    res.status(404).send(new JsonGenerator.Options().build().toJson(ex))
                })
                .error( Exception.class, {req, res, ex ->
                    ex.printStackTrace()
                    res.headers().contentType(MediaType.APPLICATION_JSON)
                    res.status(500).send(new JsonGenerator.Options().build().toJson(ex))
                })
                .build()
    }

    static void main(final String[] args) throws IOException {
        startServer()
    }

    protected static WebServer startServer() throws IOException {

        // load logging configuration
        LogManager.getLogManager().readConfiguration(
                Main.class.getResourceAsStream("/logging.properties"))

        // By default this will pick up application.yaml from the classpath
        Config config = Config.create()

        // Get webserver config from the "server" section of application.yaml
        ServerConfiguration serverConfig =
                ServerConfiguration.fromConfig(config.get("server"))

        WebServer server = WebServer.create(serverConfig, createRouting())

        // Start the server and print some info.
        server.start().thenAccept( { NettyWebServer ws ->
            println "Web server is running at http://${config.get("server").get("host").asString()}:${config.get("server").get("port").asString()}"
        })

        // Server threads are not demon. NO need to block. Just react.
        server.whenShutdown().thenRun({ it ->
            Unirest.shutdown()
            println "Web server has been shut down.  Goodbye!"
        })

        return server
    }
}
Heldion SE uses a YAML file located in src/main/resources (named application.yaml) for configuration. You can store server related config, as well as any application variables in this file. Chris’ team puts a few variables related to the API in this file:
app:
  apiBaseUrl: "https://api.openweathermap.org/data/2.5"
  apiKey: "[redacted]"

server:
  port: 8080
  host: 0.0.0.0
Looking back at the Main class, notice on line 13 where the endpoint “/weather” is registered and pointed at the WeatherService. That’s the class that’ll do all the heavy lifting when it comes to getting weather data. Helidon SE services implement the Service interface. This class has an update() method that is used to establish sub-routes for the given service and point those sub-routes at private methods of the service class. Here’s what Chris’ team came up with for the update() method:
void update(Routing.Rules rules) {
    rules
        .any(this::countAccess as Handler)
        .get("/current/city/{city}", this::getByLocation as Handler)
        .get("/current/id/{id}", this::getById as Handler)
        .get("/current/lat/{lat}/lon/{lon}", this::getByLatLon as Handler)
        .get("/current/zip/{zip}", this::getByZip as Handler)
}
Chris’ team creates 4 different routes under “/weather” giving the consumer the ability to get the current weather in 4 separate ways (by city, id, lat/lon or zip code). Note that since we’re using Groovy we have to cast the method references as io.helidon.webserver.Handler or we’ll get an exception. We’ll take a quick look at just one of those methods, getByZip():
private void getByZip(ServerRequest request, ServerResponse response) {
    def zip = request.path().param("zip")
    def weather = getWeather([ (ZIP): zip ])
    response.headers().contentType(MediaType.APPLICATION_JSON)
    response.send(weather.getBody().getObject().toString())
}
The getByZip() method grabs the zip parameter from the request and calls getWeather(), which uses a client library called Unirest to make an HTTP call to the chosen weather API and returns the current weather to getByZip() which sends the response to the browser as JSON:
private HttpResponse<JsonNode> getWeather(Map params) {
    return Unirest
        .get("${baseUrl}/weather?${params.collect { it }.join('&')}&appid=${apiKey}")
        .asJson()
}
As you can see, each service method gets passed two arguments when called by the router – the request and response (as you might have guessed if you’ve worked with a microservice framework before). These arguments allow the developer to grab URL parameters, form data or headers from the request and set the status, body or headers into the response as necessary. Once the team builds out the entire weather service they are ready to execute the Gradle run task to see everything working in the browser.

Cloudy in London? A shocking weather development!
There’s obviously more to Helidon SE, but as you can see it doesn’t take a lot of code to get a basic microservice up and running. We’ll take a look at deploying the services in a later post, but Helidon makes that step trivial with baked in support for generating Dockerfiles and Kubernetes config files.
Let’s switch gears now and look at Michiko’s team who was tasked with building out a backend to return random quotes since no personalized homepage would be complete without such a feature. The Tokyo team prefers to code in Java and they use Maven to manage compilation and dependencies. They are quite familiar with the Microprofile family of APIs. Michiko and team also decided to use Helidon, but with their Microprofile expertise, they decided to go with Helidon MP over the more reactive functional style of SE because it provides recognizable APIs like JAX-RS and CDI that they have been using for years. Like Chris’ team, they rapidly scaffold out a skeleton application with the MP quickstart archetype and set out configuring their Main.java class. The main method of that class calls startServer() which is slightly different from the SE method, but accomplishes the same task – starting up the application server using a config file (this one named microprofile-config.properties and located in /src/main/resources/META-INF):
protected static Server startServer() throws IOException {
    // load logging configuration
    LogManager.getLogManager().readConfiguration(
            Main.class.getResourceAsStream("/logging.properties"));
    // Server will automatically pick up configuration from
    // microprofile-config.properties
    Server server = Server.create();
    server.start();
    return server;
}
Next, they create a beans.xml file in /src/main/resources/META-INF so the CDI implementation can pick up their classes:
<!--?xml version="1.0" encoding="UTF-8"?-->
<beans>
</beans>
Create the JAX-RS application, adding the resource class(es) as needed:
@ApplicationScoped
@ApplicationPath("/")
public class QuoteApplication extends Application {
    @Override
    public Set<Class<?>> getClasses() {
        Set<Class<?>> set = new HashSet<>();
        set.add(QuoteResource.class);
        return Collections.unmodifiableSet(set);
    }
}
And create the QuoteResource class:
@Path("/quote")
@RequestScoped
public class QuoteResource {

    private static String apiBaseUrl = null;

    @Inject
    public QuoteResource(@ConfigProperty(name = "app.api.baseUrl") final String apiBaseUrl) {
        if (this.apiBaseUrl == null) {
            this.apiBaseUrl = apiBaseUrl;
        }
    }

    @SuppressWarnings("checkstyle:designforextension")
    @Path("/random")
    @GET
    @Produces(MediaType.APPLICATION_JSON)
    public String getRandomQuote() throws UnirestException {
        String url = apiBaseUrl + "/posts?filter[orderby]=rand&filter[posts_per_page]=1";
        HttpResponse<JsonNode> quote = Unirest.get(url).asJson();
        return quote.getBody().toString();
    }

}
Notice the use of constructor injection to get a configuration property and the simple annotations for the path, HTTP method and content type of the response. The getRandomQuote() method again uses Unirest to make a call to the quote API and return the result as a JSON string. Running the mvn package task and executing the resulting JAR starts the application running and results in the following:
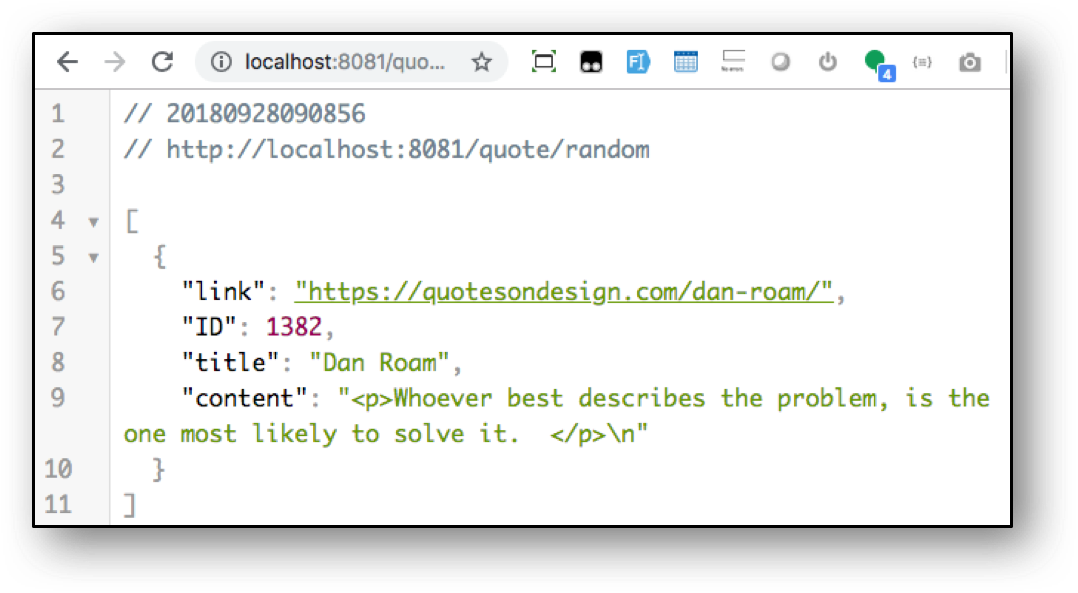 Michiko’s team has successfully built the initial implementation of their quote microservice on a flexible foundation that will allow the service to grow with time as the user base expands and additional funding rolls in from the excited investors! As with the SE version, Helidon MP generates a Dockerfile and Kubernetes app.yaml file to assist the team with deployment. We’ll look at deployment in a later post in this series.
In this post, we talked about a fictitious startup getting into microservices for their heavily funded internet homepage application. We looked at the Helidon microservice framework which provides a reactive, functional style version as well as a Microprofile version more suited to Java EE developers who are comfortable with JAX-RS and CDI. Lydia’s teams are moving rapidly to get their backend architecture built out and are well on their way to implementing her vision for TechCorp. In the next post, we’ll look at how Murielle and Dominic’s teams build out their services and in future posts we’ll see how all of the teams ultimately test and deploy the services into production.