Using Kafka Connect With Oracle Streaming Service And Autonomous DB
Posted By: Todd Sharp on 12/12/2019 5:08 GMT
Tagged: Cloud, Containers, Microservices, APIs

Whether you are using a framework like Micronaut to consume and produce messages or using the Kafka SDK itself, Oracle Streaming Service (OSS) is an easy and less expensive way to handle messaging within your application infrastructure. You don't have to turn up your own Kafka cluster and worry about the cost and maintenance that goes along with that. You just create a stream and get to work with producing and consuming messages.
Sometimes you need a bit more though. Messaging is certainly important in a microservice architecture, and until now OSS only handled the 'transport' part of the equation - IE: producing and consuming - which meant your application was responsible for both the source and the destination part of the communication. That all changes today with the ability to utilize Kafka Connect with OSS.
What's Kafka Connect? Glad you asked! Kafka Connect is an open source framework for connecting Kafka (or, in our case - OSS) with external sources. Things like object stores, databases, key-value stores, etc. There are two terms you should be familiar with when it comes to Kafka Connect: source connectors and sink connectors. Source connectors allow you to ingest data from an external source. Sink connectors let you deliver data to an external source.
Pretty cool stuff, really. Think about it - you can actually have a stream that receives a message every time a record is inserted into a database table. Or, you could post records to a table just by producing a message to a topic! But enough talk, let's take a look at how to actually make this happen. It's not difficult - we'll walk through every step below.
Preparing For Kafka Connect Integration
We're going to create a source connector to ingest data from a table in our Autonomous Transaction Processing (ATP) instance in this tutorial. But before we dig into the integration bits we need to do a bit of prep work. It would be a good idea to create a project directory somewhere on your machine to store some of the miscellaneous bits and bytes that we'll be working with. We'll refer to that directory as /projects/connect-demo from here on out - just make sure to substitute your own path as necessary.
Autonomous DB Setup
Let's create a schema and table to use for testing the integration with Autonomous DB and grab our wallet credentials. If you don't have an instance, follow my guide to get up and running quickly with Autonomous DB. You can even use an "always free" ATP instance if you'd like - it will work just fine.
First up, let's connect to the running instance with SQL Developer (or the free SQL Developer Web) and create a new user with a few permissions:
Next, create a minimal table.
OK, let's grab some other bits!
Download Dependencies
We'll need to download three things into our project directory:
- Oracle JDBC Drivers
- Kafka JDBC Connector
- Your ATP Wallet
Place the contents from the Oracle driver zip file in /projects/connect-demo/drivers and the contents of the Kafka JDBC Connector zip in /projects/connect-demo/kafka-jdbc/connector. Next, we'll grab our wallet and place it in /projects/connect-demo/wallet. You can download it via the console UI, or via the CLI. To do it quickly via the CLI:
Note: don't forget to unzip the wallet so that the contents of the wallet are in /projects/connect-demo/wallet.
OK, that's all the 1's and 0's that we need from elsewhere to move forward. Let's dip our toes into the stream pool!
Creating A Stream Pool
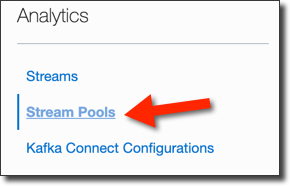
Right, so there are two pieces we need to create next. A Stream Pool and a Connect Configuration. You can do this via code with the OCI SDK which comes in all your favorite flavors, but I find it easier to create it via the console UI. First thing you'll need to do is head to the Streaming portion of the console by clicking 'Analytics' -> 'Streaming' from the console burger menu:

Next, in the left hand menu of the streaming landing page, select 'Stream Pools'.
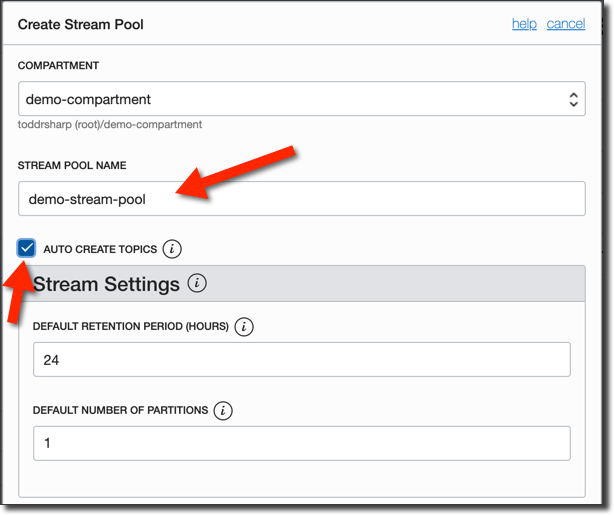
Then click 'Create Stream Pool'.

Give it a name and check 'Auto Create Topics'. This will ensure that Kafka Connect can create topics as it needs to and is equivalent to the Kafka setting 'auto.create.topics.enable'.
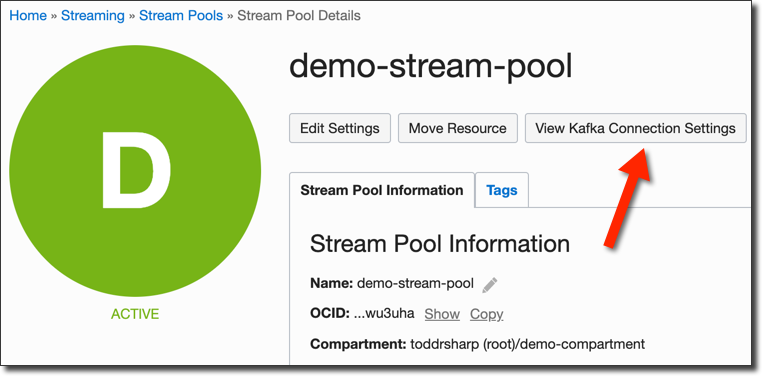
Click 'Create Stream Pool' and in a few seconds your pool will become 'Active'. Once it's active, click the 'View Kafka Connection Settings' button.
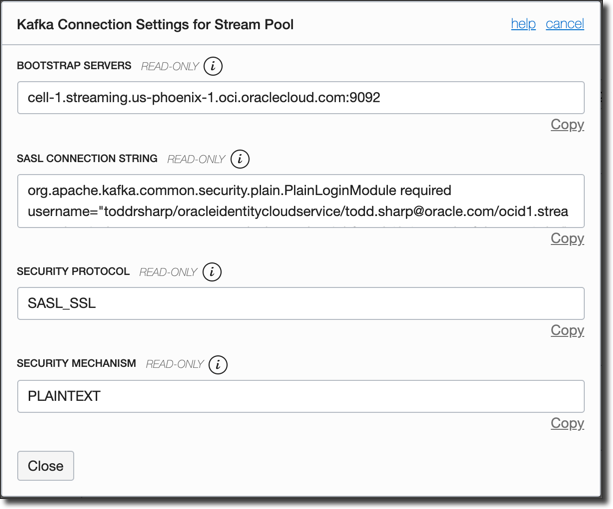
The next dialog will contain some information that we'll need to copy down for later use. Take note though, you may want to substitute a different username in the SASL Connection String (see the Create A Streams User of this post for more information).
The pool is now warm and ready, so let's cook up a Connect Configuration.
Creating A Connect Configuration
Next, click 'Kafka Connect Configuration' from the sidebar and click the button to create one.
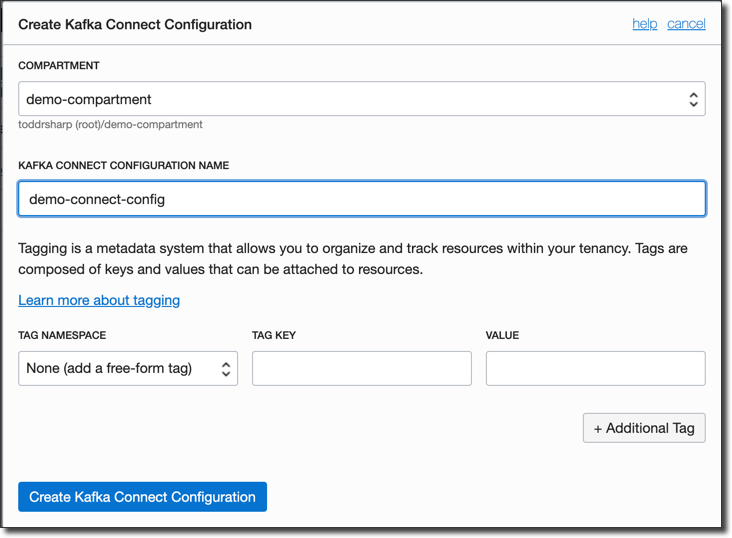
The only thing to do here is give it a name.
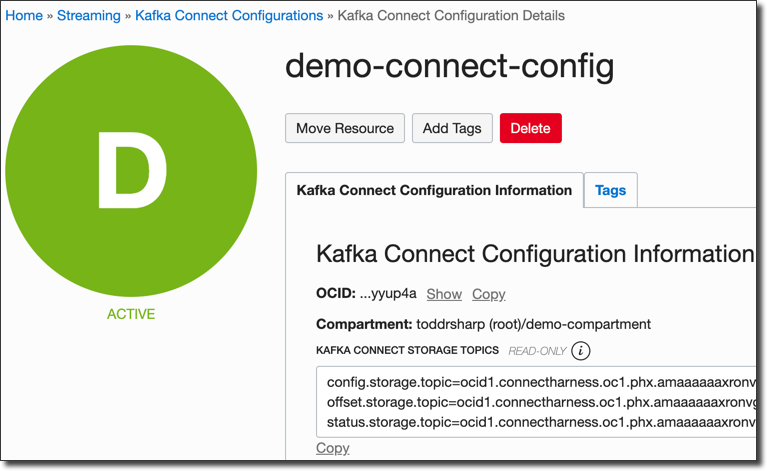
Once it's created, copy down the Connect configuration OCID as well as the Kafka Connect Storage Topics.
Done. Let's move on!
Configuring And Launching Kafka Connect
We're now ready to launch Kafka Connect and create our Source Connector to listen to our TEST table. We're going to use the Debezium Connect Docker image to keep things simple and containerized, but you can certainly use the official Kafka Connect Docker image or the binary version. Before we can launch the Docker image, we'll need to set up a property file that will be used to configure Connect. We'll need some of the values that we collected earlier, so keep those handy. We'll also need our streaming username which we collected from our Stream Pool above (see the SASL Connection String) and our auth token. See this post for more info on dedicated streaming users and how to generate an auth token for that user.
Create a file called /projects/connect-demo/connect-distributed.properties and populate it as such, substituting your actual values wherever you see <bracketed> values.
We need a way to get our dependencies into the container, so create /projects/connect-demo/Dockerfile which we will base on the debezium/connect image.
Now we'll build the Docker image. I create a Bash script to build and run the image just to make substituting the necessary topic names easier, but you can just run these commands manually and substitute the values directly if you'd prefer. Note that we're mounting the /projects/connect-demo/connect-distributed.properties file into the Docker container.
Now we can launch the Connect instance by running the Bash script. It'll take about 30-45 seconds to get up and running, depending on your machine and your connection. Once it's running, we can utilize the REST API to create our connector, but first we'll need a JSON config file to describe our connector.
Note a few things above. Our connection URL should look familiar if you've worked with ATP and JDBC in the past. It references the chosen entry from the tnsnames.ora file in your wallet and then passes the location to the wallet (the location within the Docker container, which we placed in the root of the file system if you remember above). The user and password are the schema credentials that we created above. The entry for topic.prefix is what will be used to prefix each topic created for the tables in table.whitelist.
Now we can POST our config to the REST API to create the source connector:
To list all connectors, perform a GET request:
To delete a connector, perform a DELETE request:
For further operations, refer to the Connect REST API documentation.
Once you have created your connector, a topic for each whitelisted table will be created and shortly become available named with the specified topic prefix and the table(s) name.
Testing The Integration
When your stream is ready, you can insert some records into the table and commit the transaction:
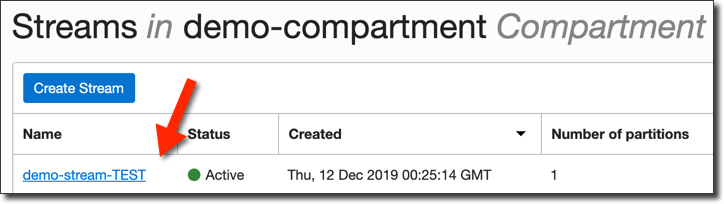
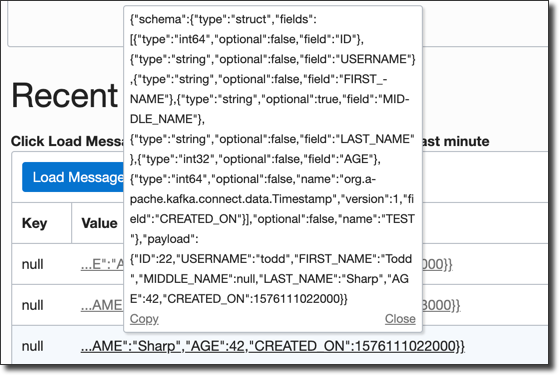
Click into the stream in the console and take a look at the recent messages by clicking 'Load Messages' and you'll see a message for each record that was inserted into the TEST table.
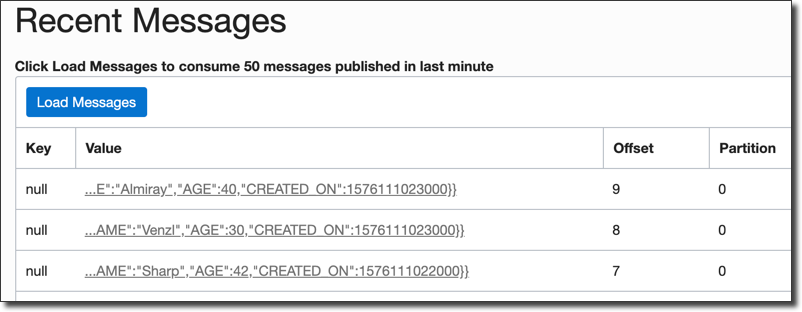
Click on the value to view details.
And that's it!
Summary
In this post we created a test schema and table in ATP, created a Stream Pool and Connect Configuration, launched an instance of Kafka Connect via the Debezium Docker image and created a source connector on Kafka Connect for our ATP table. We inserted records into the table and observed those records published as messages in the stream.
Kafka Connect integration is extremely powerful and can be used in any microservice architecture on the Oracle Cloud.
Photo by Bob Canning on Unsplash