Building Cross Platform Native Images With GraalVM
Posted By: Todd Sharp on 7/10/2020 12:00 GMT
Tagged: Cloud, Java
A few weeks ago, I blogged about a utility that I created that helps you debug your serverless functions in the Oracle Cloud. The code behind that project is pretty simple and my previous blog post explains how to create the socket server utility, but I failed to cover what is actually the more exciting part of that project in my opinion: creating cross-platform native image releases of the project that can be used on any OS.
In this post, I'll show you exactly how this is done, and by the time we're finished here, you'll have all the tools that you need to create a native image from your Java code for each of the three major operating systems.
But How?? You may have played around with GraalVM to generate native images and realized that the image can only be used on the same OS that it was generated on. For example, an image created on a Mac can't be used on a Linux machine. So how can we easily create images for operating systems other than the one we're developing are app on? Read on to find out!
Creating The JAR That Will Be Used To Generate The Native Image
Before we can create our native image, we'll need a JAR file from our Java code. In this case, I'll be showing you my CI/CD workflow from my GitHub Actions pipeline, but these steps can certainly be modified for whatever build tool your organization uses assuming it supports running the build the OS that you specify. Our overall build will have several "jobs" involved and the first one will be to create our JAR file.
But I Don't Use Java! That's OK! GraalVM native images can be created from just about any JVM language: Scala, Clojure, Kotlin, and even Groovy (with some extra work). Read the docs for more info!
We'll run this job on an Ubuntu runner - though it doesn't matter for this step which OS you use for the VM runner.
To get started, we'll check out the code, make sure that the runner is configured for Java 11 and then build our JAR:
Not bad so far. Next, let's grab the version number from our Gradle properties and "publish" the JAR. In this context, publishing the JAR will result in an artifact being attached to our build that can be downloaded later on. This is not a proper (or public) "release", just an artifact of the build.
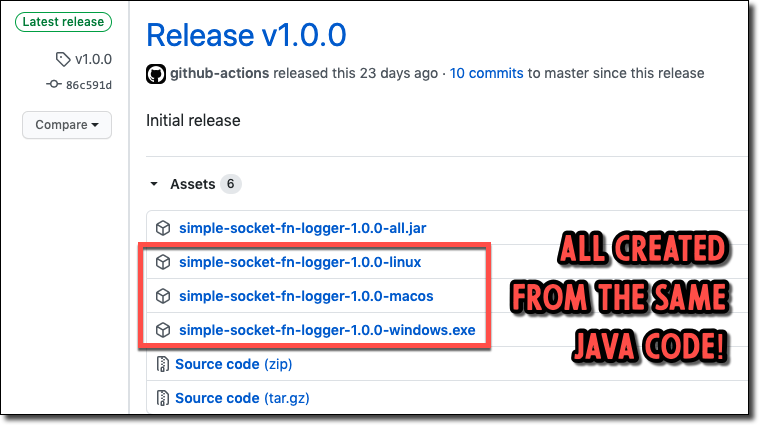
Now we'll handle the actual "release" part. This is how we get a proper tagged release (like the ones you see in the screenshot above) that can be downloaded by anyone on GitHub. Notice the conditional logic - this allows me to prevent the release unless it's an actual tagged release (allowing me to test the build without making a true release).
We've created a release, but we haven't yet uploaded any assets to the release. Let's do that now, adding our JAR file to the tagged release.
Now we've got a public release and our additional jobs can download the published artifact and use it. But wait, since these jobs don't share any context we'll need to publish our release URL so they can know where they need to upload their assets to as well!
Excellent. We're ready to create our native images!
Creating The Linux Image
Right, so now we can add a job to create our Linux native image using the GraalVM native image tool. We'll need to depend on the previous job so that this job doesn't run until that one is finished (after all, you can't create a native image if the JAR hasn't been published). Also, since we're creating a Linux image, we'll run it on an Ubuntu runner.
Checkout the code again (we'll need it to grab our version number) and set up Java 11:
Now we'll need to setup GraalVM and then add the native-image plugin. Luckily, there's an awesome GitHub Action that we can use to help with getting Graal setup and once that's done we can use gu to install the plugin.
Now we'll grab our version number again, download the previously published JAR artifact, and the release URL text file and set the release URL into an environment variable.
And now for the image creation magic. We use the native image tool with a few flags and we pass it our JAR file to use to create the image.
Finally, we publish the image and release it (if necessary):
Creating The macOS Image
The next step in our cross-platform compatible campaign is to create a native image that works on macOS. Luckily, GitHub Actions offers us a macOS runner that we can use for that purpose. Here's the entire job to create the macOS native image:
If you look through this code you'll notice that it looks very similar to the steps that we took to create the Linux image above. In fact, the only difference here is the runner and a few references to the OS that are used as a "label" for the assets and artifacts and step names. If you're like me, you're starting to smell some code that is in desperate need of refactoring to avoid repeating itself. Let's fix this problem!
Creating The Linux & macOS Image
GitHub Actions gives us the ability to use a build matrix to run the same steps based on multiple variables such as the runner OS and any other dependent variables.
Now when we run the build, this step will run twice - one for each OS in our matrix.
Now our steps, with some slight modification to use the proper label as necessary.
Notice, for example, the use of the ${{matrix.label}} and ${{matrix.os}} tokens which are substituted as appropriate.
Creating The Windows Image
When it comes to creating a Windows image, things are a little different. And to be honest, it's been a few years since I've used Windows so I found it a little more difficult. I actually lucked into finding a really good example in a Micronaut repo on GitHub and just about everything you see below is a direct copy of that workflow since I'm not very experienced with PowerShell. Since the process for the Windows image is fundamentally different (using PowerShell vs. Bash commands) I added the Windows image creation as it's own job in the pipeline. Here's what the entire job looks like for Windows, but it follows the same exact process as the Linux and macOS job above.
The end result is a published artifact and, if tagged, a released Windows executable.
Summary
In this post, we learned how to take a single JAR file from a Java project and create three distinct executable files with GitHub Actions that can be run on Windows, Linux, and macOS using GraalVM's native-image plugin. If you would like to learn more about GraalVM, including its support for polyglot applications and the performant JIT compiler, check the documentation. And as always, leave a comment below if you have any questions!
Where's The Code? If you're interested in seeing the complete code from this blog post, check out the repository on GitHub: https://github.com/recursivecodes/simple-socket-fn-logger. Specifically, the entire workflow YAML configuration is available here: https://github.com/recursivecodes/simple-socket-fn-logger/blob/master/.github/workflows/simple-socket-fn-logger.yaml
Image by OpenClipart-Vectors from Pixabay
Related Posts

Querying Autonomous Database from an Oracle Function (The Quick, Easy & Completely Secure Way)
I've written many blog posts about connecting to an Autonomous DB instance in the past. Best practices evolve as tools, services, and frameworks become...

Sending Email With OCI Email Delivery From Micronaut
Email delivery is a critical function of most web applications in the world today. I've managed an email server in the past - and trust me - it's not fun...

Brain to the Cloud - Part III - Examining the Relationship Between Brain Activity and Video Game Performance
In my last post, we looked at the technical aspects of my Brain to the Cloud project including much of the code that was used to collect and analyze the...