Querying Autonomous Database from an Oracle Function (The Quick, Easy & Completely Secure Way)
Posted By: Todd Sharp on 3/31/2022 12:44 GMT
Tagged: Cloud, Database, Java, Micronaut

I've written many blog posts about connecting to an Autonomous DB instance in the past. Best practices evolve as tools, services, and frameworks become more mature. In this post, I want to revisit this topic based on the current state of the tools and languages. I'm confident that the method described here represents the most secure way to connect to an Autonomous DB instance, and it's even easier to do than the previous methods that required you to save your Autonomous DB wallet into secrets or an otherwise less-than-ideal manner. The following blog posts are now obsolete as of publishing on this post.
- Oracle Functions - Connecting To An ATP Database
- Oracle Functions - Connecting To An ATP Database Revisited
- Oracle Functions - Connecting To An ATP Database With A Wallet Stored As Secrets
With that out of the way, let's talk about this current approach. We will use the Micronaut framework to create a serverless function in this post. Micronaut gives us several advantages. For one, Micronaut has an extensive Oracle Cloud module that provides integrations into the OCI Secrets service to ensure we're not storing our database user credentials in an insecure manner. Additionally, we'll use Micronaut's ability to automatically download our Autonomous DB wallet to avoid the extra steps involved with obtaining that wallet which keeps our code concise and maintainable. Finally, we'll create a native image version of our function with GraalVM to drastically improve the function's cold and hot start times to enable much better runtime performance. This tutorial will walk you through the entire process, but please refer to the documentation if you get stuck or would like to read more. Here are the steps that we'll take in this post:
- Create Secrets
- Creating the Micronaut Function Application
- Creating the Application in OCI
- Creating the Function in OCI
- Bonus: Deploying as a Native Image
- Performance
- Summary
Create Secrets
The Micronaut Oracle Cloud module provides an excellent option for safely and securely storing sensitive stuff. The docs are thorough, so refer to them as needed. I hope you're already familiar with creating secrets in an OCI vault, so I won't cover that entire process to keep this post on the shorter side. We will need four secrets in a vault for our serverless function:
ATP_USER: the user for your Autonomous DB instanceATP_PASSWORD: the password for your Autonomous DB instance.ATP_OCID: the Autonomous DB instanceOCIDATP_WALLET_PASSWORD: password to encrypt the keys inside the wallet; must be at least eight characters long and must include at least one letter and either one numeric character or one special character
Name these secrets as shown above since Micronaut will look for secrets with these names to create config variables in our application below.
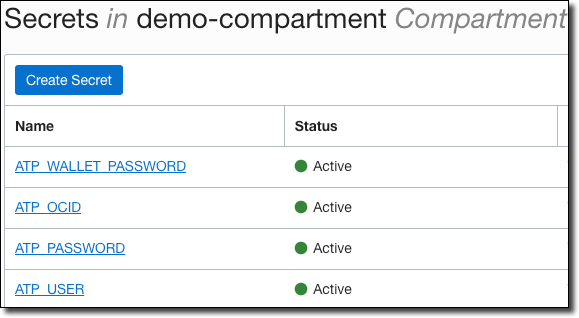
Once you have created your secrets in your vault, collect the vault OCID and the OCID for your vault's compartment.
Creating the Micronaut Function Application
Next, let's create the Java application for our serverless function. If you are not familiar with Micronaut, don't stress! There isn't much difference between Micronaut and other popular Java frameworks, and this function will serve as a good, gentle introduction to the framework for you! We'll use the Micronaut CLI to create the function, so make sure you have it installed locally.
If you don't want to install the CLI, another option is to use Micronaut Launch to create the application. If you choose that route, enter the following inputs to generate the app, and then download and unzip it to a local directory.
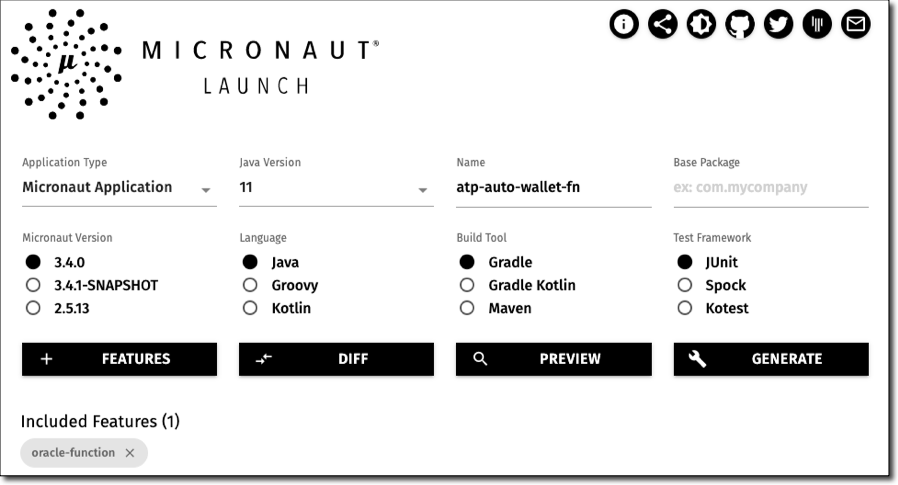
Now that we've generated the Micronaut application let's open it up in our favorite IDE and start configuring it.
Configuring the Application
To configure the application, we'll need to change the build script. Open up build.gradle and look for the following entries:
The image path in these blocks defines the location within OCIR (OCI Container Registry), where the Docker image that we will ultimately produce is stored. Substitute the proper values for [REGION], [TENANCY] and [REPO] but leave the values that use the $ token notation as they will be populated when we call the task later on. Once I updated them, my entries looked like this:
Next, we'll need to add some dependencies.
- The Autonomous DB module
- The OCI SDK module (required by vault)
- The OCI Vault module (used to retrieve and decode secrets)
- The UCP module for connection pooling
- The OJDBC driver
To use the OCI Vault integration, we need to create a new file at /src/main/resources/bootstrap.yml. We need to populate the OCID values for our vault and vault compartment that we collected above in this file. I have also entered the path to my local OCI config, my profile, and region so that I can test this function out locally.
Note: There is no need to include your OCI config file in the Docker image! Configure resource principal authentication for your tenancy, and the Micronaut module will properly utilize that authentication protocol when you deploy your OCI Function.
Now we must add a datasource to our configuration located at /src/main/resources/application.yml. You can copy and paste the config below, assuming you've created the secrets in your vault with the matching names mentioned above.
Micronaut will retrieve the secrets from your vault, decode them, and populate the datasource configuration with the proper values at runtime.
Modifying the Function To Query the Database
The next step is to change the function itself to query the database. If you open up the main function class (located at /src/main/java/atp/auto/wallet/fn/Function.java), your function should look like so:
We can delete the injected TenancyIdProvider and the body of the handleRequest() method, since we will not need them for our function. To perform our database query, we can inject a DataSource bean and use that bean to execute our query in the handleRequest() method. A handy helper function to convert the ResultSet to a List and some serialization with Jackson, and we're able to return a JSON serialized list of Map objects from the function.
Testing the Function
Micronaut was kind enough to create a test for us, which we can extend as needed. We can find the test at /src/test/java/atp/auto/wallet/fn/FunctionTest.java. Here's how it looks:
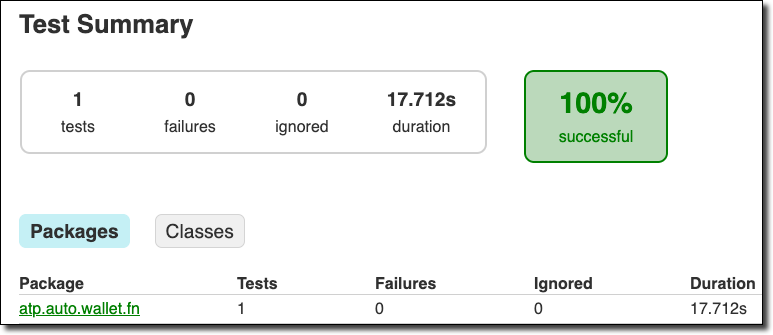
Since this is just a demo, I'm comfortable simply testing to ensure the invoked function result is not null. Feel free to update your test for your specific business requirements. Next, run the test with:
And once it is complete, open the report located in build/reports/tests/test/index.html. Here is how a successful test report should look.
Building & Pushing the Docker Container
We're now ready to build a Docker image from our application and push it to our Container Registry. To do that, run the following commands:
The output of the dockerPush command should look similar to this:
The message above tells us that our image is now happily residing in the OCI Container Registry. Now we can move on to creating an 'application' in OCI.
Creating the Application in OCI
Oracle Functions require an associated "application" entity in the cloud. Oracle Functions uses the application to share configuration for grouped functions. You can create one via the OCI Console or the CLI. I find the CLI easier, but this does require you to know the proper OCID for the subnet that you want to associate with the application. Because I often use the OCI CLI, I have created several environment variables to store often-used values, so I don't have to remember or look them up when I need them. In this case, I plugged in my OCI_FAAS_SUBNET and OCI_FAAS_COMPARTMENT environment variables.
Your response should look similar to this JSON output.
We'll need to use the application ID later, so copy the "id" from the response JSON that uses the format ocid1.fnapp and keep it handy.
Creating the Function in OCI
Now it's time to create the serverless function in OCI that uses the Docker image that we produced from our Micronaut Application. Again, I am using the CLI. I'm plugging in the OCI application "id" that we just obtained in the previous section. We can name this function whatever we would like. The function should run fine on less memory, but you can't go wrong with granting 2GB of RAM. Finally, make sure that the --image argument matches the location to the Docker image in the OCI Container Registry.
The result of the command above will return another JSON response. That response will look close to this:
We'll need the function "id" (ocid1.fnfunc...) in just a moment, so keep it handy.
Invoking the Function
We'll use the OCI CLI to invoke the function to ensure that everything is working as expected.
Here's an example of the JSON that my function returned from my test invocation (prettified with jq):
Updating the Function
Of course, your function could change over time. When that happens, update the Micronaut application as necessary. When it's time to deploy the updated changes, make sure that you first update the version number in build.gradle.
And once you've built and pushed the Docker image, use the OCI CLI to point to the updated image.
Bonus: Deploying as a Native Image
We can also build and deploy our function as a GraalVM native image as a bonus. This native image will result in improved performance for our function. To do that, we'll have to make a slight modification to the graalvmNative block in build.gradle. Right now, it should look like the following:
We'll need to add an argument to this section for a reflectionconfig JSON file. Modify the above block to look like the block below.
Now create a file located at /src/main/resources/reflectionconfig.json and populate it with the JSON below. This file tells GraalVM to enable reflective access for this necessary class.
Heads Up! Soon, it will not be necessary to indicate the reflection config shown above manually. Keep an eye on this issue for more information.
To build and push the native image, use the following Gradle tasks.
Now update the OCI Function to use the native Docker image.
And test it by invoking.
Performance
GraalVM native images provide significantly improved performance versus running our function on the JVM itself.
I ran some rudimentary tests to compare this function's non-native and native implementations for this demo. Further optimizations are possible, but just by deploying this function as a native image, the cold start time improved by 55%.
When looking at hot starts, performance was increased by 23%.
Summary
In this post, we created and deployed a Micronaut application as an OCI Function that connects to and queries an Autonomous DB instance. Another option that you might want to consider is integrating with an OCI API Gateway for HTTPS serverless functions. Check out the Micronaut Oracle Cloud module documentation to learn more about that.
Image by Bethany Drouin from Pixabay
Related Posts

Sending Email With OCI Email Delivery From Micronaut
Email delivery is a critical function of most web applications in the world today. I've managed an email server in the past - and trust me - it's not fun...

Brain to the Cloud - Part III - Examining the Relationship Between Brain Activity and Video Game Performance
In my last post, we looked at the technical aspects of my Brain to the Cloud project including much of the code that was used to collect and analyze the...

Brain to the Cloud - Part II - How I Uploaded My Brain to the Cloud
In my last post, we went over the inspiration, objectives, and architecture for my Brain to the Cloud project. In this post, we'll look in-depth at the...