Adventures in CI/CD [#2]: Building & Publishing A JAR
Posted By: Todd Sharp on 4/24/2020 12:00 GMT
Tagged: Cloud, Containers, Microservices, APIs, Integration, Open Source

Welcome back to this journey down the path to CI/CD enlightenment. In our last post, we created a Java microservice application, added our source code to a Git repository which was pushed to GitHub and created our first workflow configuration for GitHub Actions which resulted in our first successful CI/CD run. Of course, that run didn’t do anything except print out a message to the console, but it was successful nonetheless! In this post, we’ll jump into more meaningful activities as it relates to CI/CD. Specifically, we’ll focus on publishing an artifact (JAR file) for our microservice application.
Runners
Before we jump into this post, let’s talk about how our CI/CD workflows get executed. GitHub Actions use something called a “runner” to perform your workflow operations (see Core Concepts For GitHub Actions). These are simply virtual machines that perform the operations that we tell them to via our configuration file. We can choose from Linux, Windows or macOS runners and the runners come preconfigured with commonly-used software (see the full list per OS here). We’ll be using GitHub hosted runners in this series, but you can also host your own runner if your project has the need to do so.
Intro To “Actions"
The ‘actions’ part of GitHub Actions refers to the tool’s ability to utilize bundled and pre-configured packages to perform certain operations within your workflow. At the time of this writing, there are over 3000 published actions in the marketplace available for your workflows. These actions will make your builds easier by bundling common activities or simply installing a tool or utility into the runner environment so that it is available in your builds.
In our last post, we saw that our job step completed a task by using the run option in the step to execute a command on the runner
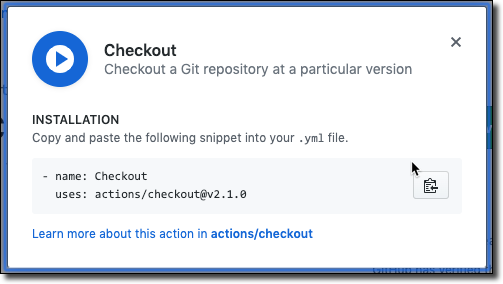
Many job steps will run commands like this, and others will utilize actions to perform certain activities. To use an action, visit the action’s page in the marketplace and click ‘Use Latest Version’ (or choose a specific version)
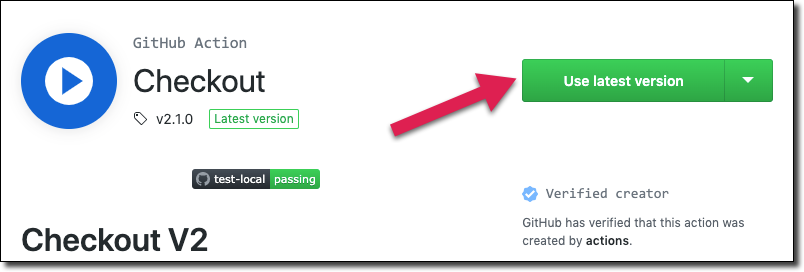
Then copy/paste the generated YAML into your workflow config file.
Some actions accept input and produce output. We’ll see more about that as we move forward.
Checkout Code
The first thing that we’ll want to add to our demo workflow is to checkout a fresh copy of our application source code. Remember, this workflow is running in a VM based runner, not in our repo itself so we need to grab the code before we can do anything else with that code. As you can imagine, there’s a ‘checkout' action in the marketplace that can help us out with this. To use this action we add the necessary YAML as a step for our job.
Setup Java
To build our JAR file we’ll use Gradle (pre-installed in the Ubuntu runner) but we’ll need a JDK installed to compile. The Ubuntu runner that we’re using has the JDK pre-installed (versions 7, 8, 11 and 12) but we’ll need to add a step to tell the runner which version we want to use. For our application let’s use JDK 11 which we can specify by passing on the input variable java-version to the setup-java action. All of the available inputs for this action can be found in the action’s docs.
And just to make sure:
Progress Check
Let’s commit and push to see how things are working so far.
Which kicks off our build that runs successfully.

Building The JAR
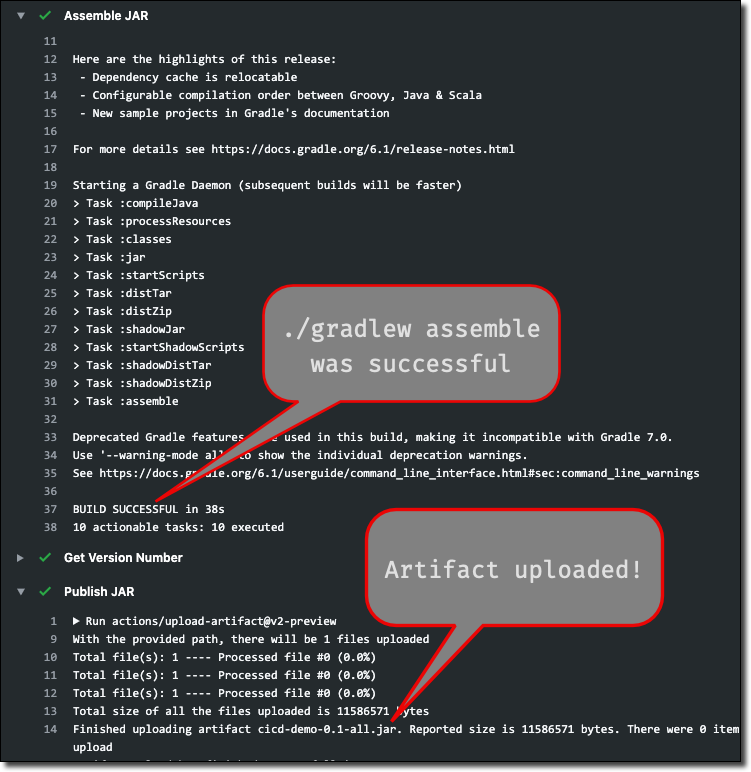
So far, we’re doing great! Everything is easy to configure, builds are running without failures. Life is good! Now that we have our source checked out to the runner workspace, let’s build the JAR. Remember from our last post that we’re using Gradle with our Micronaut application, so to create a JAR file we invoke ./gradlew assemble which will build a JAR file and place it in the build/libs directory. We’ve already talked about Gradle being pre-installed on our runner VM, so we can simply add a step to invoke the assemble task with Gradle and the JAR will be available in our workspace once it’s complete.
Cool, so we have our first build artifact! Problem is, once the job is complete if we did nothing else we would lose our JAR. It would simply go away since it’s stored in the ephemeral storage on the runner VM. So, we need to do something with the JAR after we build it.
Publishing The JAR
Ultimately we’re going to deploy our JAR to a production server (and we’ll eventually look at a few different options for that in this series). But for now, let’s simply “publish” the artifact which is another way of saying “make the JAR available for download after the runner VM has terminated”. Good news - there’s an action that can help us with this! We’ll want to add the current version number to the JAR’s filename so that someone who downloads the artifact knows which version they are getting, so we’ll add an interim step to grab that version number using Gradle and store it in an environment variable for use in subsequent steps. Here is the step to grab the version number:
And the step to publish the JAR. The name key is what the published JAR will be named and the path key is the path in the runner’s workspace to the artifact that we want to publish. Since the JAR name changes with every version, we’ll use a wildcard in the path to make sure we’re always grabbing the latest JAR. Note that wildcard support was added to the upload-artifact action in v2-preview so make sure you’ve got at least that version!
At this point we can commit and push to kick off a new build:
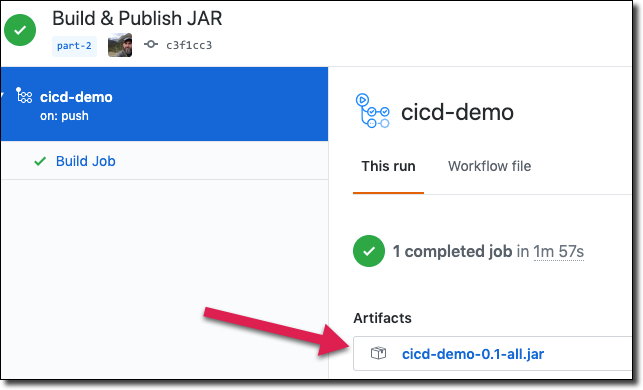
This results in our JAR being built and our artifact being published as we can see in the build log.
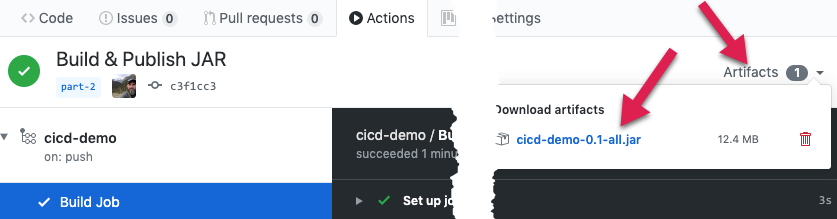
To download the JAR file, select ‘Artifacts’ above the Action Console and download the file:
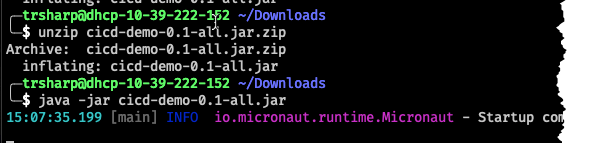
At this point, we can download, unzip and run the JAR file and our application would startup:
The artifact is also available for download from the workflow details page.
Note: In a public repo, any logged-in user can download your published artifacts. Keep this in mind and make sure this is your intention! Also, note that published artifacts are different from GitHub “releases”. If you wish to create a “release” for your project, take a look at the create-release action.
TL;DR
In this post, we talked about some GitHub Actions terminology and added some steps to our demo build to check out our code, configure Java on the runner VM, build a JAR file from our code and publish that artifact so that it can be downloaded.
Next
In our next post, we will look at running tests and publishing the associated reports for those tests.
Source Code
For this post can be found at https://github.com/recursivecodes/cicd-demo/tree/part-2
Photo by Frenjamin Benklin on Unsplash