.
Attention!!! This process in the blog post below has been superseded by the information contained in a newer blog post. If you are trying to connect your Oracle Function to an Autonomous DB instance, please read that post instead! This post will be left online for archival purposes.
So you've created, deployed and tested your first serverless function on Oracle Functions. It works great and you're ready to take the next step beyond "Hello, World" to actually create a useful function that can be used in your microservice architecture. In this post we'll take a look at how to connect your serverless function to an Autonomous Transaction Processing (ATP) instance and query the database for some data.
Before I get started, let me address the fact that querying a database is not something that is typically recommended when it comes to serverless functions. By their nature, serverless functions should be lean and not include many dependencies and external libraries. The "cold start" delay is a real thing and every ounce of code or external connections to your function add to that delay. Ideally your function would call another service in your API to retrieve or manipulate data via HTTP calls, but, let's be honest - there is always an edge case. And in those edge cases, you'll need to understand how to connect up to ATP from within your function so that is what we'll take a look at here today.
To give you a little background if you're brand new to Oracle Functions (which is based entirely on the Fn Project), Oracle Functions are "container-native". This means that each function is a completely self-contained Docker image that is stored in your OCIR Docker Registry and pulled, deployed and invoked when you invoke your function. If the latest version of the container is already deployed and running then there is virtually no delay when the function is invoked (this is known as a "warm start"). All serverless platforms face this issue - this is not something unique to Oracle Functions, rather it's a simple fact and it is the reason why serverless functions don't cost you a dime when they are not in use.
With that out of the way, let's create a Java function that connects up to an ATP Serverless instance and does some simple queries against a database table.
Note: The instructions below will allow you to connect to both "Serverless" and "Dedicated" Autonomous Transaction Processing instances. If you're using these instructions to connect to a Dedicated ATP instance you will need to ensure that your function is created with a subnet that can access the private subnet that your dedicated instance resides in (you will need to create an ingress rule to allow this communication on port 1521 for TCP). Refer to the documentation for further information.
When using Fn to create a Java function, you can typically rely on the boilerplate Docker image. But in our case, we'll need to add some external dependencies to the container so we'll need to do things a bit differently. Let's get started by creating an application. Applications are simply groups of functions that allow you to utilize shared configurations and compartmentalize your functions under a common group. To create an application, run the following command with the Fn CLI:
$ fn create app --annotation oracle.com/oci/subnetIds='["ocid1.subnet.oc1.phx...."]' atp-demo-app |
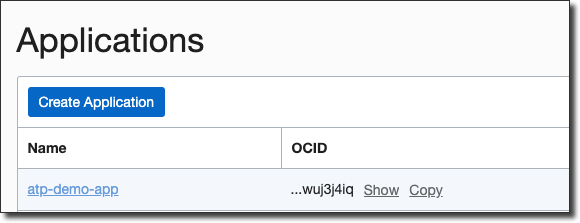
You can confirm that the application was created via the console UI:
Next, let's create the function itself. To do this, we'll take advantage of a feature in Fn that allows you to create your function from an "init-image". This allows us to modify the Dockerfile
a bit to make sure that our ATP wallet contents end up inside of the Docker image that we produce for our function. Cloneout the JDK init image into a local directory and then run the following commands to get our function created:
# create a TAR (from within the JDK 11 init image repo) | |
$ tar cf jdk-12ea-init.tar func.init.yaml pom.xml src Dockerfile | |
# build the init-image | |
$ docker build -f Dockerfile-init -t jdk-12ea-init . | |
# move back to your project directory, then run: | |
$ fn init --init-image jdk-12ea-init atp-demo-fn-1 |
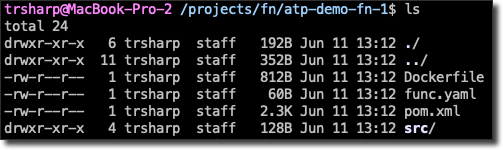
Take a look inside the directory that was created with this function and you'll see that some files have been generated for us:
Notice that the init image has created a Dockerfile
for us which we'll ultimately use to make sure our wallet gets into the function image. Before we do that we need to download our ATP wallet that contains the necessary credentials that we will need to connect to ATP. There are several ways to do this, but the easiest is to use the OCI CLI like so:
$ oci db autonomous-data-warehouse generate-wallet --autonomous-data-warehouse-id ocid1.autonomousdatabase.oc1.phx.... --password WalletPassw0rd --file /projects/fn/atp-demo-fn-1/build-resource/wallet.zip |
Make sure to use the correct OCID for your ATP instance and set a strong wallet password with the CLI command. I like to keep mine in a build-resource
directory that is ignored from source control. Unzip the wallet and let's take a look at the Dockerfile
that was generated for us. If you haven't worked much with Docker you really shouldn't be too concerned as the syntax here is easy to understand and the commands we need to add are very minimal. It should be pretty obvious what is going on:
FROM maven:3.6.0-jdk-12-alpine as build-stage | |
WORKDIR /function | |
ENV MAVEN_OPTS -Dhttp.proxyHost= -Dhttp.proxyPort= -Dhttps.proxyHost= -Dhttps.proxyPort= -Dhttp.nonProxyHosts= -Dmaven.repo.local=/usr/share/maven/ref/repository | |
ADD pom.xml /function/pom.xml | |
ADD src /function/src | |
RUN ["mvn", "package", \ | |
"dependency:copy-dependencies", \ | |
"-DincludeScope=runtime", \ | |
"-Dmdep.prependGroupId=true", \ | |
"-DoutputDirectory=target" ] | |
FROM openjdk:12-ea-19-jdk-oraclelinux7 | |
WORKDIR /function | |
COPY --from=build-stage /function/target/*.jar /function/app/ | |
COPY src/main/c/libfnunixsocket.so /lib | |
ENTRYPOINT [ "/usr/bin/java", \ | |
"-XX:+UseSerialGC", \ | |
"--enable-preview", \ | |
"-Xshare:on", \ | |
"-cp", "/function/app/*", \ | |
"com.fnproject.fn.runtime.EntryPoint" ] | |
CMD ["com.example.fn.HelloFunction::handleRequest"] |
This Dockerfile
uses a build container to perform the Maven build step, then creates our function container based on a slim JDK image, copies the generated JAR file into the function container and sets an entrypoint that is used to invoke the function. Before we go any further, let's deploy our function and test it out to make sure we're on the right track:
trsharp@MacBook-Pro-2 ~/Projects/fn/atp-demo-fn-1$ fn deploy --app atp-demo-app 130 ↵ | |
Deploying atp-demo-fn-1 to app: atp-demo-app | |
Bumped to version 0.0.4 | |
Building image phx.ocir.io/toddrsharp/faas/atp-demo-fn-1:0.0.4 | |
Parts: [phx.ocir.io toddrsharp faas atp-demo-fn-1:0.0.4] | |
Pushing phx.ocir.io/toddrsharp/faas/atp-demo-fn-1:0.0.4 to docker registry...The push refers to repository [phx.ocir.io/toddrsharp/faas/atp-demo-fn-1] | |
fa9b3fa6ad13: Layer already exists | |
3d90a0036b2c: Layer already exists | |
d36ad7fe6103: Layer already exists | |
918949106598: Layer already exists | |
0f19a3bf0af3: Layer already exists | |
bcaa84a0d085: Layer already exists | |
0.0.4: digest: sha256:c0923fb2c2a68db7f4fb2a3418ed0d470919c050bed162ca47150a251557cc75 size: 1578 | |
Updating function atp-demo-fn-1 using image phx.ocir.io/toddrsharp/faas/atp-demo-fn-1:0.0.4... |
Now we can try invoking it. First take a look at the HelloFunction.java
file that the init-image
created for us:
package com.example.fn; | |
public class HelloFunction { | |
public String handleRequest(String input) { | |
var result = | |
switch (input.toUpperCase()) | |
{ | |
case "MONDAY", "TUESDAY" -> "Get back to work! "; | |
case "WEDNESDAY" -> "Wait for the end of week. "; | |
case "THURSDAY" -> "Almost there... wait till tomorrow... "; | |
case "FRIDAY" -> "Prepare plan for the weekend! "; | |
case "SATURDAY", "SUNDAY" -> "Enjoy the weekend! "; | |
default -> "Please tell me which day... "; | |
}; | |
return result; | |
} | |
} |
The function is expecting us to pass in a single string representing a day of the week, so invoke the function and pass one in like so:
$ trsharp@MacBook-Pro-2 ~/Projects/fn/atp-demo-fn-1$ echo -n "friday" | fn invoke atp-demo-app atp-demo-fn-1 | |
Prepare plan for the weekend! |
Which gave us the expected result. Great, our function is deployed and can be invoked! Now let's get down to adding our wallet credentials to the image. Modify the Dockerfile
like so (note the addition on line 17):
FROM maven:3.6.0-jdk-12-alpine as build-stage | |
WORKDIR /function | |
ENV MAVEN_OPTS -Dhttp.proxyHost= -Dhttp.proxyPort= -Dhttps.proxyHost= -Dhttps.proxyPort= -Dhttp.nonProxyHosts= -Dmaven.repo.local=/usr/share/maven/ref/repository | |
ADD pom.xml /function/pom.xml | |
ADD src /function/src | |
RUN ["mvn", "package", \ | |
"dependency:copy-dependencies", \ | |
"-DincludeScope=runtime", \ | |
"-Dmdep.prependGroupId=true", \ | |
"-DoutputDirectory=target" ] | |
FROM openjdk:12-ea-19-jdk-oraclelinux7 | |
WORKDIR /function | |
COPY --from=build-stage /function/target/*.jar /function/app/ | |
COPY src/main/c/libfnunixsocket.so /lib | |
COPY build-resource/wallet/* /function/wallet/ | |
ENTRYPOINT [ "/usr/bin/java", \ | |
"-XX:+UseSerialGC", \ | |
"--enable-preview", \ | |
"-Xshare:on", \ | |
"-cp", "/function/app/*", \ | |
"com.fnproject.fn.runtime.EntryPoint" ] | |
CMD ["com.example.fn.HelloFunction::handleRequest"] |
Next, create some config variables for your application that will contain the necessary credentials for the database connection:
fn config app atp-demo-app DB_PASSWORD [Password Value] | |
fn config app atp-demo-app DB_URL [jdbc:oracle:thin:@db_LOW] | |
fn config app atp-demo-app DB_USER [schema user] | |
fn config app atp-demo-app KEYSTORE_PASSWORD [Wallet Password] | |
fn config app atp-demo-app TRUSTSTORE_PASSWORD [Wallet Password] | |
fn config app atp-demo-app CLIENT_CREDENTIALS /function/wallet |
Note: You should always encrypt any configuration variables that contain sensitive information. Check my guide to using Key Management in OCI to learn how!
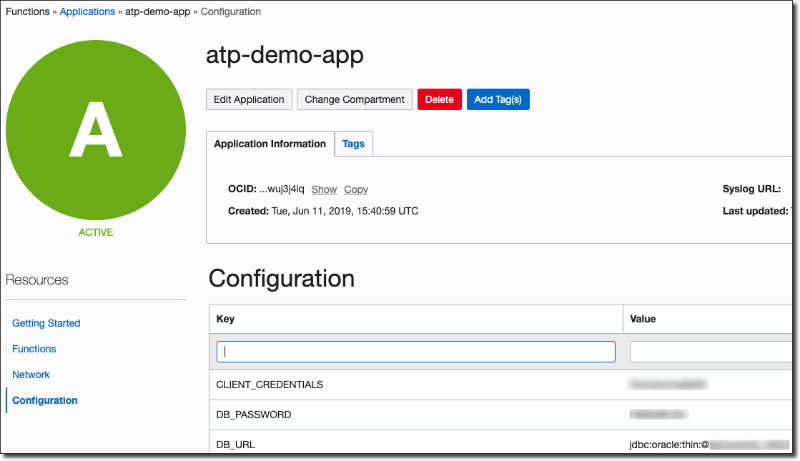
Verify the configuration was set via the console UI:
Configuration variables will now be available via environment variables matching the config key within each function. Next, modify the HandleFunction.java method as follows to grab the values from the environment and simply test serializing a simple Map and returning it:
package com.example.fn; | |
import com.cedarsoftware.util.io.JsonWriter; | |
import com.fnproject.fn.api.OutputEvent; | |
import java.util.HashMap; | |
public class HelloFunction { | |
public OutputEvent handleRequest(String input) { | |
String dbUser = System.getenv().get("DB_USER"); | |
String dbPassword = System.getenv().get("DB_PASSWORD"); | |
String dbUrl = System.getenv().get("DB_URL"); | |
String clientCredPath = System.getenv().get("CLIENT_CREDENTIALS"); | |
System.setProperty("oracle.jdbc.driver.OracleDriver", "true"); | |
System.setProperty("oracle.net.ssl_version", "1.2"); | |
System.setProperty("javax.net.ssl.keyStore", "${clientCredPath}/keystore.jks"); | |
System.setProperty("javax.net.ssl.keyStorePassword", System.getenv().get("KEYSTORE_PASSWORD")); | |
System.setProperty("javax.net.ssl.trustStore", "${clientCredPath}/truststore.jks"); | |
System.setProperty("javax.net.ssl.trustStorePassword", System.getenv().get("TRUSTSTORE_PASSWORD")); | |
System.setProperty("oracle.net.tns_admin", clientCredPath); | |
HashMap<String, String> test = new HashMap<>(); | |
test.put("user", dbUser); | |
return OutputEvent.fromBytes( JsonWriter.objectToJson(test).getBytes(), OutputEvent.Status.Success, "application/json"); | |
} | |
} |
Deploy, and test again and you should see the DB_USER variable sent back within a JSON object:
trsharp@MacBook-Pro-2 ~/Projects/fn/atp-demo-fn-1$ fn invoke atp-demo-app atp-demo-fn-1 | |
{"@type":"java.util.HashMap","user":"faas"} |
Awesome, now we have everything we need to talk to the ATP instance right inside our function. Assuming we have a table in our database with the following structure:
CREATE TABLE EMPLOYEES ( | |
EMP_EMAIL VARCHAR2(100 BYTE) NOT NULL | |
, EMP_NAME VARCHAR2(100 BYTE) | |
, EMP_DEPT VARCHAR2(50 BYTE) | |
, CONSTRAINT PK_EMP PRIMARY KEY ( EMP_EMAIL ) | |
); |
We need to make sure that we have the OJDBC dependencies within the Docker image. Modify the pom.xml as follows:
<dependency> | |
<groupId>com.oracle.jdbc</groupId> | |
<artifactId>ojdbc8</artifactId> | |
<version>18.3.0.0</version> | |
</dependency> | |
<dependency> | |
<groupId>com.oracle.jdbc</groupId> | |
<artifactId>oraclepki</artifactId> | |
<version>18.3.0.0</version> | |
</dependency> | |
<dependency> | |
<groupId>com.oracle.jdbc</groupId> | |
<artifactId>osdt_core</artifactId> | |
<version>18.3.0.0</version> | |
</dependency> | |
<dependency> | |
<groupId>com.oracle.jdbc</groupId> | |
<artifactId>osdt_cert</artifactId> | |
<version>18.3.0.0</version> | |
</dependency> |
Now modify the Dockerfile to make sure we are copying the dependencies into the build container and installing them locally so they will be properly resolved (note lines 6-11):
FROM maven:3.6.0-jdk-12-alpine as build-stage | |
WORKDIR /function | |
ENV MAVEN_OPTS -Dhttp.proxyHost= -Dhttp.proxyPort= -Dhttps.proxyHost= -Dhttps.proxyPort= -Dhttp.nonProxyHosts= -Dmaven.repo.local=/usr/share/maven/ref/repository | |
ADD pom.xml /function/pom.xml | |
ADD src /function/src | |
ADD build-resource/libs/* /function/build-resource/libs/ | |
RUN ["mvn", "install:install-file", "-Dfile=/function/build-resource/libs/ojdbc8.jar", "-DgroupId=com.oracle.jdbc", "-DartifactId=ojdbc8", "-Dversion=18.3.0.0", "-Dpackaging=jar"] | |
RUN ["mvn", "install:install-file", "-Dfile=/function/build-resource/libs/oraclepki.jar", "-DgroupId=com.oracle.jdbc", "-DartifactId=oraclepki", "-Dversion=18.3.0.0", "-Dpackaging=jar"] | |
RUN ["mvn", "install:install-file", "-Dfile=/function/build-resource/libs/osdt_core.jar", "-DgroupId=com.oracle.jdbc", "-DartifactId=osdt_core", "-Dversion=18.3.0.0", "-Dpackaging=jar"] | |
RUN ["mvn", "install:install-file", "-Dfile=/function/build-resource/libs/osdt_cert.jar", "-DgroupId=com.oracle.jdbc", "-DartifactId=osdt_cert", "-Dversion=18.3.0.0", "-Dpackaging=jar"] | |
RUN ["mvn", "package", \ | |
"dependency:copy-dependencies", \ | |
"-DincludeScope=runtime", \ | |
"-Dmdep.prependGroupId=true", \ | |
"-DoutputDirectory=target" ] | |
FROM openjdk:12-ea-19-jdk-oraclelinux7 | |
WORKDIR /function | |
COPY --from=build-stage /function/target/*.jar /function/app/ | |
COPY src/main/c/libfnunixsocket.so /lib | |
COPY build-resource/wallet/* /function/wallet/ | |
ENTRYPOINT [ "/usr/bin/java", \ | |
"-XX:+UseSerialGC", \ | |
"--enable-preview", \ | |
"-Xshare:on", \ | |
"-cp", "/function/app/*", \ | |
"com.fnproject.fn.runtime.EntryPoint" ] | |
CMD ["com.example.fn.HelloFunction::handleRequest"] |
We can now query the database like so:
package com.example.fn; | |
import com.cedarsoftware.util.io.JsonWriter; | |
import com.fnproject.fn.api.OutputEvent; | |
import java.sql.*; | |
import java.util.ArrayList; | |
import java.util.HashMap; | |
import java.util.List; | |
public class HelloFunction { | |
public OutputEvent handleRequest(String input) { | |
String dbUser = System.getenv().get("DB_USER"); | |
String dbPassword = System.getenv().get("DB_PASSWORD"); | |
String dbUrl = System.getenv().get("DB_URL"); | |
String clientCredPath = System.getenv().get("CLIENT_CREDENTIALS"); | |
System.setProperty("oracle.jdbc.driver.OracleDriver", "true"); | |
System.setProperty("oracle.net.ssl_version", "1.2"); | |
System.setProperty("javax.net.ssl.keyStore", "${clientCredPath}/keystore.jks"); | |
System.setProperty("javax.net.ssl.keyStorePassword", System.getenv().get("KEYSTORE_PASSWORD")); | |
System.setProperty("javax.net.ssl.trustStore", "${clientCredPath}/truststore.jks"); | |
System.setProperty("javax.net.ssl.trustStorePassword", System.getenv().get("TRUSTSTORE_PASSWORD")); | |
System.setProperty("oracle.net.tns_admin", clientCredPath); | |
ResultSet resultSet = null; | |
String records = ""; | |
try { | |
DriverManager.registerDriver(new oracle.jdbc.OracleDriver()); | |
Connection con = DriverManager.getConnection(dbUrl,dbUser,dbPassword); | |
Statement st = con.createStatement(); | |
resultSet = st.executeQuery("select * from employees"); | |
List<HashMap<String, Object>> recordList = convertResultSetToList(resultSet); | |
records = JsonWriter.objectToJson(recordList); | |
con.close(); | |
} | |
catch (Exception ex) { | |
ex.printStackTrace(); | |
} | |
return OutputEvent.fromBytes( records.getBytes(), OutputEvent.Status.Success, "application/json"); | |
} | |
private List<HashMap<String,Object>> convertResultSetToList(ResultSet rs) throws SQLException { | |
ResultSetMetaData md = rs.getMetaData(); | |
int columns = md.getColumnCount(); | |
List<HashMap<String,Object>> list = new ArrayList<HashMap<String,Object>>(); | |
while (rs.next()) { | |
HashMap<String,Object> row = new HashMap<String, Object>(columns); | |
for(int i=1; i<=columns; ++i) { | |
row.put(md.getColumnName(i),rs.getObject(i)); | |
} | |
list.add(row); | |
} | |
return list; | |
} | |
} |
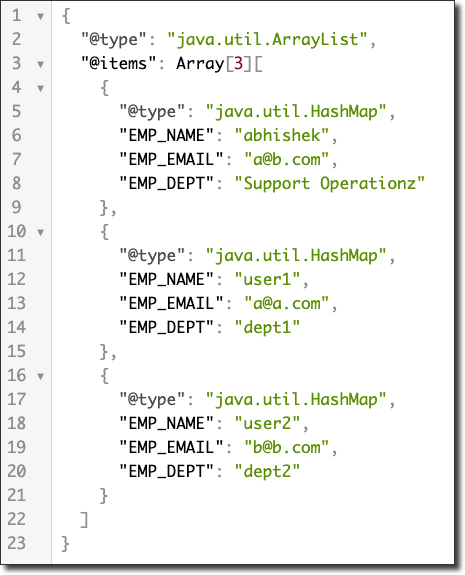
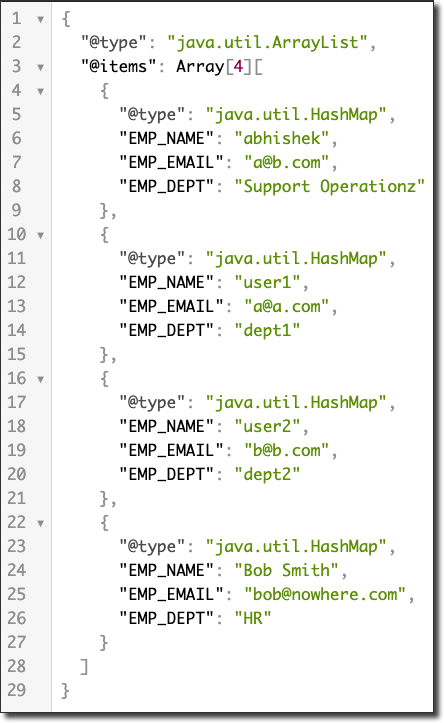
And now when we invoke the function, we'll see a nice JSON array of employees:
Of course, we can also take advantage of passing data into the function. Take another function in this application that defines an Employee
POJO like so:
package com.example.fn; | |
public class Employee { | |
private String email; | |
private String name; | |
private String dept; | |
public Employee() {} | |
public Employee(String email, String name, String dept) { | |
this.setEmail(email); | |
this.setName(name); | |
this.setDept(dept); | |
} | |
public String getEmail() { | |
return email; | |
} | |
public void setEmail(String email) { | |
this.email = email; | |
} | |
public String getName() { | |
return name; | |
} | |
public void setName(String name) { | |
this.name = name; | |
} | |
public String getDept() { | |
return dept; | |
} | |
public void setDept(String dept) { | |
this.dept = dept; | |
} | |
} |
We can persist new employees by slightly modifying the previous function:
package com.example.fn; | |
import com.cedarsoftware.util.io.JsonWriter; | |
import com.fnproject.fn.api.OutputEvent; | |
import java.sql.*; | |
import java.util.ArrayList; | |
import java.util.HashMap; | |
import java.util.List; | |
public class HelloFunction { | |
public OutputEvent handleRequest(Employee employee) { | |
String dbUser = System.getenv().get("DB_USER"); | |
String dbPassword = System.getenv().get("DB_PASSWORD"); | |
String dbUrl = System.getenv().get("DB_URL"); | |
String clientCredPath = System.getenv().get("CLIENT_CREDENTIALS"); | |
System.setProperty("oracle.jdbc.driver.OracleDriver", "true"); | |
System.setProperty("oracle.net.ssl_version", "1.2"); | |
System.setProperty("javax.net.ssl.keyStore", "${clientCredPath}/keystore.jks"); | |
System.setProperty("javax.net.ssl.keyStorePassword", System.getenv().get("KEYSTORE_PASSWORD")); | |
System.setProperty("javax.net.ssl.trustStore", "${clientCredPath}/truststore.jks"); | |
System.setProperty("javax.net.ssl.trustStorePassword", System.getenv().get("TRUSTSTORE_PASSWORD")); | |
System.setProperty("oracle.net.tns_admin", clientCredPath); | |
try { | |
DriverManager.registerDriver(new oracle.jdbc.OracleDriver()); | |
Connection con = DriverManager.getConnection(dbUrl,dbUser,dbPassword); | |
PreparedStatement st = con.prepareStatement("insert into employees (EMP_EMAIL, EMP_NAME, EMP_DEPT) values (?, ?, ?)"); | |
st.setString( 1,employee.getEmail()); | |
st.setString(2, employee.getName()); | |
st.setString(3, employee.getDept()); | |
st.executeUpdate(); | |
st.close(); | |
con.close(); | |
} | |
catch (Exception ex) { | |
ex.printStackTrace(); | |
} | |
return OutputEvent.fromBytes( JsonWriter.objectToJson(employee).getBytes(), OutputEvent.Status.Success, "application/json"); | |
} | |
} |
To invoke the insert function we pass a JSON object with the keys corresponding to the Employee
POJO:
$ echo '{"email": "bob@nowhere.com", "name": "Bob Smith", "dept": "HR"}' | fn invoke atp-demo-app atp-demo-fn-2 |
To confirm the insert, re-invoke the original function and notice the new employee:
In my next post, we'll take a look at connecting up to ATP with a NodeJS based function.
Attention!!! This process in the blog post below has been superseded by the information contained in a newer blog post. If you are trying to connect your Oracle Function to an Autonomous DB instance, please read that post instead!