Project GreenThumb Part 2 - The Data Collection
Posted By: Todd Sharp on 3/24/2021 12:00 GMT
Tagged: Cloud, Cloud, Java, Java, Open Source, Open Source

Welcome to part 2 of my short series about Project GreenThumb, a hardware, software and cloud-based solution for monitoring and automating seedling growth. In my last post, I introduced you to the motivation and goals of the project and we looked at the hardware setup. In this post, I want to go a bit more in-depth about the Arduino code necessary to collect the environment data and publish it to a message queue so that it can later be consumed, persisted and visualized. Let’s get into it!
The Hardware Build & Schematic
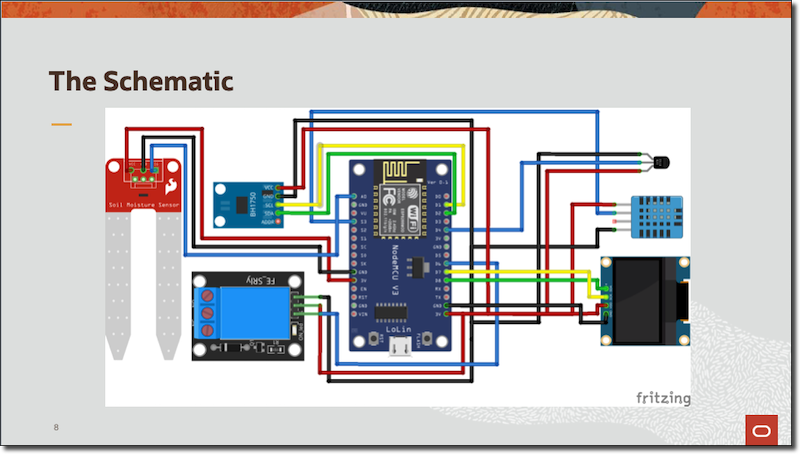
I assembled the hardware by soldering the sensors mentioned in the last post to the NodeMCU board and leaving plenty of slack in each lead wire in order to ensure they would reach the seedling tray. Here’s a wiring diagram that shows which pins were used for which sensors.

The Arduino Code
Thanks to the amazing Arduino community, I was able to rely on a number of libraries to read all of the sensors, output the data to the OLED display and publish the messages to MQTT.
Reading Sensors
Some sensors are straightforward - just read the value using analogRead or digitalRead.
Others are a bit more complex, requiring third-party libraries.
There’s nothing really complex about reading most sensors with Arduino and as I mentioned there are open source libraries that can help with just about every sensor out there.
Need To See More? Don’t worry, I’ve published the entire client source code on GitHub.
Serializing Messages as JSON
I planned on publishing all of the sensor readings from each iteration to a message queue in the cloud as a single JSON object. Once the readings are obtained, JSON Serialization was done with the ArduinoJson library (https://arduinojson.org).
Step 1 - Include the Library
Step 2 - Create a JSON Document & String to Hold Serialized Result
Step 3 - Set Document Values & Serialize
The MQTT Client
The MQTT Client by Adafruit was used to publish the messages to an MQTT topic running on RabbitMQ in an always free VM instance in the Oracle Cloud.
Need A RabbitMQ Instance? Check out how to launch your own instance of the popular messaging queue on an always free instance in the Oracle Cloud!
I’m only doing one-way messaging (publishing sensor data), but I could quite easily modify the code to receive incoming messages as well. Here’s a simple overview of how to use the MQTT client:
Step 1 - Include the Library
Step 2 - Create the Client & Publisher
Step 3 - Create a Function for Connecting to the Client
Step 4 - Connect & Publish Message
I won’t cover every bit of the microcontroller code here, but the examples above should give you a basic idea of what it takes to read the sensors, serialize the data, and publish it to the MQTT topic. The full source code for the microcontroller project is available on GitHub if you’d like to check it out.
Summary
In this post, we looked at some of the code that I used to read and publish the sensor data to a message queue. In the next post, we’ll start to look at how I consumed that sensor data, persist and visualize it.
Photo by Vishnu Mohanan on Unsplash