Project GreenThumb Part 3 - Consuming and Persisting the Sensor Data in the Cloud
Posted By: Todd Sharp on 3/26/2021 12:00 GMT
Tagged: Cloud, Cloud, Java, Java, Open Source, Open Source
In my last post, we looked at how the Arduino code reads from the attached sensors and publishes those readings to a message queue running in the cloud. That’s only half of the technical story though, as the data doesn’t do me any good until it’s persisted and visualized! In this post, we’ll start to look at how that’s done.
The Persistence & Visualization App Build
As mentioned in part one, I chose Micronaut (my favorite Java framework) for the monolithic cloud application that consumes the MQTT messages, persists them, and pushes them in real-time to a simple HTML front-end via websockets. The data is persisted into a table in an Autonomous DB instance in the cloud. I know that sounds complicated, but I promise, it’s really not! Let’s look at how I accomplished this, first by looking at the DB instance and schema. After that, we’ll dig into the Micronaut application.
The DB Instance & Schema
Autonomous DB is a full-blown cloud database that is completely managed. You can create an instance and be up and running in just a few minutes.
New To Autonomous DB? Check out The Complete Guide To Getting Up And Running With Autonomous Database In The Cloud.
Once my instance was up and running, I created the table that I would use to store the readings. Since the reading data was a bit unstructured (the values from the readings are not all the same data type) I could handle this in several ways. The first approach would be to create tables for each different sensor and type the value column accordingly, but that’s a bit rigid. I decided to go with the second option: create a table with a JSON column and store the entire JSON object for each timestamped reading. This allowed me to adapt to any future variations in the data (additional sensors would just be part of the JSON) but let me remain flexible with my querying since Autonomous DB has full support for JSON columns! Here’s the DDL I used to create the table:
I’ve got an ID column that uses auto-number for the primary key, the READING column is defined as a CLOB (and is constrained to ensure that it is valid JSON), and a CREATED_ON column to contain the timestamp that the reading was obtained. That’s it - that’s the entire schema. Just a simple table that I'll use to store the message JSON, but as you’ll see later on it remains plenty flexible so that I can create a wide range of reports based on the data.
The Micronaut Application
Let’s take a look at some of the highlights of the Micronaut application that I created to persist the readings and publish the front-end.
Show Me The Code! We’ll look at the exciting parts below, but if you want to see the entire application you can check out the project on GitHub.
Creating The App
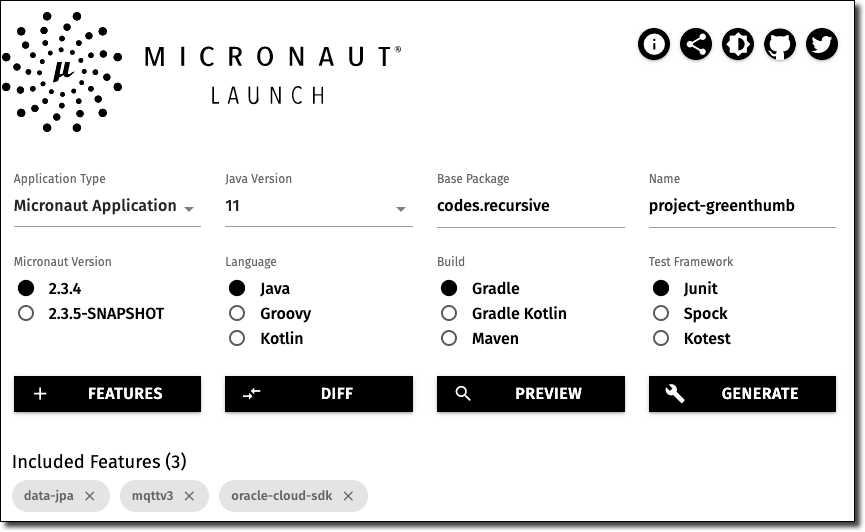
Bootstrapping an app with Micronaut can be done in several ways. I like to use the web-based Micronaut Launch because it’s difficult to remember every single option when creating a new project and the UI gives you nice dropdown options for configuration, but you can also use the Micronaut CLI with the mn create-app command. For this project, here are the options I selected to generate the application. Notice that I selected the data-jpa, mqttv3, and oracle-cloud-sdk features to be included.
Hot Tip! You can create a new GitHub repo directly from the code generated by Micronaut Launch and check out your application locally.
Automatic Autonomous Wallets
Once I checked out my brand-new Micronaut application, the first change that I made was to add some configuration for automatic wallet download for my Autonomous DB connection. This is a new feature that was just added to the Oracle Cloud SDK module that makes life so much easier and I recently blogged about how to configure your app for auto wallet download, so check out that post for details. Basically, the automatic wallet download required me to add to blocks to the configuration file located at src/main/resources/application-local.yml. The first block is the configuration needed for the OCI SDK module, and since I have the OCI CLI installed locally the module is able to load and utilize the information in the config file for the CLI if we tell it the profile to use.
The second block that we have to add is to tell Micronaut which DB to use for our datasource. By configuring the DB OCID, username and password it has enough information to download and configure the datasource (even without a URL!).
That’s all the DB-related configuration that needs to be done. We’ll look at how the datasource is used down below.
Consuming The MQTT Topic
My application needs to be able to easily consume the messages that the hardware client publishes to the MQTT topic, so MQTT integration was a must for the framework on the server-side. Spoiler alert: Micronaut, of course, makes this straightforward via the micronaut-mqtt module. Like our datasource above, this requires a bit of configuration in my src/main/resources/application-local.yml file.
Environment Specific Config! You may have noticed that my configuration file has the -local suffix in it. This means I have to pass in the environment when I run the app via -Dmicronaut.environments=local, but I could have just as easily left it named application.yml and it would have automatically been applied. But I like to be explicit with the config, because it differentiates itself from the src/main/resources/application-oraclecloud.yml file that sits beside it. Since I have a slightly different config when I deploy the app, I like to keep a separate config file per environment and Micronaut is totally smart enough to know that it is running in the Oracle Cloud and apply the proper config file at runtime!
The only thing left to do at this point is to create a consumer class with a receive method that will be fired every time a new message is received on the given topic. For now, this consumer is just receiving the message, but I’ll show you how it handles those messages in just a bit.
If we add a logger entry to our src/main/resources/logback.xml file and start the app up at this point, we can see each message as it is received.
Excellent! The application is now receiving messages every 10 seconds from the hardware! Let’s work on adding persistence to the application so that we can save each reading as it is received.
Persisting the Reading With Micronaut Data
Right. So, persistence, eh? Seems like it might be the part where things get tricky, but rest assured this part is just as uncomplicated as the rest of the project so far. For this, I’m using Micronaut Data (the JPA flavor, as opposed to the JDBC variety). Here’s the process:
Step 1 - Configuration
This is already done. Since we chose the data-jpa feature on Micronaut Launch and set up our config files above, all of our necessary dependencies and configuration is complete.
Step 2 - Create the Domain Entity
I created a class called Reading and added properties to represent each column in the database table. I then annotated the class with @Entity and @Table (the table annotation is only necessary because the domain class name is slightly different from the table name).
The ID column is annotated with @Id and @GeneratedValue so Micronaut knows how that Oracle will handle generating the ID, and the @DateCreated annotation on the createdOn property tells Micronaut to timestamp the value at creation. Add a constructor and getters and setters and the domain entity is ready to go (I left them out above for brevity).
Step 3 - Create a Repository
Next, I created an interface that extends PageableRepository. This interface will be implemented at compile time since we’ve told Micronaut everything it needs to know about our table and datasource and the concrete methods will be available at runtime for all of our basic CRUD operations.
Step 4 - Using the Repository
At this point, the ReadingRepository is ready to be injected into controllers or other classes in the application and used for persisting new Reading objects. We’ll look at how that’s done in the next post in this series.
Summary
In this post, we looked at the DB schema, how I created the monolithic Micronaut application and consumed and persisted the sensor data. In the next post, we’ll look at the queries used for reporting on the data.
Photo by Clint Patterson on Unsplash