Tracking & Analyzing Water Usage Data in the Cloud with a Flow Sensor, Microcontroller & Autonomous DB
Posted By: Todd Sharp on 10/1/2020 7:26 GMT
Tagged: Cloud, Developers, JavaScript
This past summer, I was lucky enough to get spend some virtual time with some of the awesome interns here at Oracle. It makes me happy to see so many college students with such a passion for engineering and technology. One of the interns that I got to meet was Allison Chen, who was clearly interested in software development but is also highly motivated to ultimately use her skills to make the world a better place which is something that I feel very strongly about myself.
I met Allison and fellow amazing intern Neil Collins when they interviewed me for the Oracle Intern Report. The published video is only a few minutes long, but the Zoom session that we had lasted well over half an hour so I really got a chance to talk to both of them about many different topics and learn more about each of them. I think one of the lesser-known roles of Developer Relations is that of a mentor, but I am always excited when I get to put on the mentorship hat and help out, especially when the mentee is highly passionate and motivated to learn as much as they possibly can.
After the Intern Report interview, I offered to connect with Allison and Neil and continue to mentor them however I could. Allison asked if I would be interested in assisting her team from Creative Labs at UCLA with a project that they had been working on. Team fLOW had been working a project which involved an inline water usage sensor and an ESP8266 (microcontrollers and sensors - more of my passions!) to track water usage. In their own words, the motivation for this project:
We would like to work with the intersection between technology and engineering and sustainability. Each and every one of us wastes water while we're washing our hands, brushing our teeth, etc. The goal of this project is to develop a device to measure water usage and display a user's trends over time. By bringing attention and awareness to the problem, individuals can actively make lifestyle changes to play their part in conserving
What you really need to understand about this project and the Creative Labs club at UCLA is that this is all voluntary. This isn’t for college credit and it’s not a project that was assigned to these students by a professor. These are students who are passionate about learning and collaborating with other students on projects that can make a difference in this world. It’s pretty impressive and quite inspiring to see a younger generation of STEM students who care enough about sustainability and the environment to actually spend their own time learning how to use technology to bring awareness to water conversation and other issues that impact society. I was more than thrilled to help Team fLOW so I was glad to spend some time talking to them about their project and sharing some thoughts about how Oracle Cloud Infrastructure (OCI) could make it easy to host their application and store their persisted data. A few weeks ago we had a call and discussed several ideas about how OCI could help manage their data persistence. It was great to learn more about the team members who shared Allison’s passion and motivation and to be able to evangelize OCI at the same time with a younger generation who is open to new ideas and technologies.
After our call, I decided to see if I could build out a similar solution as I thought it would make for an interesting post here on the developer blog. In this post we’ll take a look at some of the options that I thought of for their project and then we’ll look at how to build our own solution. Make sure you check out Team fLOW’s project site and check out their code and project summary on GitHub.
Project Goal
The goal of this project is to track water usage and persist the usage data into an Autonomous Transaction Processing instance in the cloud for further analysis and reporting. The hardware involved, in my implementation, is as follows.
If you’d like to play along at home, you can purchase the equipment and follow along.
No cloud account? No problem! This entire solution will work great on the Oracle Cloud Infrastructure (OCI) “Always Free” tier, so sign up for an account while you’re waiting for your hardware to arrive!
Potential Solution 1 - Publish Sensor Data via a Messaging Queue
Often times when working with sensor data from microcontrollers, people utilize messaging queues as a way to quickly and easily publish their sensor readings from the device. MQTT is the most commonly used protocol since it is extremely lightweight and there are existing client libraries for use in Arduino projects to make publishing quite easy. I’ve blogged about getting RabbitMQ up and running in OCI and it’s quite easy to do. Using RabbitMQ (or another MQTT server) would make it easy to consume the sensor data with something like Node-RED (another topic that I’ve blogged about) but at that point, you’d have used up both of your free instances and would still need a way to persist the sensor data to the database. It’s a fun stack to work with and certainly useful for certain use cases, but it seemed like the wrong answer for this use case. You might be asking yourself why I haven’t yet mentioned Oracle Streaming Service (OSS), and that’s a valid question. I’ve created blog posts and videos about OSS and it has many uses in cloud-native applications, but for this use case, it would either require a dependency on an SDK or the usage of the OCI REST APIs which have a pretty involved process for request signing which would complicate this project unnecessarily. Let’s look at another possible solution.
Potential Solution 2 - Save Data via HTTP with Oracle REST Data Services
When you’re working with microcontrollers, the first consideration for any solution is to utilize the most lightweight solution possible. Clearly, this means that using any kind of SDK or direct database dependency (such as the Oracle Call Interface) would be off the table as the package size and required memory would be too intense for the ESP8266 board that was chosen for this project. Since HTTP is pretty familiar, ubiquitous, and readily available on the Arduino platform, it seemed like one of the best options. This means that we’ll need some sort of “proxy” to persist the data to the database. I’ve talked plenty in the past about Oracle Rest Data Services (ORDS) and it would be a perfect way to accomplish this goal. Here’s a quick intro to ORDS if you’re not familiar with it, and of course our very own (That) Jeff Smith has blogged and written articles about it quite often.
Since ORDS is included at no charge with Autonomous DB it would be quite easy to create your schema and table and “auto REST” enable them to expose the table for collecting the data as a REST endpoint for full CRUD support. You can even provide custom endpoints to retrieve the data in any format you need it for further analysis. Speaking of further analysis, the only downside to using ORDS is that you would still require some sort of service tier to interface with the database from the front-end since you certainly would not want to include any OAUTH credentials in your client-side code. In the case of Allison’s team, they already had a Node-based back-end in place that was being used to retrieve and persist the data to a legacy database. While it is certainly possible to utilize ORDS from the Node back-end, it felt unnecessary to introduce an additional component into the architecture, so ORDS was not chosen for this project.
Potential Solution 3 - Save Data via HTTP with Back-End Service
This solution is straightforward. A Node-based back-end already exists for Allison’s project, and it is super easy to work with Autonomous DB via Node so we’d just have to configure the back-end and add an endpoint for saving the sensor data. This endpoint can be called directly from the ESP8266 via HTTP as a quick and easy way to persist the data. Since the data will be stored in a simple relational table, it’ll be quite easy to write SQL queries to aggregate/filter/group the data later on. For this project, using a Node-based back-end was the best choice.
The Chosen Solution
Before I go into how it's built, here's a 2-minute video that explains the chosen solution, gives an overview of the architecture and shows you the solution in action:
Building The Back-End
So now that we’ve chosen a solution for this project, it’s time to go about setting up the back-end. Before we jump into that code, let's create our schema and table to store the data.
If you haven’t yet launched an Autonomous DB instance, do so now. If you’re not familiar with how to do that, check out this blog post (skip down past the signup info in that post).
You’ll need your Autonomous DB wallet going forward, so download that (instructions at the bottom of this blog post if you’re stuck) and put it in a directory. Unzip a copy of it, but keep a zipped copy as well. I like to keep resources like this in a directory called /projects/resources but I also like to create a symlink on my Mac in the filesystem root for ease of use later on. Just make sure you remember where it is later on!
If this is your first Autonomous DB instance, you’ll need to create a schema. To do that, install SQLcl (a handy tool that you’ll use often for querying your instance going forward) and use your Autonomous DB wallet and connect up with SQLcl as your admin user. Your tnsname is one of the entries listed in the tnsnames.ora file in your wallet (see this doc which explains the different options for the service names).
Create your schema with:
Now, connect up with SQLcl as your new schema user:
Now, create the table that we’ll use to collect the sensor data. It really couldn’t be easier here - just a table with an autonumber ID, a float column for the reading value, and a timestamp that defaults to the current date and time.
Create Back-End with Express & Node.JS
We’ll use the popular Express framework for the Node backend. Create the project, install your dependencies like so:
Hey! If you’d like to jump directly to the completed solution the full code for this project can be found on GitHub.
To start the app, use the command that was provided in the output from the previous commands. Mine looked like so:
The oracledb node module requires that you have the Oracle Instant Client installed, so grab a link for the latest proper version for your OS and install it in a directory of your choosing. Again, I keep resources like this in my /projects/resources directory.
We’ll need to set some environment variables for the oracledb module as well as our credentials that we’ll ultimately use to make the database connection. Here’s an explanation of the variables we need to set:
-
TNS_ADMIN- The path to the unzipped wallet on your machine. -
ORACLEDB_USER- The schema user that we created for this project. -
ORACLEDB_PASSWORD- The password for the schema user. -
ORACLEDB_CONNECTIONSTRING- The service name from thetnsnames.orafile that we will use (see above). -
INSTANT_CLIENT_PATH- The path to the unzipped instant client on your machine.
Set these according to the proper method for your operating system. On my Mac, this is how it might look:
Create Save Endpoint
The only thing left to do for the back-end is to add our /save endpoint. Open up routes/index.js in your project and include the oracledb module and tell it the path to the instant client.
We could open and close our connections with each request, but that would get redundant pretty quickly. So let’s create some convenience functions. Normally I would create a service layer to handle this, but since this is a simple example we’ll keep it in the router.
Now we can add an endpoint that gets a connection, performs the insert, closes the connection, and returns the newly created record ID. We’ll accept the reading value as a path parameter since it’s the only value we need to insert into the database (instead of passing in JSON or using form data). We’ll use async/await instead of promises to keep things clean, so we’ll need to wrap our calls in try/catch/finally. This code is pretty heavily commented to help you out if you’re new to using Oracle with Node.
That’s all we need to do on the back-end to add a persistence endpoint. Start the app up locally and give it a test:
Back-End Bonus: Deploying
As a proof-of-concept, running the back-end locally certainly “works” and assuming your LAN is properly configured you can run the back-end locally and point your hardware at your local IP and it will persist your data as you’d expect. But, since we’ve got 2 free VMs in the cloud, why not deploy the service to one of them. An easy way to do this would be to launch a VM, install Docker, and build/push/run the Docker image on the new VM. Of course, there are other options for deploying, but let’s cover the Docker version here so that we at least know how to launch a VM and get Docker installed and run the Docker image on the VM.
Creating A VM
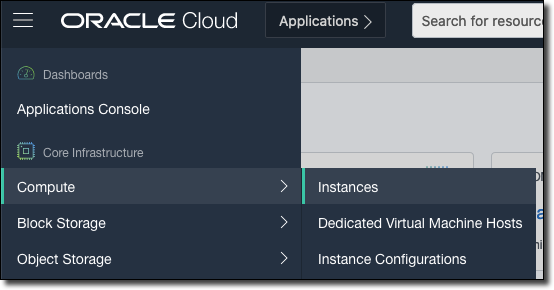
Let’s create a VM on the Oracle Cloud. This can be a regular VM, or an “Always Free” VM - either one will work fine for this application. The first step is to select ‘Compute’ and then ‘Instances’ from the burger menu in the OCI console.
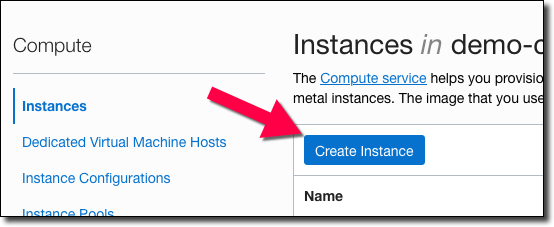
Next, on the instance list page, click ‘Create Instance’.
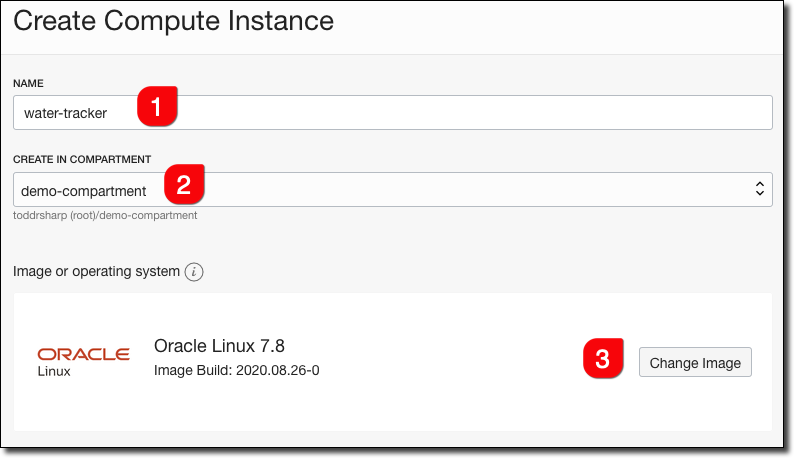
Next, give it a name (#1), select a compartment that the instance will live in (#2), and select an OS (#3). For this project, stick with Oracle Linux 7.X so we can be sure the commands that we use below will work.
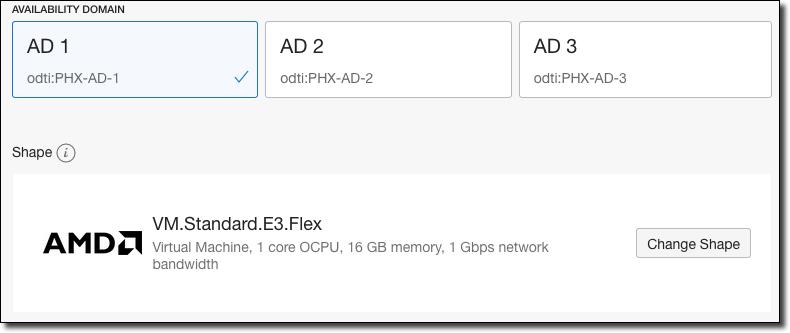
Choose an availability domain and the instance shape. Again, choosing an “always free” shape will work fine for this application.
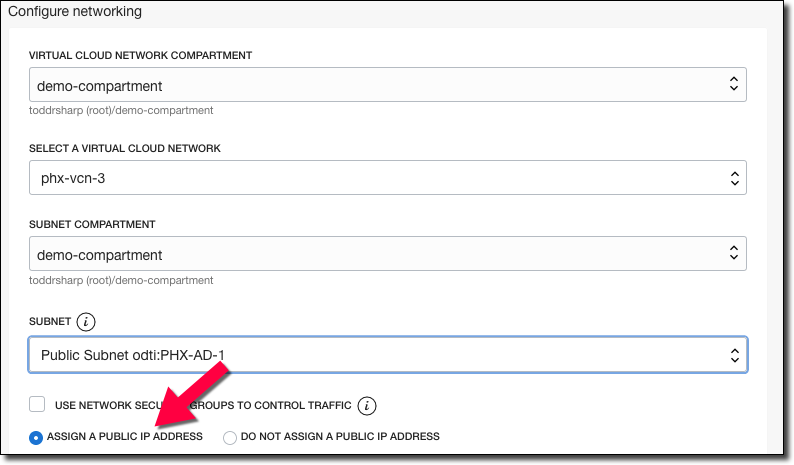
Configure your networking options, and make sure to assign a public IP to the instance.
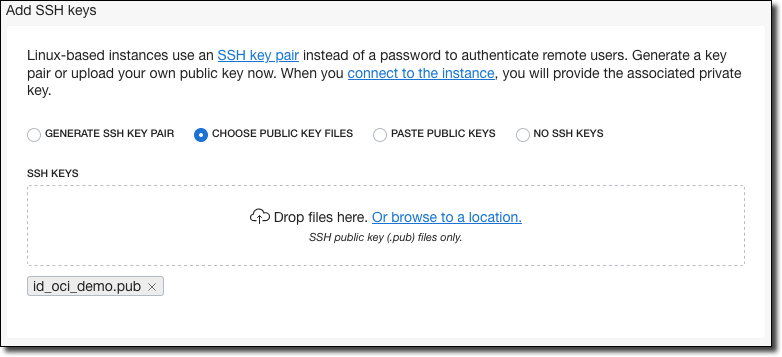
Scroll down and choose an option for your SSH key. You can choose an existing key, paste the contents of one, or generate a new one and download it.
Note! If you don’t add an SSH key, you’ll be unable to remote into your VM later on!
Click ‘Create’ and wait for your VM to complete. Once it’s running, copy the public IP from the instance details page.
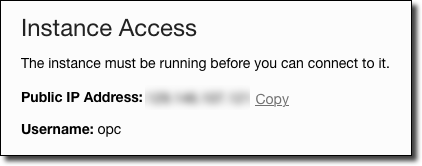
Use this IP to SSH into your VM.
Installing Docker on Your VM
Now that we’ve established a connection to the machine, let’s install Docker to get it ready to run our application. First, make sure YUM is up to date.
Next, install Docker and start and enable the service.
You’ll want to do the following so that you can run docker commands without sudo as your OPC user.
Note! You must log out and log back in at this point so that your OPC user can run Docker commands without sudo.
Docker is now installed and ready to run an image.
Creating the Docker Image
Now that we’ve got a VM running with Docker installed let's create a Dockerfile that installs the necessary dependencies, copies our wallet into the container, and runs the application. We’re going to be using the Oracle Cloud Infrastructure Registry to host our Docker images, so if necessary read up on OCIR in the Oracle docs. You can certainly choose another registry if you’d like, just substitute URLs and credentials below as necessary.
Build the Docker image (make sure to point at your own repo):
Push the image:
Heads Up! Make sure port 3000 is open in your security list and in your VM firewall!
You'll also need to open port 3000 in your VM, use the appropriate command for your OS. For example, on Oracle Linux 7:
Now we can run the container and pass in our environment variables as necessary (note the ‘--restart always’ flag so we can be sure that the image will run at every reboot of the VM). We don’t need to pass the INSTANT_CLIENT_PATH variable like we did locally because installing the instant client with YUM in the Dockerfile will make sure that everything is installed in the default directory where the Oracle module expects it to be.
At this point, our back-end is up and running in a VM in the Oracle Cloud!
Hardware
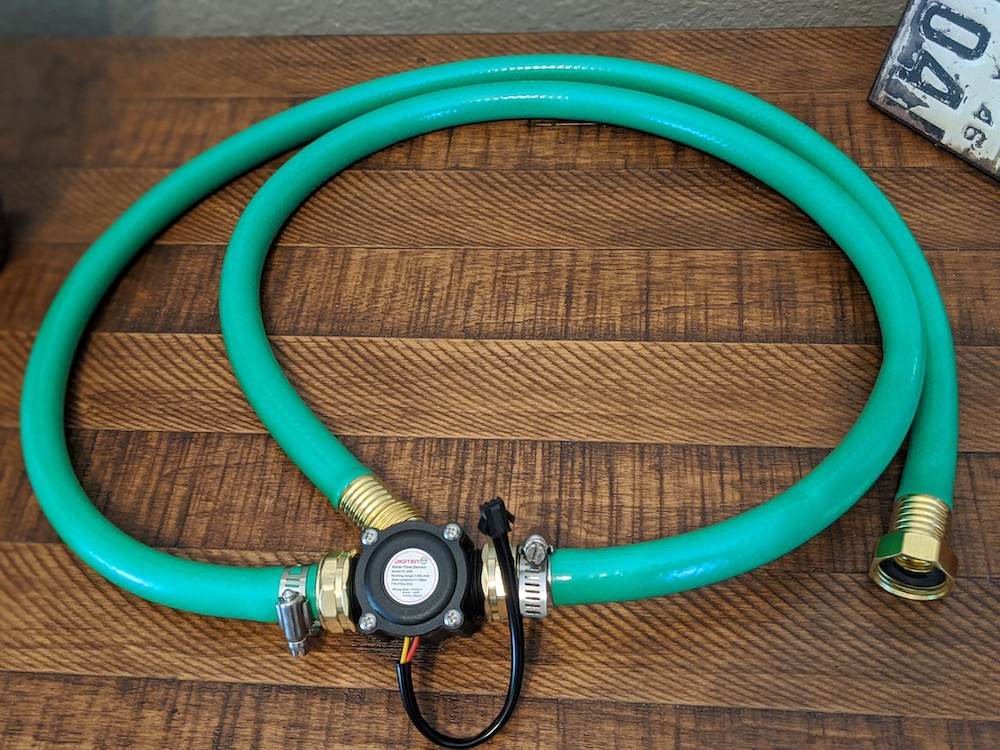
Now that we have our back-end created, let’s take a look at the hardware portion of this project. The first thing I created was a simple section of garden hose with the flow sensor spliced attached inline.
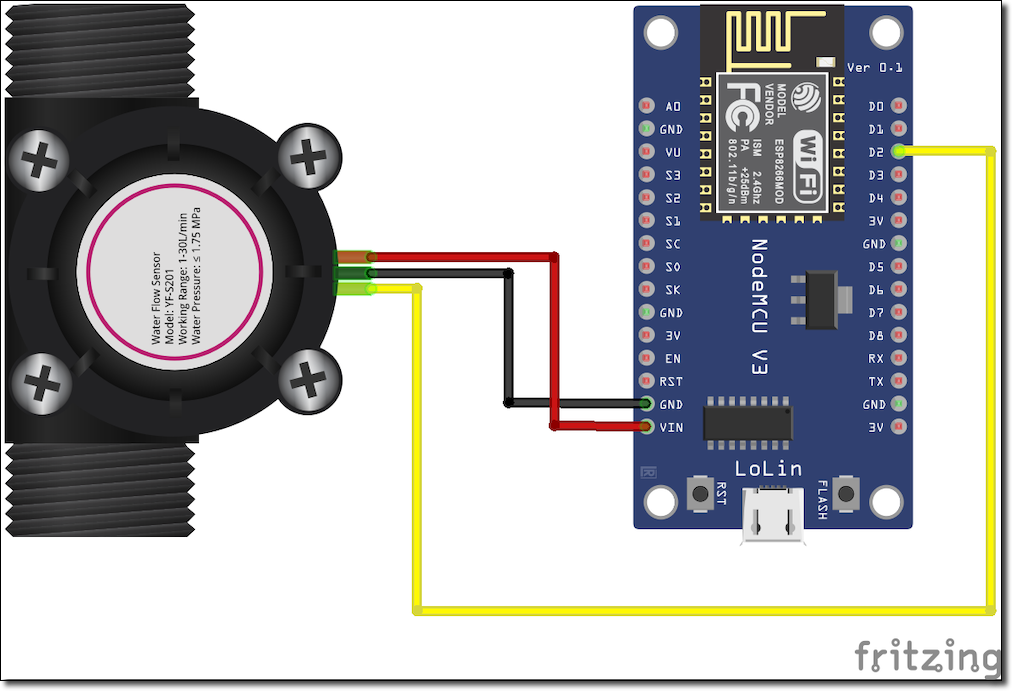
The next task was to connect the ESP8266 up to the flow sensor. It’s a very simple wiring job. The red wire on the flow sensor goes to ‘VIN’ (5 volts), black to ground, and the yellow (signal) wire connects up to the D2 pin.
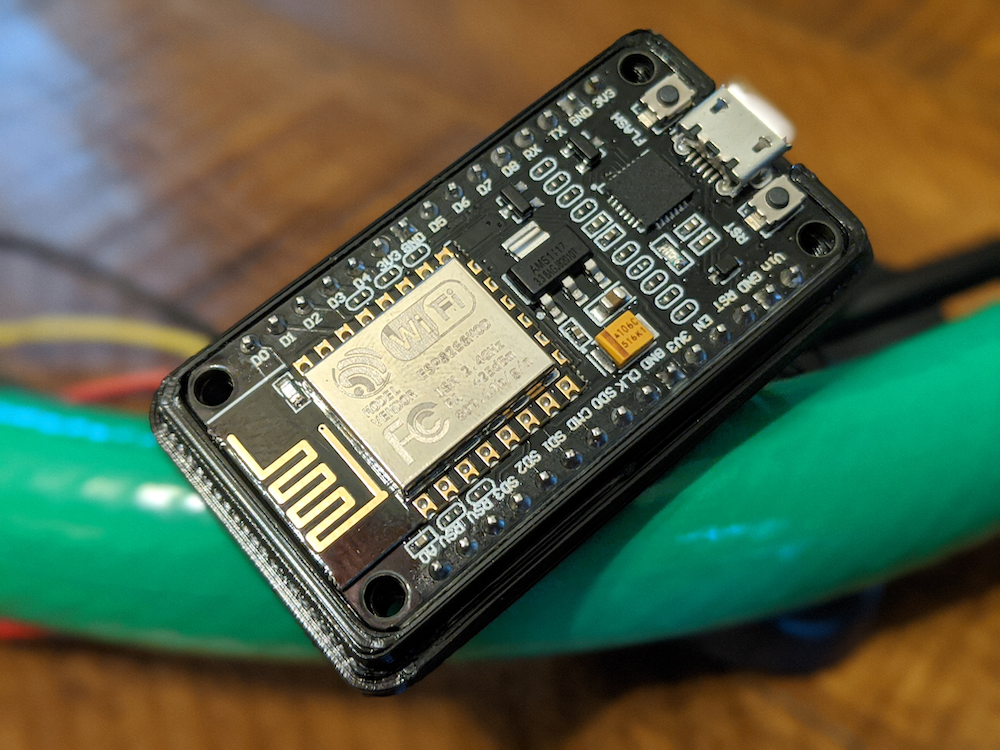
Here’s the NodeMCU ESP8266.
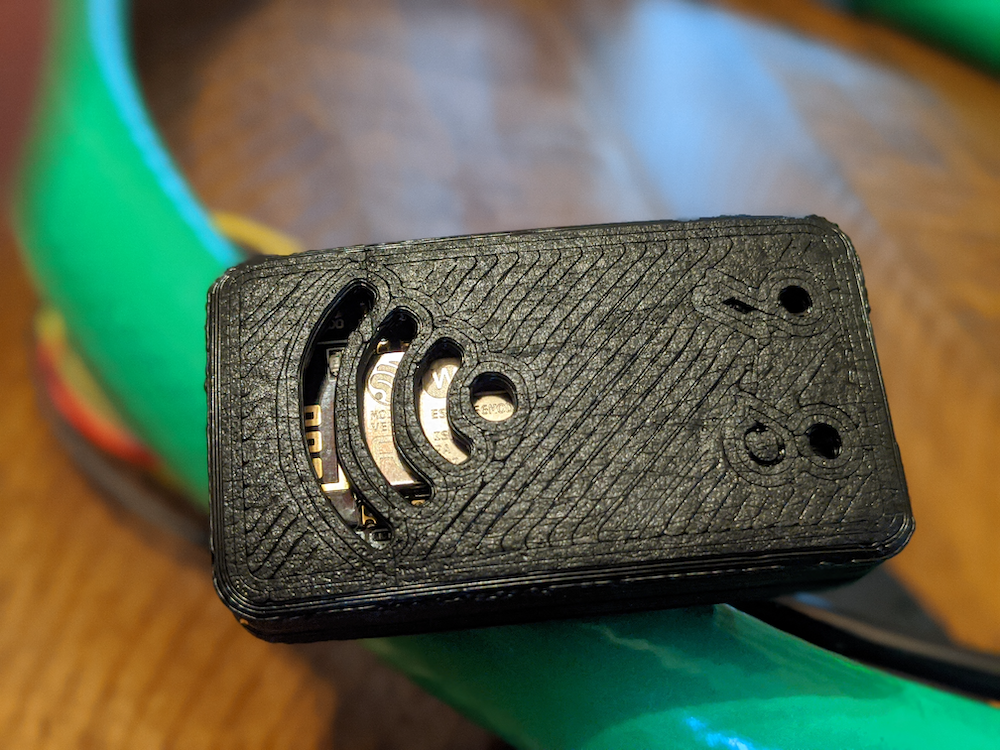
I found a decent case for the NodeMCU on Thingiverse and printed it out to keep the ESP8266 contained.
With that, the hardware is assembled and we can focus on the Arduino code to read the sensor and persist the readings.
Coding The ESP8266
I love to play around with microcontrollers and other various hardware devices, but when it comes to programming them I’m certainly more of a “tinkerer” than an “expert”, so I often rely on the abundance of tutorials on the web when it comes to my Arduino sketches. That was certainly the case with this project so I found a really great tutorial that I followed for most of the sketch. You don’t have to use that exact tutorial, there are plenty out there for flow sensors. I added in some code to make the HTTP call to the back-end to the code from the tutorial which takes the readings and modified the tutorial code to work with my sensor that was different from the one they used. Let’s break it down.
Arduino sketches have, at a minimum, two methods: setup() and loop(). setup() is run once and loop() runs continuously (shocking, I know). Before we get to those, we’ll need to include some dependencies and declare some globals.
Notice the include for the variables.h file? We’ll need to create that and make sure it’s not checked in to source control since it contains our WiFi credentials. Take a look at the variables_template.h file in the same directory of the GitHub repo for an example of this file, or create one like so and save it in the same directory as the sketch. It should contain the following variables:
Now, in setup() we’ll connect to WiFi and configure the sensor. The comments should explain what is going on here.
The Flow function simply increments a counter each time it receives a signal.
Let’s add a function to perform the HTTP call to the back-end.
In our loop() function, we’ll check how many pulses have been counted since the last check, convert the value to milliliters and save the reading. My initial attempts at this code were calling the back-end every second and these tests were somewhat confusing as the persisted volumes were much lower than I expected them to be before I realized what was going on. HTTP calls are blocking, so even though they were pretty quick they were still happening often enough to disrupt the interrupt function that was counting the pulses from the sensor. When I bumped the frequency up to 5 seconds this yielded much more accurate results, but they’re still not perfect since the HTTP call still blocks (it just does it less often). There are two other possible ways around this problem. The first option would be to wait until the pulses have not incremented for some extended period of time and then perform the HTTP request. However, just because there haven’t been any readings for X milliseconds doesn’t mean there won’t be any coming while we’re making the HTTP request. Also, there is no guarantee that there will ever be an extended period of X milliseconds of inactivity in the system in order to make the request. This workaround is less than perfect. Indeed, the only proper way to address this situation is to utilize a library that makes non-blocking (asynchronous) HTTP calls to persist the readings to the back-end. In my case, the accuracy simply isn’t 100% necessary so I am ok with blocking every 5 seconds, even if it throws off the readings a bit.
Here’s the loop() function and, like before, it’s pretty heavily commented.
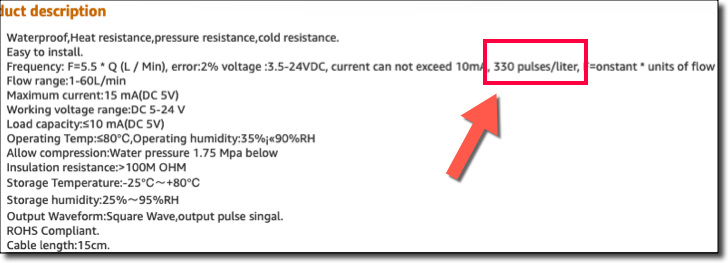
My meter was slightly different from the one in the tutorial which meant that I had to refer to the product documentation to determine the proper amount of pulses per liter. Obviously, this has a huge impact on your readings, so make sure you’re using the proper value!
Our sketch is ready to upload. Once the built-in LED is lit all of the water that runs through the hose will be measured and our readings will be persisted to the Autonomous DB instance via our back-end.
Running The App
With the back-end deployed and the sketch deployed to the ESP8266 we’re ready to test out the project! To test out the app, we just need to connect the hose to a spigot and run some water through it. For this post, I cleared the database table and ran a quick session through the system. After running what appeared to be around 2 gallons into a 5-gallon bucket, I disconnected the system and went back to my office to run some queries against the table. The first query was to verify that I had a group of readings, separated by about 5 seconds each.
Which produced the following records:
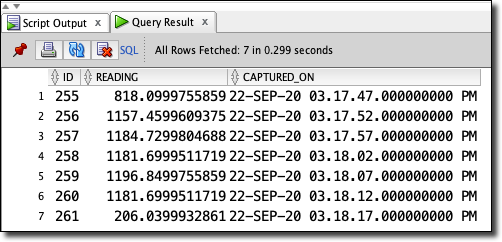
Cool. Exactly what I expected and it looks like when the hose is running at “full strength” we’re getting around 1100 mL every 5 seconds. Next, I wanted to aggregate the data into the total mL run in the session, and then convert that value to gallons.
Which gave me:
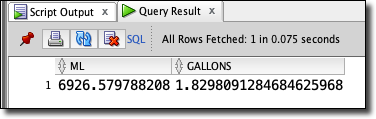
Just about 2 gallons - pretty much what I expected!
TL;DR
In this (slightly longer than normal) blog post, we talked about the inspiration for this project and then built out a simple system to track water usage using a flow sensor and a NodeMCU ESP8266 board that persisted data to an Autonomous DB instance via a Node backend hosted on a VM in the Oracle Cloud. The same concept can easily be applied for any sensor you might want to use, so try to modify this project and persist your sensor data in the cloud. You could also build a front-end which charts the data and adds search functionality. The possibilities are endless!
The full code for this project can be found on GitHub.
Photo by Harry Grout on Unsplash
Related Posts

Querying Autonomous Database from an Oracle Function (The Quick, Easy & Completely Secure Way)
I've written many blog posts about connecting to an Autonomous DB instance in the past. Best practices evolve as tools, services, and frameworks become...

Brain to the Cloud - Part III - Examining the Relationship Between Brain Activity and Video Game Performance
In my last post, we looked at the technical aspects of my Brain to the Cloud project including much of the code that was used to collect and analyze the...

Brain to the Cloud - Part II - How I Uploaded My Brain to the Cloud
In my last post, we went over the inspiration, objectives, and architecture for my Brain to the Cloud project. In this post, we'll look in-depth at the...