Creating An ATP Instance With The OCI Service Broker
Posted By: Todd Sharp on 6/10/2019 1:03 GMT
Tagged: Cloud, Containers, Microservices, APIs, DevOps, Open Source
We recently announced the release of the OCI Service Broker for Kubernetes, an implementation of the Open Service Broker API that streamlines the process of provisioning and binding to services that your cloud native applications depend on.
The Kubernetes documentation lays out the following use case for the Service Catalog API:
An application developer wants to use message queuing as part of their application running in a Kubernetes cluster. However, they do not want to deal with the overhead of setting such a service up and administering it themselves. Fortunately, there is a cloud provider that offers message queuing as a managed service through its service broker.
A cluster operator can setup Service Catalog and use it to communicate with the cloud provider’s service broker to provision an instance of the message queuing service and make it available to the application within the Kubernetes cluster. The application developer therefore does not need to be concerned with the implementation details or management of the message queue. The application can simply use it as a service.
Put simply, the Service Catalog API lets you manage services within Kubernetes that are not be deployed within Kubernetes. Things like messaging queues, object storage and databases can be deployed with a set of Kubernetes configuration files without needing knowledge of the underlying API or tools used to create those instances thus simplifying the deployment and making it portable to virtually any Kubernetes cluster.
The current OCI Service Broker adapters that are available at this time include:
- Autonomous Transaction Processing (ATP)
- Autonomous Data Warehouse (ADW)
- Object Storage
- Streaming
I won't go into too much detail in this post about the feature, as the introduction post and GitHub documentation do a great job of explaining service brokers and the problems that they solve. Rather, I'll focus on using the OCI Service Broker to provision an ATP instance and deploy a container which has access to the ATP credentials and wallet.
To get started, you'll first have to follow the installation instructions on GitHub. At a high level, the process involves:
- Deploy the Kubernetes Service Catalog client to the OKE cluster
- Install the
svcatCLI tool - Deploy the OCI Service Broker
- Create a Kubernetes Secret containing OCI credentials
- Configure Service Broker with TLS
- Configure RBAC (Role Based Access Control) permissions
- Register the OCI Service Broker
Once you've installed and registered the service broker, you're ready to use the ATP service plan to provision an ATP instance. I'll go into details below, but the overview of the process looks like so:
- Create a Kubernetes secret with a new admin and wallet password (in JSON format)
- Create a YAML configuration for the ATP Service Instance
- Deploy the Service Instance
- Create a YAML config for the ATP Service Binding
- Deploy the Service Binding to obtain which results in the creation of a new Kubernetes secret containing the wallet contents
- Create a Kubernetes secret for Microservice deployment use containing the admin password and the wallet password (in plain text format)
- Create a YAML config for the Microservice deployment which uses an initContainer to decode the wallet secrets (due to a bug which double encodes them) and mounts the wallet contents as a volume
Following that overview, let's take a look at a detailed example. The first thing we'll have to do is make sure that the user we're using with the OCI Service Broker has the proper permissions. If you're using a user that is a member of the group devops then you would make sure that you have a policy in place that looks like this:
Allow group devops to manage autonomous-database in compartment [COMPARTMENT_NAME]The next step is to create a secret that will be used to set some passwords during ATP instance creation. Create a file called atp-secret.yaml and populate it similarly to the example below. The values for password and walletPassword must be in the format of a JSON object as shown in the comments inline below, and must be base64 encoded. You can use an online tool for the base64 encoding, or use the command line if you're on a Unix system (echo '{"password":"Passw0rd123456"}' | base64).
Now create the secret via: kubectl create -f app-secret.yaml.
Next, create a file called atp-instance.yaml and populate as follows (updating the name, compartmentId, dbName, cpuCount, storageSizeTBs, licenseType as necessary). The paremeters are detailed in the full documentation (link below). Note, we're referring to the previously created secret in this YAML file.
Create the instance with: kubectl create -f atp-instance.yaml. This will take a bit of time, but in about 15 minutes or less your instance will be up and running. You can check the status via the OCI console UI, or with the command: svcat get instances which will return a status of "ready" when the instance has been provisioned.
Now that the instance has been provisioned, we can create a binding. Create a file called atp-binding.yaml and populate it as such:
Note that we're once again using a value from the initial secret that we created in step 1. Apply the binding with: kubectl create -f atp-binding.yaml and check the binding status with svcat get bindings, looking again for a status of "ready". Once it's ready, you'll be able to view the secret that was created by the binding via: kubectl get secrets atp-demo-binding -o yaml where the secret name matches the 'name' value used in atp-binding.yaml. The secret will look similar to the following output:
This secret contains the contents of your ATP instance wallet and next we'll mount these as a volume inside of the application deployment. Let's create a final YAML file called atp-demo.yaml and populate it like below. Note, there is currently a bug in the service broker that double encodes the secrets, so it's currently necessary to use an initContainer to get the values properly decoded.
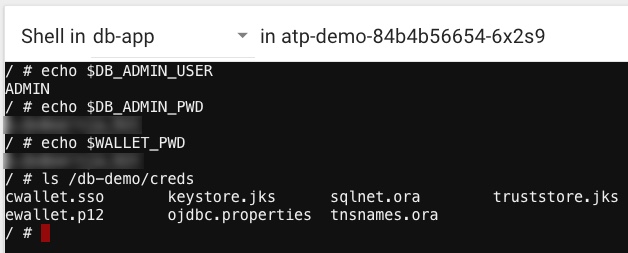
Here we're just creating a basic alpine linux instance just to test the service instance. Your application deployment would use a Docker image with your application, but the format and premise would be nearly identical to this. Create the deployment with kubectl create -f atp-demo.yaml and once the pod is in a "ready" state we can launch a terminal and test things out a bit:
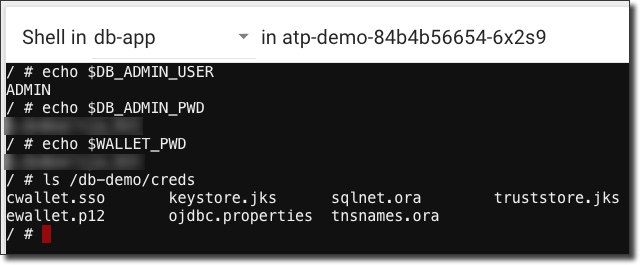
Note that we have 3 environment variables available in the instance: DB_ADMIN_USER, DB_ADMIN_PWD and WALLET_PWD. We also have a volume available at /db-demo/creds containing all of our wallet contents that we need to make a connection to the new ATP instance.
Check out the full instructions for more information or background on the ATP service broker. The ability to bind to an existing ATP instance is scheduled as an enhancement to the service broker in the near future, and some other exciting features are planned.
Related Posts

Querying Autonomous Database from an Oracle Function (The Quick, Easy & Completely Secure Way)
I've written many blog posts about connecting to an Autonomous DB instance in the past. Best practices evolve as tools, services, and frameworks become...

Brain to the Cloud - Part III - Examining the Relationship Between Brain Activity and Video Game Performance
In my last post, we looked at the technical aspects of my Brain to the Cloud project including much of the code that was used to collect and analyze the...

Brain to the Cloud - Part II - How I Uploaded My Brain to the Cloud
In my last post, we went over the inspiration, objectives, and architecture for my Brain to the Cloud project. In this post, we'll look in-depth at the...