Brain to the Cloud - Part II - How I Uploaded My Brain to the Cloud
Posted By: Todd Sharp on 3/15/2022 6:00 GMT
Tagged: Arduino, Brain to the Cloud, Cloud, Java, Micronaut

In my last post, we went over the inspiration, objectives, and architecture for my Brain to the Cloud project. In this post, we'll look in-depth at the code that was used to capture, upload, and visualize my brain activity.
- Video Overview
- Uploading My Brain to the Cloud
- Building the Micronaut Application
- Collecting the Data
- Analyzing the Data
- Summary
Video Overview
If you would to watch like a more entertaining, but slightly less technical version of this blog post, check out the following YouTube video. But, be sure to read the rest of the post, as there is much more info here than in the video!
Uploading My Brain to the Cloud
Once I hacked the Mind Flex hardware, I needed to upload some code to the ESP board to capture the brain data and upload it to the cloud via an MQTT topic. The blog post that served as my initial inspiration provided the base code necessary to capture the Mind Flex data. I just needed to modify the code to connect to WiFi, serialize the data into a JSON object, and publish the data to the MQTT topic. You can view the entire sketch on GitHub, but let's quickly go over the important bits. First, we need to define an EspMQTTClient:
Next, in the loop() method, I updated the mqttClient, and check the Mind Flex for new brain data. If it exists, I serialize it into a JSON object and publish it to the MQTT topic via the mqttClient if it's been more than 5 seconds since I last published data.
That's essentially the extent of the Arduino sketch. The rest of the sketch involved connecting to WiFi and blinking LEDs, so there's not much else to it.
Building the Micronaut Application
For my cloud application, I chose the Micronaut Java framework. Micronaut is primarily a cloud-based, microservice framework. But it also includes support for rendering front-end views. My presentation tier isn't complex, so I decided to take a monolithic approach and include the presentation tier in the same application as the back-end API. I'll keep this post more high-level since I've already blogged about many of these features. Still, at the risk of being redundant, I'll mention a few of the highlights here and link to sources for further reading if you are interested in learning more about any specific features.
Persistence Tier and Automatic Autonomous Database Wallets
As you might imagine, the cloud application involved quite a bit of database activity. The obvious choice was Micronaut Data. It handles creating the database connection and even writes basic CRUD queries. Since I don't have to focus on boilerplate, I can instead focus on the business logic, advanced query logic, and presentation tier instead of writing boilerplate SQL for persistence and basic data retrieval. In a nutshell, Micronaut Data will configure a connection based on the configuration that you provide and implement your persistence repositories based on your mapped domain entities. To make life even easier, I reached for Project Lombok, which meant that I only needed to create domain classes with simple properties. I'd get full CRUD support at runtime, thanks to Micronaut's compile-time implementations. I also relied on Micronaut Data's ability to automatically download my Autonomous DB wallet (used for TLS connections to my database) so that I didn't have to worry about downloading the wallet myself and storing it on the VM where I deployed the application. How about an example?
The first step is to include the required dependencies. I'll skip over that in this post because I would rather keep things high-level (refer to the docs). Once the dependencies are in place, I need to provide my configuration info in the application.yml config file.
To download my wallet, Micronaut needs the ocid and walletPassword. Once those are in place, Micronaut can use the Oracle Cloud Infrastructure (OCI) Java SDK to retrieve the wallet, store it safely in memory, and use it for my database connection. I also provided the credentials necessary to make a secure connection. You might be wondering why I've used the $ syntax in my configuration files, and if so, I applaud you for your astute observation! Micronaut will substitute these values at runtime with the proper values based on the values that are stored securely in an OCI Vault. But I'm getting ahead of myself as we'll look at how that works in the next section. To complete my persistence tier, I needed to define my entities. Here's what the Game entity looks like - and I've simplified it somewhat for brevity by removing a few properties, but I have not changed anything necessary for persistence.
Let's talk briefly about a few noteworthy things in the above class. The class is annotated with @Entity to tell Micronaut it needs to manage this class. The other annotations are Lombok annotations that will handle generating the necessary getters and setters and necessary methods like equals() and hashCode(). The ID property is annotated @Id, and the match column stores the JSON response from the Call of Duty API. The createdOn property stores a timestamp. The entity is now defined, so the next step is to create a repository.
That's all the necessary code to get full CRUD at runtime in the application. I've defined additional methods in my repository for various queries and reports in my application, and we'll look at those later. But for basic CRUD, the job here is done. The repository is ready to be injected into services and controllers.
OCI Vault Secrets
As promised above, let's take a quick look at how I kept all of my credentials secure in my application. I've blogged on this topic before, so check out that post for further reference, but let's take a quick look at the feature in this post just as a refresher. I used the Micronaut Oracle Cloud integration module, which enabled me to store my credentials in a (free) OCI Vault and download a decrypted version of the credentials at runtime. The first step I had to perform was to create a vault and set the values of my credentials into individual secrets in that vault. Next, I had to make a new configuration file called bootstrap.yml in the /src/main/resources directory and set the vault and compartment OCID values into that config file.
The above configuration was for my local development environment. Note that the VAULT_OCID and VAULT_COMPARTMENT_OCID are the only values passed into the application at runtime. They certainly could have been hardcoded, but I felt better about externalizing all of the configuration values, so I chose to pass them in. Also, note that since I've got the OCI CLI configured locally, I am using my CLI config file to authenticate the SDK by passing in the path-to-config and setting use-instance-principal to false. But since my cloud VM can use instance principal authentication, I created a cloud-specific config file named bootstrap-oraclecloud.yml that is picked up in that environment. That config file looks like this:
That's all the necessary configuration for the application. Now, any secrets in the specified vault will be retrieved and injected into properties that exactly match the name of the vault secret. Easy, yet secure! What is better than that?
HTTPS Support via Micronaut ACME
ACME support is a feature that I don't believe I've ever covered in the past on my blog. I wanted to use TLS (HTTPS) for my web-based application, so I reached for the Micronaut ACME module. To generate a valid TLS cert, you must first create a keypair and create an account with an ACME provider. There are helpful CLI commands (mn create-key and mn create-acme-account) that we can use to generate the keys and account. Once you've created the keys and account, it's a matter of plugging the proper values into your Micronaut config (via application.yml). A valid TLS certificate will be generated (and automatically renewed when appropriate) for you.
Secured Endpoints
I wanted to keep specific endpoints and actions restricted to a logged-in user, so it was necessary to implement a login system. Once again, Micronaut has a module for that - Micronaut Security. Since the application was monolithic, I chose to use session-based security. Session-based security gave me the ability to annotate specific controllers and endpoints to restrict with @Secured(SecurityRule.IS_AUTHENTICATED) or allow with @Secured(SecurityRule.IS_ANONYMOUS). I could also specify rules for static endpoints like scripts and images via my application.yml config file. Check out the module documentation or my code on GitHub for more info.
Consuming an MQTT Topic and Broadcasting Brain Data via WebSockets
As mentioned above, the Mind Flex published my brain data on an MQTT topic. To persist that brain data into Autonomous DB and broadcast the data to the front-end for live demo purposes, it was necessary to consume the MQTT topic. I accomplished this via a Micronaut module and core framework support. This time, I used the Micronaut MQTT module and the built-in WebSocket support.
Need an MQTT Server? Good news - I've blogged about launching your own (free) MQTT server in the cloud using either RabbitMQ or Mosquitto. Of course, there are other options, but those two are free and not difficult to get started with.
Since one of the central themes of this blog post is gaming, let's do a speed run for this section. First - dependencies (not shown, refer to docs) and config:
Next, a consumer annotated @MqttSubscriber. Notice the injection of a BrainRepository so that I can persist the reading, and a class called WebSocketBroadcaster which is available when WebSockets are enabled via a class annotated with @ServerWebSocket. The application used the WebSocket to broadcast the brain reading data to the front-end for live demos.
Done.
Collecting the Data
Now, I know what you're thinking. Indeed, this project required a very grueling, demanding, and time-consuming data collection effort. And - you're right. At least, that's what I told my wife as I the next month playing Call of Duty with the Mind Flex strapped to my head.
But seriously, I knew that I had to collect a lot of data to have a proper sample size to analyze the data correctly. So I spent about a month playing Call of Duty while wearing the device and uploading my brain activity to the cloud. Once I hit the 20-hour mark, I figured I had collected enough data to establish some patterns and prevent anomalies from tainting the results. I'm still not sure there's enough data to draw proper conclusions, but I noticed trends started to reveal themselves, so I wasn't sure that additional data would change the underlying results. So, what did the data show?
Analyzing the Data
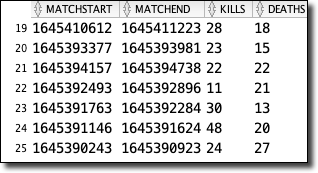
To analyze the data, I needed to construct some SQL queries. To properly examine the data, I would need to "normalize" the JSON-based game data to perform aggregations on it. What do I mean by that? Well, consider my game table used to store individual game results from the Call of Duty API. A basic "select *" query on that table would look like so:
This query would produce a result that looked like this:

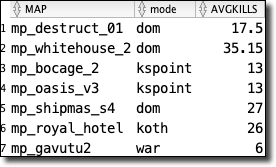
As you can see, the match column contains a JSON object. I like this. I'm OK with this. Since I don't have control over the third-party API, I want to remain flexible and not manually manage the schema every time the API changes. That would be a nightmare, and I don't like such headaches in my applications. So then, how can I query the individual values within the JSON object? By using "dot" notation, I can access the values. Consider the following:
Which gives me results that feel very familiar. I can go as "deep" as I need to (notice the embedded object playerStats inside the JSON object), and if I pass a key that doesn't exist in a given structure, I get a null value instead of an exception. That's one of the keys to remaining flexible with the data schema.
Since I would need to perform joins and many aggregations on this data ultimately, I settled on a materialized view that would make the game data "feel" like it was relational and would be updated any time the underlying game table changed. Here's how I did that:
The materialized view makes my aggregation queries much cleaner (instead of using "dot" notation for every element in the JSON object).
For other reports, I created an additional materialized view that joined the game data with the collected brain records where the brain record timestamp was between the game start and end time. If you're interested in that view definition, check it out here.
Faking Parameterized Views
While constructing additional views to analyze and report on the collected data, I found several views that shared a significant amount of SQL code but varied in how they grouped the resulting data. I quickly grew annoyed at updating each view every time I wanted to add or change a column, but I knew that Oracle DB does not support parameterized views, so I reached out to my boss and mentor, Gerald Venzl, with my issue. As with any matter of SQL, Gerald was quick to suggest a great workaround - SQL macros! Consider the following view definitions and note how they are nearly identical, except for the column used to group the data.
As always, when you simplify and reduce redundancies, your code becomes more manageable. In this instance, the answer was to create a SQL macro that allowed me to pass in the factor that I wanted to evaluate and query that column as needed.
To call the macro, we treat it like a function that returns a result set:
Which produces the expected data.
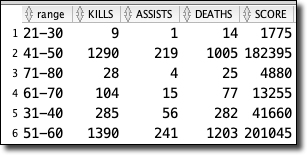
Quite lovely, indeed!
Querying the SQL Views from Micronaut
Since I relied heavily on views and materialized views on the SQL side of things, adding the proper queries to my Micronaut repositories was relatively easy to do. For example, to get a list of game details for games that had associated brain records, I defined a method signature in my repository interface that would return a paged result of DTO projections and annotated the signature with @Query and passed in the native SQL to execute for this method.
And that's it. I can call the necessary repository method at runtime and get my results. The simplicity of Micronaut Data keeps my repository clean and easy to maintain.
Summary
In this post, we took a detailed look at the code that was used to upload my brain activity to the cloud and produce the reports necessary to visualize and analyze the data. In the next post, we'll wrap things up with an in-depth analysis of the data, to finally answer the questions posed by the project. If you'd like to learn more about this project, check out the project site at https://bttc.toddrsharp.com.
Related Posts

Querying Autonomous Database from an Oracle Function (The Quick, Easy & Completely Secure Way)
I've written many blog posts about connecting to an Autonomous DB instance in the past. Best practices evolve as tools, services, and frameworks become...
Sending Email With OCI Email Delivery From Micronaut
Email delivery is a critical function of most web applications in the world today. I've managed an email server in the past - and trust me - it's not fun...

Brain to the Cloud - Part III - Examining the Relationship Between Brain Activity and Video Game Performance
In my last post, we looked at the technical aspects of my Brain to the Cloud project including much of the code that was used to collect and analyze the...