Microservices From Dev To Deploy, Part 3: Local Deployment & The Angular UI
Posted By: Todd Sharp on 10/9/2018 3:28 GMT
Tagged: APIs, Containers, Microservices, APIs, DevOps, Developers, Java, JavaScript, JavaScript, Open Source, Open Source

In this series, we're taking a look at how microservice applications are built. In part 1 we learned about the new open source framework from Oracle called Helidon and learned how it can be used with both Java and Groovy in either a functional, reactive style or a more traditional Microprofile manner. Part 2 acknowledged that some dev teams have different strengths and preferences and that one team in our fictional scenario used NodeJS with the ExpressJS framework to develop their microservice. Yet another team in the scenario chose to use Fn, another awesome Oracle open source technology to add serverless to the application architecture. Here is an architecture diagram to help you better visualize the overall picture:
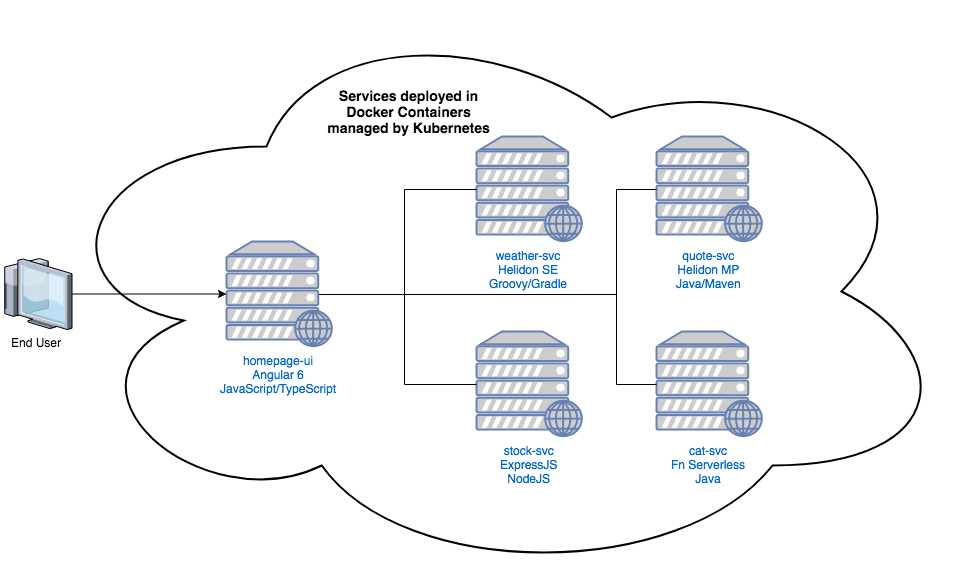
It may be a contrived and silly scenario, but I think it properly represents the diversity of skills and preferences that are the true reality of many teams that are building software today. Our ultimate path in this journey is how all of the divergent pieces of this application come together in a deployment on the Oracle Cloud and we're nearly at that point. But before we get there, let's take a look at how all of these backend services that have been developed come together in a unified frontend.
Before we get started, if you're playing along at home you might want to first make sure you have access to a local Kubernetes cluster. For testing purposes, I've built my own cluster using a few Raspberry Pi's (following the instructions here), but you can get a local testing environment up and running with minikube pretty quickly. Don't forget to install kubectl, you'll need the command line tools to work with the cluster that you set up.
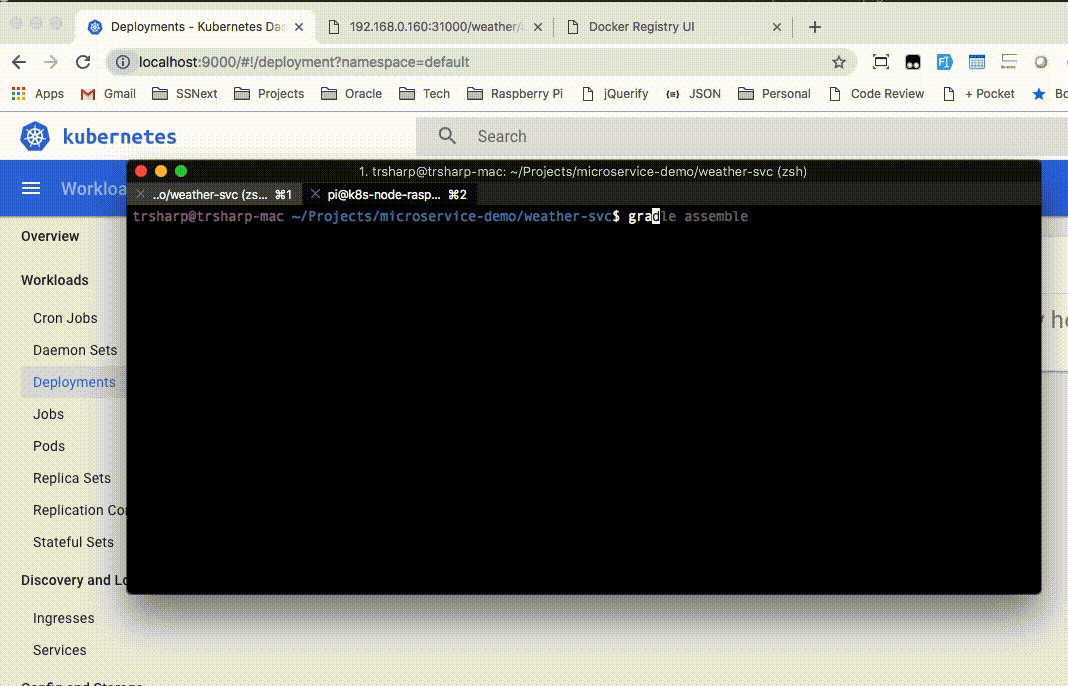
With the environment set up, let's revisit Chris' team who you might recall from part 1 have built out a weather service backend using Groovy with Helidon SE. The Gradle 'assemble' task gives them their JAR file for deployment, but Helidon also includes a few other handy features: a docker build file and a Kubernetes yaml template to speed up deploying to a K8S cluster. When you use the Maven archetype (as Michiko's team did in part 1) the files are automatically copied to the 'target' directory along with the JAR, but since Chris' team is using Groovy with Gradle, they had to make a slight modification to the build script to copy the templates and slightly modify the paths within them. The build.gradle script they used now includes the following tasks:
task copyDocker(type:Copy) {
    from "src/main/docker"
    into "build"
    doLast {
        def d = new File( 'build/Dockerfile' )
        def dfile = d.text.replaceAll('\\$\\{project.artifactId\\}', project.name)
        dfile = dfile.replaceAll("COPY ${project.name}", "COPY libs/${project.name}")
        d.write(dfile)
    }
}
task copyK8s(type:Copy) {
    from "src/main/k8s"
    into "build"
    doLast {
        def a = new File( 'build/app.yaml' )
        def afile = a.text.replaceAll('\\$\\{project.artifactId\\}', project.name)
        a.write(afile)
    }
}

copyLibs.dependsOn jar
copyDocker.dependsOn jar
copyK8s.dependsOn jar
assemble.dependsOn copyLibs
assemble.dependsOn copyDocker
assemble.dependsOn copyK8s
So now, when Chris' team performs a local build they receive a fully functional Dockerfile and app.yaml file to help them quickly package the service into a Docker container and deploy that container to a Kubernetes cluster. The process now becomes:
- Write Code
- Test Code
- Build JAR (gradle assemble)
- Build Docker Container (docker build / docker tag)
- Push To Docker Registry (docker push)
- Create Kubernetes Deployment (kubectl create)
Which, if condensed into a quick screencast, looks something like this:
When the process is repeated for the rest of the backend services the frontend team led by Ava are now are able to integrate the backend services into the Angular 6 frontend that they have been working on. They start by specifying the deployed backend base URLs in their environment.ts file. Angular uses this file to provide a flexible way to manage global application variables that have different values per environment. For example, an environment.prod.ts file can have it's own set of production specific values that will be substituted when a `ng build --prod` is performed. The default environment.ts is used if no environment is specified so the team uses that file for development and have set it up with the following values:
export const environment = {
  production: false,
  stockApiBaseUrl: 'http://192.168.0.160:31002',
  weatherApiBaseUrl: 'http://192.168.0.160:31000',
  quoteApiBaseUrl: 'http://192.168.0.160:31001',
  catApiBaseUrl: 'http://localhost:31004',
};
The team then creates services corresponding to each microservice. Here's the weather.service.ts:
import {Injectable} from '@angular/core';
import {HttpClient} from '@angular/common/http';
import {environment} from '../../environments/environment';

@Injectable({
  providedIn: 'root'
})
export class WeatherService {

  private baseUrl: string = environment.weatherApiBaseUrl;

  constructor(
    private http: HttpClient,
  ) { }

  getWeatherByCoords(coordinates) {
    return this.http
      .get(`${this.baseUrl}/weather/current/lat/${coordinates.lat}/lon/${coordinates.lon}`);
  }
}
And call the services from the view component.
getWeather() {
  this.weather = null;
  this.weatherLoading = true;

  this.locationService.getLocation().subscribe((result) => {
    const response: any = result;
    const loc: Array<string> = response.loc.split(',');
    const lat: string = loc[0];
    const long: string = loc[1];
    console.log(loc)
    this.weatherService.getWeatherByCoords({lat: lat, lon: long})
      .subscribe(
        (weather) => {
          this.weather = weather;
        },
        (error) => {},
        () => {
          this.weatherLoading = false;
        }
      );
  });
}
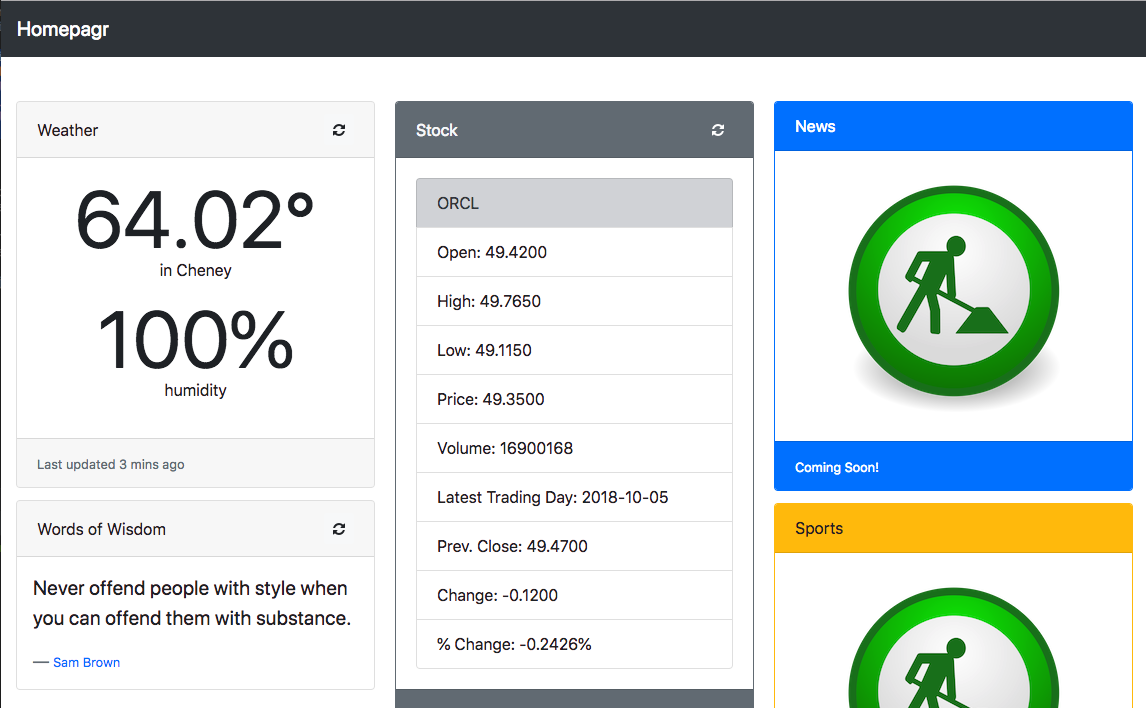
Once they've completed this for all of the services, the corporate vision of a throwback homepage is starting to look like a reality:
In three posts we've followed TechCorp's journey to developing an internet homepage application from idea, to backend service creation and onto integrating the backend with a modern JavaScript based frontend built with Angular 6. In the next post of this series we will see how this technologically diverse application can be deployed to Oracle's Cloud.
Related Posts

Querying Autonomous Database from an Oracle Function (The Quick, Easy & Completely Secure Way)
I've written many blog posts about connecting to an Autonomous DB instance in the past. Best practices evolve as tools, services, and frameworks become...

Sending Email With OCI Email Delivery From Micronaut
Email delivery is a critical function of most web applications in the world today. I've managed an email server in the past - and trust me - it's not fun...

Brain to the Cloud - Part III - Examining the Relationship Between Brain Activity and Video Game Performance
In my last post, we looked at the technical aspects of my Brain to the Cloud project including much of the code that was used to collect and analyze the...