Back To The Database - Part 3: Publishing Database Changes To A Stream
Posted By: Todd Sharp on 3/19/2020 11:00 GMT
Tagged: Cloud, Containers, Microservices, APIs, Database
In the last post, we talked at great length about consuming a stream in your Autonomous DB instance and using the messages in that stream to insert, update and delete records in a table in your DB. I highly suggest you read that post first if you haven’t read it yet, as we’ll build quite a bit on the foundation that we laid in that post.
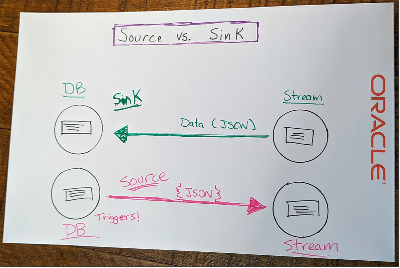
Now that you’re all caught up, let’s talk about the other part of this amazing drawing of mine - the “source” side. Meaning, we’ll publish the changes from a table in our DB to a stream that can be consumed by another service in our architecture.
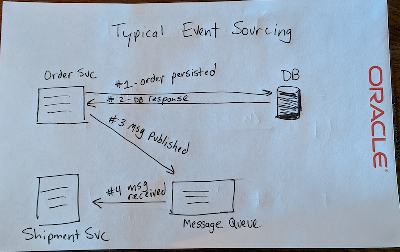
When would you want to do this? Quite often it turns out! Imagine you run an e-commerce site. You can easily imagine that you’d have a number of different services on the backend - two of which might be an “order” service and a “shipment” service. When a new record is inserted into your order table, your shipment service probably needs to know about that. This is often referred to as “event sourcing” in the microservice world, but it’s certainly not exclusive to microservices (Chris Richardson has a good article about event sourcing that you should check out). Any system that has proper separation of concerns will need a way to communicate changes when more than one piece of the architecture has a need to know. Here’s a diagram of how this is typically accomplished:
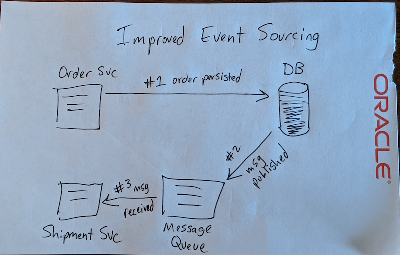
Following the theme of this series, we’re going to improve this design by using the database to capture any changes to our table and broadcast them to a stream using Oracle Streaming Service with the DBMS_CLOUD package. Instead of our order service broadcasting the change to our message queue, we’ll eliminate a potential point of failure and simplify our architecture by letting the DB announce the changes itself. Here’s another horribly drawn representation of this improved flow:
If you read my last post, the concept of using the DB to interact with our cloud based stream should be somewhat familiar by now. If you are new to working with RDBMS you may be asking yourself how we will be able to capture the changes. We’ll accomplish that by using triggers!
What Are Triggers?
Again, my apologies to the vets among the crowd, but since I want to make sure that those who may be new to working with RDBMS are up to speed, I’d like to take a minute to define what a trigger is. Feel free to skip to the next section if you’re familiar with triggers. Now, our documentation does a very thorough job of explaining them, but let me break it down a bit more.
A trigger is somewhat similar to a stored procedure, in that it can be stored in the database and invoked repeatedly. They differ from stored procedures because you can enable or disable them. Also, you can’t manually invoke them. When a trigger is enabled, it fires automatically. You can define a trigger on many items in the database - a table, view or even the database itself. For our use case, we’ll define it on our table which means it’s a DML trigger.
Whoa...there's a potentially new term: DML...
DML is an abbreviation that stands for Data Manipulation Language. It’s used to refer to objects that can be manipulated or statements that access, modify or retrieve data. INSERT statements, UPDATE statements, DELETEs - these are all examples of DML. DDL stands for Data Definition Language and is used to refer to statements that define or create objects in the database. CREATE or ALTER statements, for example.
When creating your trigger, you can define the time period in the transaction life cycle that you want the trigger to fire (BEFORE or AFTER), the context of that life cycle (ROW or STATEMENT) and the type(s) of transaction that you are listening for (INSERT, UPDATE [potentially limited to a specific column or columns], DELETE). You can combine timing points, contexts and types to create what is called a compound DML trigger. The docs have a really good example of a simple trigger that combines these concepts into an easy to understand the statement.
In the statement above we define the trigger named t that will fire BEFORE a row has an INSERT or when an UPDATE statement affects the salary or department_id columns or a row has a DELETE occur. The action is passed to the body using the constants INSERTING, UPDATING and DELETING so we can determine the type of transaction that is occurring and we can take the appropriate action.
One final thing to know for now about triggers is that there is are two special variables (NEW and OLD) referred to as pseudo records that are available inside of the trigger body. These can be used to grab the values of the row-level changes both before and after the trigger is fired. You’ll see that these are crucial to our use case below.
Create A Stream
Before we create our trigger, we’ll need a new stream to work with. Here’s a quick walkthrough on how to do that.
This time create a stream called ‘atp-oss-source’, grab the OCID and the region in which you created it and keep those bits handy for later on.
Creating A Trigger To Publish Changes To A Stream
Now that you’re up to speed on what triggers are and how you create them, let’s look at creating a trigger that will publish inserts, updates and deletes to a new table that we will create. What table? Glad you asked! Let’s create that now:
Just a very simple table - nothing special here. We’re going to create the trigger in just a second, but first we need to make sure that we have a credential created in our database for use with DBMS_CLOUD. If you followed along with the last post, you should be good to go. If you skipped that one, here’s a reminder:
We create the credential by calling the CREATE_CREDENTIAL function in the DBMS_CLOUD package! If you’ve got the OCI CLI installed, you’ll know where to get these values. If not, stop what you’re doing and install it now!
Excellent. Let’s create that trigger!
Let’s break it down. We’re creating a trigger that will fire AFTER each ROW INSERT, UPDATE & DELETE. We’re declaring two variables that you’ll need to populate - the region and stream_id (remember above when I said you would need those!) and several other variables that we’ll use as we populate the body of the trigger where we’ll take our action(s). In the body (right after BEGIN) the first thing we do is check the constants to determine which action has triggered this invocation and set a string value accordingly (we’ll pass this in our JSON event to the stream later on).
The next step is to craft our JSON message containing the data that was mutated and publish that message up to our stream. A few things below might seem a bit tricky, so let me explain first. The REST endpoint expects a JSON object containing the PutMessageDetails request. Also note that the “value” for each message must be a Base64 encoded byte array. Finally, take a look at the documentation for DBMS_CLOUD.SEND_REQUEST which shows that the body of the request needs to be encoded as RAW. That sounds like a lot of weird layers to the request, but it’s not difficult to achieve the necessary format with a few function calls.
Let’s move on to populating the body of the trigger. The end goal of this is to POST a PutMessageDetails request to the stream that follows this format:
To do this, we’ll create a JSON_OBJECT that has a JSON_ARRAY of messages. Within each message we will indicate the type of transaction (our transaction_type variable that we populated already) and include an ‘oldObj’ which shows the previous state of the record before mutation and a ’newObj’ which shows the new state. We’ll use the pseudo records OLD and NEW to populate the states respectively. Publishing these messages will give our downstream subscribing services the ability to know when a dependent object changes and understand exactly what about it changed.
The only thing left to do is publish the message to the REST endpoint and close the connection.
And just to be thorough, here’s the entire trigger definition:
At this point, you can run a few queries to insert, update and delete data:
Then hop over to your stream in the console dashboard and click ‘Load Messages’. If you ran the three statements above, you’d see three messages:
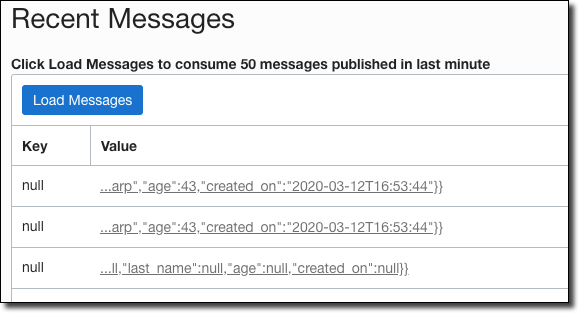
Hover your mouse over the value to view details. I’ll paste the three individual messages below so you can see what each look like:
Insert:
Update:
Delete:
Summary
To wrap up this series, I hope that these last few posts have challenged you to reconsider the power and flexibility of the good old RDBMS. We’ve moved so much of our business logic out of the DB and into our application layer that we’ve forgotten about the power and flexibility available to us. On top of that, the RDBMS - especially Oracle/Autonomous DB has grown up quite a bit over the past few years. As you can see, it’s easy to interact with cloud APIs directly from your DB code. And we haven’t even begun to look at the enhancements related to storing JSON documents and collections directly in the relational DB which brings an entirely new and extremely powerful new tool to our services. If you have any questions, please feel free to leave them below or contact me on Twitter or YouTube. If you’re interested in seeing more content like this, please let me know!
Jeremy Thompson from United States of America / CC BY
Edit me...
Related Posts

Querying Autonomous Database from an Oracle Function (The Quick, Easy & Completely Secure Way)
I've written many blog posts about connecting to an Autonomous DB instance in the past. Best practices evolve as tools, services, and frameworks become...

Brain to the Cloud - Part III - Examining the Relationship Between Brain Activity and Video Game Performance
In my last post, we looked at the technical aspects of my Brain to the Cloud project including much of the code that was used to collect and analyze the...

Brain to the Cloud - Part II - How I Uploaded My Brain to the Cloud
In my last post, we went over the inspiration, objectives, and architecture for my Brain to the Cloud project. In this post, we'll look in-depth at the...