Cloud Cost Cutting: Autoscaling Your Dev/QA Environments
Posted By: Todd Sharp on 6/23/2020 4:25 GMT
Tagged: Cloud

I've worked on many software projects over the last 16 years, and one thing that each of those projects had in common was the existence of an environment used exclusively for demos or testing. You can call it whatever you like: dev, demo, test, QA (you might even have more than one) but the fact is that you likely have environments in the cloud that exist outside of production for testing or demo purposes. This makes sense, but paying for them to be up and running outside of the hours that you need them up and running does not. In this post, I want to show you several options for scaling your environments with tools available in the Oracle Cloud as well as one option that is a bit more flexible and works outside of the Oracle Cloud.
Before we dig in, you may be asking yourself why this post and why now? Those are both valid questions, so let me answer them quickly.
Why Autoscale?
You're no doubt familiar with the concept of autoscaling, and it's certainly not new on the Oracle Cloud. Your workloads (both VM and DB) can easily scale based on metrics/demand. We're not going to look at metrics based autoscaling today, rather we're going to look at schedule-based autoscaling since this is a brand new service enhancement that was just recently released. You might have seen the blog post announcing it recently or even caught it on Twitter (like my buddy Guillermo's feed, which you should totally follow if you don't already). The official docs are super helpful and you should read up on them later on, but I'll show you everything you need to get started today in this post.
Why Now?
Well, why not? But truthfully, the reason I was motivated to dig into this topic and write this blog post was the other recent announcement: per-second billing for compute and autonomous DB. Like I said earlier, why pay to run a QA server when no one is working on it? Will there be exceptions? Sure, absolutely. And you can deal with those as needed, but generally, you will likely have a set schedule that you need your QA instances up and running, and paying for them to run outside that window is spending money that could likely be used on better things for your project or team.
Are you crazy? Possibly, but I don't see what that has to do with this blog post. Look, I'm a developer advocate - which means I advocate for developers. And helping them save money is one of the ways I can do that.
Schedule Based Autoscaling
Let's get to it. Say you have an instance that runs your shiny microservice. Doesn't matter what it is, but you want it to be available between 8 AM and 5 PM Eastern Time. This service runs on a compute VM in the Oracle Cloud. Let's look at how to set up a schedule based autoscale for our hypothetical VM based service. Here's an outline of the steps we'll need to take:
- Create a VM and configure microservice
- Create a custom image from the configured VM
- Create an instance based on the custom image
- Create an instance configuration from the VM running the custom image
- Create an instance pool based on the instance configuration
- Create an autoscaling configuration based on the instance pool
I know that sounds like a lot of steps, but I promise it won't take long to complete the process. There is plenty written on this blog about steps one and two, so we'll start with step 3 to keep things brief.
Create An Instance Based On The Custom Image
If you're new to creating custom images, here's a quick primer:
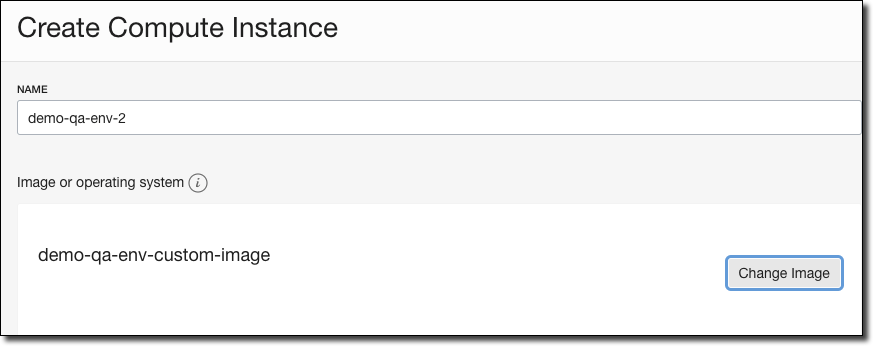
Remember that custom images are essentially a deep copy of the instance that was used to create it. Any software that was installed on the original VM will be installed on the instance created from the custom image. That includes our microservice. So, assuming that we created a custom image called "demo-qa-env-custom-image" from our demo-qa-env VM, create a new VM based on that image.
Create An Instance Configuration From The VM Running The Custom Image
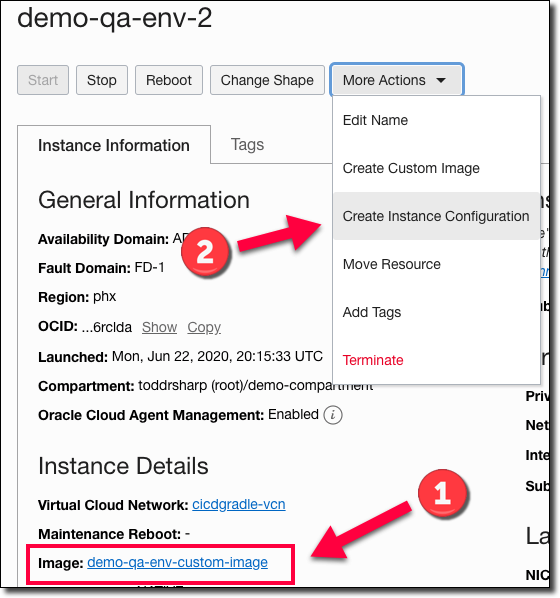
When the new VM is created (confirm the source custom image as shown in #1 below), click 'More Actions' and select 'Create Instance Configuration' (#2).
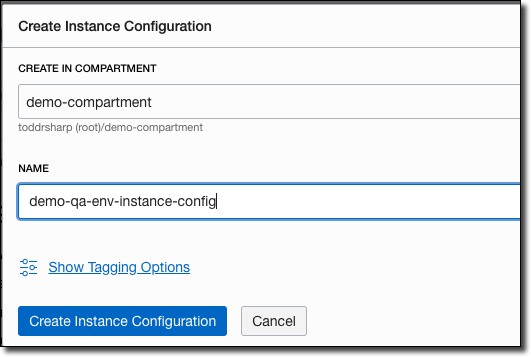
Name your Instance Configuration and click 'Create'.
Create An Instance Pool Based On The Instance Configuration
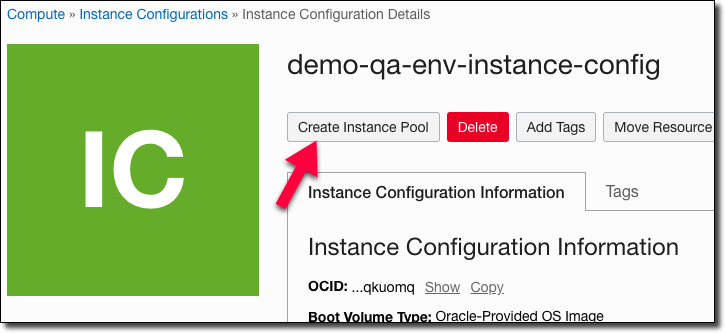
From the Instance Configuration details page, click 'Create Instance Pool'.
Populate the Instance Pool details. For our use case, the 'Number of Instances' will be set to zero since we plan to use our scheduled Autoscale Configuration to manage the pool size.
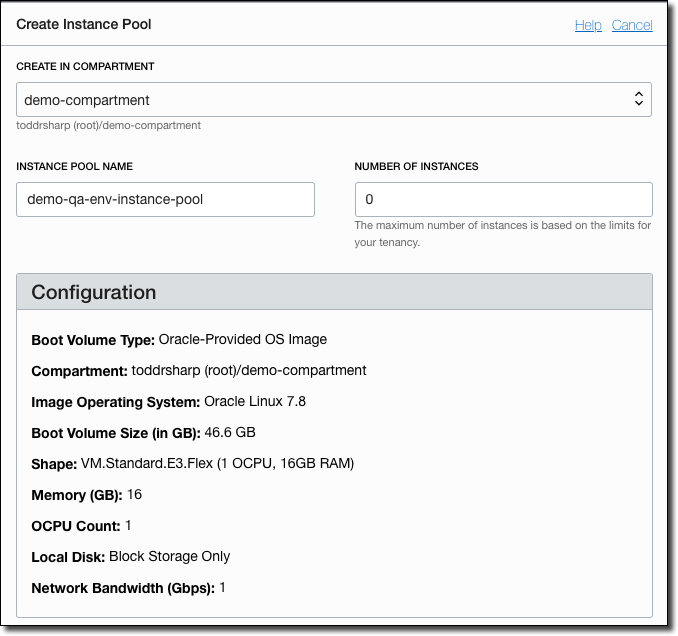
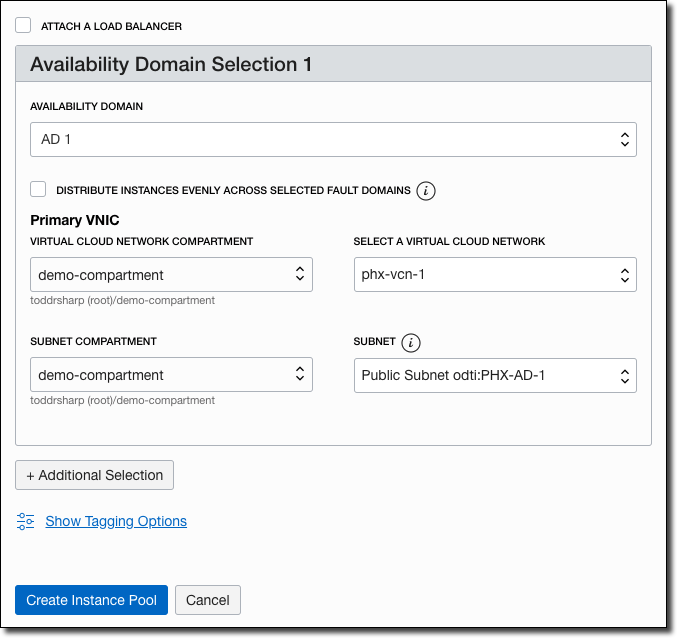
Select the proper AD, compartment, VCN, and subnet and then click 'Create Instance Pool'.
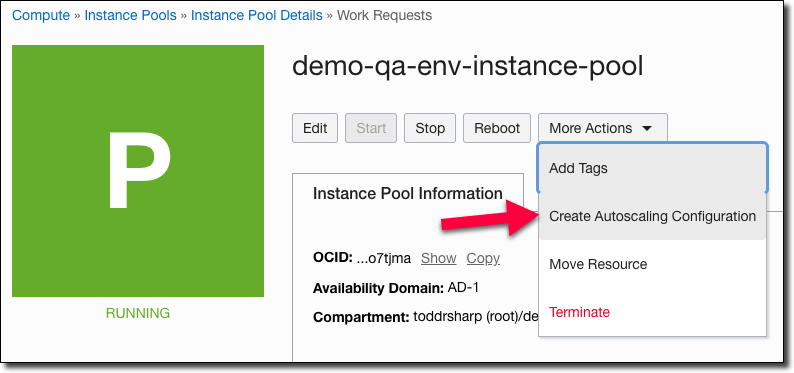
Create An Autoscaling Configuration Based On The Instance Pool
From the Instance Pool details page, select 'More Actions' and then click 'Create Autoscaling Configuration'.
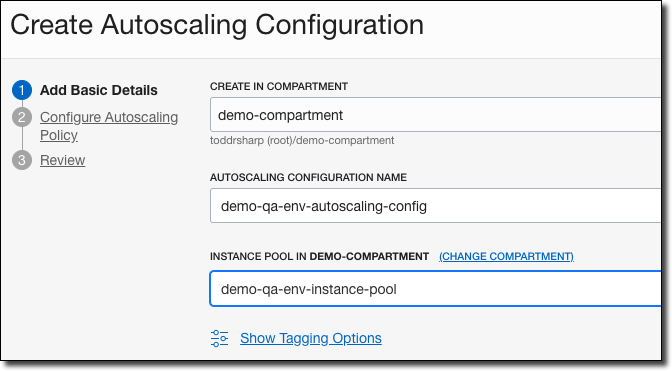
Creating the Autoscaling Config is done with a simple wizard. In step 1, choose the compartment, name it and select the proper instance pool (it should be pre-selected if you came from the instance pool details page).
In step 2, select 'Schedule-based Autoscaling'. Now we'll create two Autoscaling policies. The first will be run at 7:45 AM ET and will scale the pool up to a single instance.
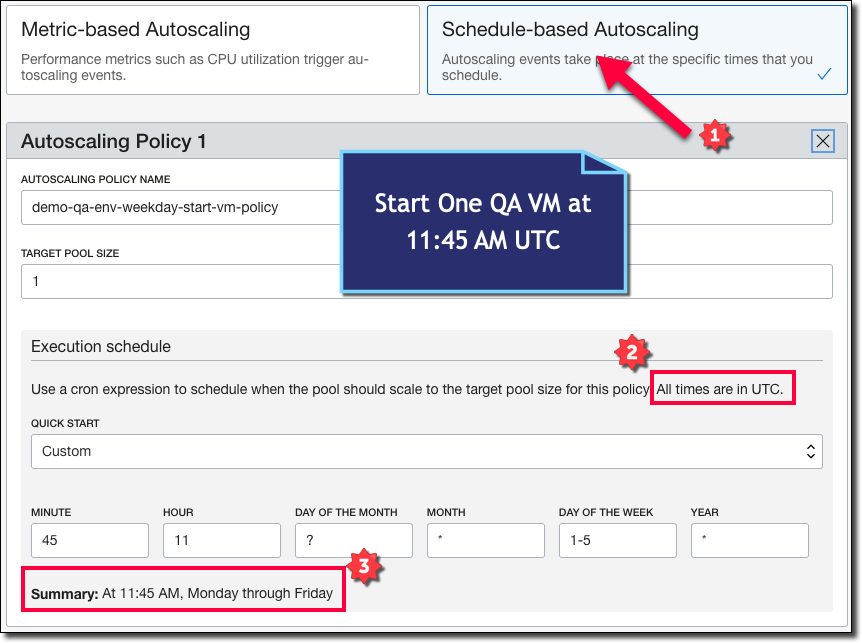
Note: The policy form expects times to be specified in UTC!
Now create another policy to scale down to zero every night at 5:15 PM ET.
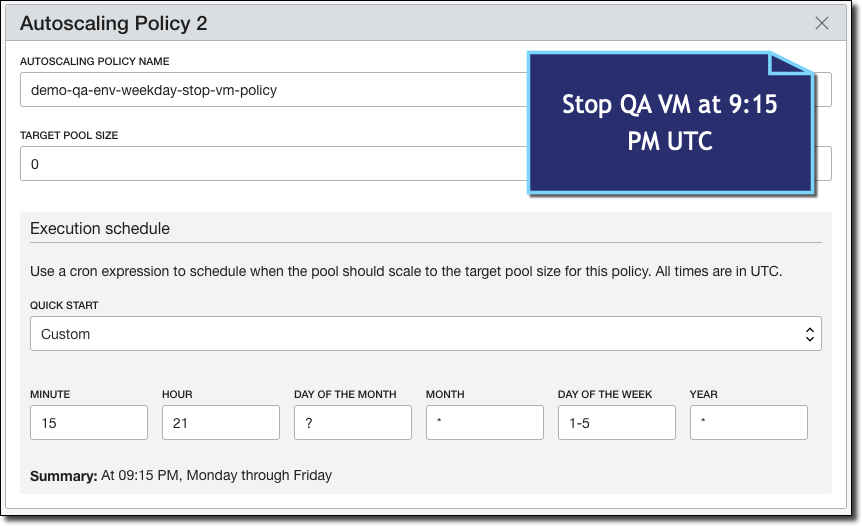
Click 'Create Autoscaling Configuration' and you're all set.
The Next Day...
If you were to check your instance pool the following morning and view the 'Work Requests', you'll see that our Autoscaling Configuration initiated a Work Request at 11:45 AM UTC as expected.

I added an endpoint to my microservice to cache a timestamp when the application server started up, and if I hit my newly turned up QA instance in the browser I can see that the service started up just a few minutes after the VM work request was initiated.
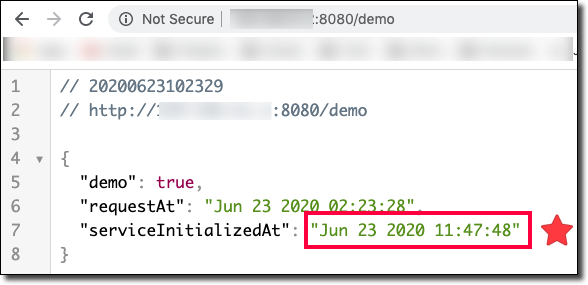
We Have A Few Issues...
Schedule based autoscaling is powerful and gives you a way to accommodate anticipated peak demand. And using schedule-based autoscaling in our scenario does work. It solves the problem of preventing unnecessary billed hours, but now we have a new problem. Each time a new VM is created (every morning) we'll get a new public IP. We could solve that by throwing our instance pool behind a load balancer, but that may be overkill for a simple QA environment.
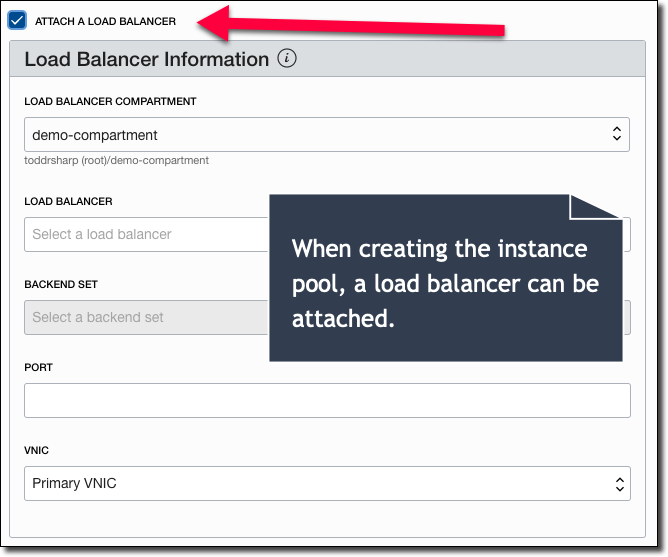
The other issue at this point is that we still haven't addressed the Autonomous DB instance behind our microservice. After all, if our application isn't running then why should the DB behind it be running and incurring costs?
Let's look at another way to solve this problem that might fit into your current CI/CD workflow and solves the issue of getting a new public IP every morning. The outline for this process looks like this:
- Create a VM and configure microservice
- Create CI/CD workflows to start and stop the VMs and DB instance
Much fewer steps involved here, and this solution is pretty flexible. Again we'll assume that step 1 has already been completed and start with step 2.
Create CI/CD Workflows To Start And Stop VM And DB Instances
We'll use GitHub Actions, but you could easily modify this to work with whatever tool you use. We'll create two workflows in our .github/workflows directory: start-qa-workflow.yaml and stop-qa-workflow.yaml. The start workflow begins with the workflow name and an "on" section where we specify the workflow trigger - in this case, a schedule.
Our start job, like the one we created in our Autoscaling Configuration, will run at 11:45 AM UTC on Monday-Friday. Next, create an environment variable to hold our VM instance name and define our job:
The first this we need to do is install the OCI CLI in our GitHub runner VM. I've set the necessary CLI config values into my repo's secrets beforehand.
Now that the CLI is installed, we can check if our DB is in a 'STOPPED' state and if so we can start it. I've set the DB OCID as a secret in the repo.
Note: We're waiting for the DB state to be 'AVAILABLE' or our microservice might have connection failures if it starts up before the DB is available!
Next, we check to see if the microservice VM is running, and if not we issue the proper CLI command to start it up. Again, the instance OCID is stored as a secret.
The nice thing about this workflow is that we're reusing the existing VM instance and just turning it on and off every day. That means our public IP address doesn't change. Here's a look at a successful run from this morning on this job:
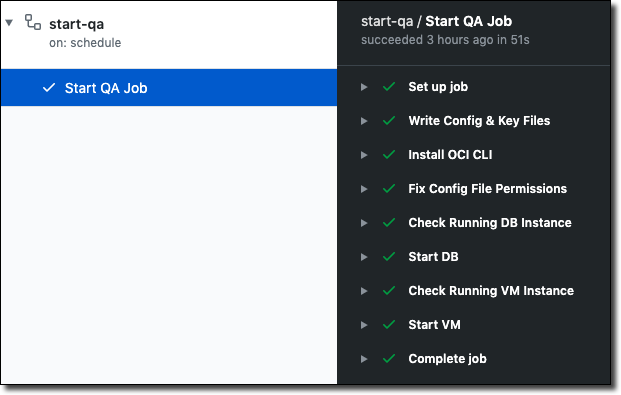
The stop workflow is almost identical, except that it does the exact opposite of the start workflow.
Summary
In this post, we looked at two approaches to cutting your cloud bill by turning off instances via scheduled jobs when they are not in use.
Photo by Jason Dent on Unsplash
Related Posts

Querying Autonomous Database from an Oracle Function (The Quick, Easy & Completely Secure Way)
I've written many blog posts about connecting to an Autonomous DB instance in the past. Best practices evolve as tools, services, and frameworks become...

Brain to the Cloud - Part III - Examining the Relationship Between Brain Activity and Video Game Performance
In my last post, we looked at the technical aspects of my Brain to the Cloud project including much of the code that was used to collect and analyze the...

Brain to the Cloud - Part II - How I Uploaded My Brain to the Cloud
In my last post, we went over the inspiration, objectives, and architecture for my Brain to the Cloud project. In this post, we'll look in-depth at the...