IaC in the Cloud: Advanced Terraform on the Oracle Cloud with Resource Manager
Posted By: Todd Sharp on 3/8/2021 1:00 GMT
Tagged: Cloud, Cloud, Cloud Native, Cloud Native

In our last post in this series, we looked at how to get started running your Terraform scripts in the Oracle Cloud with Resource Manager. The example in that post was very basic and contrived, so let’s take a look at a more realistic example in this post and how to handle more complex scenarios with Terraform and Resource Manager.
Schema Documents
In our last post, we looked at how to run a simple Terraform script that had all of its variables hardcoded with default values. As we all know, that’s not likely going to be the reality for the majority of our scripts. Most of them are going to require some sort of data input from the person running the script - maybe even requiring some dynamic list of options. This scenario would be pretty common for stacks that are distributed to other teams or open source projects that are intended to be deployed on tenancies other than your own. Sometimes our stacks will need to handle dynamic values like all of the potential instance shapes, OS images - heck, even something like listing available compartments to allow the person deploying the stack a choice as to where they want to store the resources. Certainly you wouldn’t want to hardcode things like lists of OS images in your script (especially since these change often and vary even from region to region). You also might not even know the potential values to list out in the first place (in the case of tenancy specific values like compartments).
Dynamic inputs is an area where Resource Manager makes your life very easy by providing a way for you to define the necessary input values which will result in a unique form generated to collect the necessary values when the stack is created. This UI can even contain dropdown lists with dynamic (and potentially tenancy/compartment specific) data. This is done via the inclusion of a schema.yml document in your stack. Let’s take a look at how this might work.
Let’s build upon the example from our last post and enhance it. To remind you, here is what the demo.tf file looked like from our last post.
Right away, we can see some room for improvement.
-
compartment_ocidcould be a dropdown containing the valid compartments in the tenancy -
regioncould be a dropdown too -
bucket_namecould be dynamic offering the person running the stack the ability to specify -
bucket_namespacecan be obtained from a data source -
access_typecan be dynamic
That’s 5 quick enhancements we can do to make this stack easier to work with. Let’s tackle them. First, create a file in the root of the project called schema.yml. Populate some meta information.
Tip: If you’re using VS Code, add the meta schema for Resource Manager as a YAML schema for code completion and validation!
Edit the title, stackDescription and logoUrl as necessary (the logo must be 130px by 130px. Next, we define our variableGroups. This just defines how we would like to group our variables and is handy if you wanted to group required vs. optional inputs for example.
Now we will define each individual variable, starting with the compartment_ocid. Each variable has several options as you’ll see below. We can set a title, description, whether or not they are visible in the UI or required (both visible and required can even be dependent on the values from other variables). We’ll take this a step further in just a minute and even add a regex for input validation! Finally, note the type attribute which supports the standard Terraform types, but also supports a number of custom types that will render as dynamically prepopulated dropdowns in Resource Manager. See the documentation for the complete list of possible values, but anything you can imagine you’d need (compartment name, region, instance shapes, etc) are supported and more are being added all the time. For our compartment_ocid, let’s render a dropdown of all potential compartments in the tenancy.
Let’s do the same for region.
For bucket name, we’ll use a type of string, but we’ll add some validation to make sure the user inputs a valid bucket name. Valid characters are letters (upper or lower case), numbers, hyphens, underscores, and periods.
We can also create our own dropdown by using an enum and hardcoding the lookup values. Also note the ability to define a default. Here we are capturing the access_type to apply to our new bucket.
As I mentioned above, we can get the bucket_namespace from a data source, so let’s modify our data.tf to do that. We can also remove the variable defaults. Here’s the updated data.tf.
Now that our schema.yml file is complete and our data.tf is updated, let’s push all these and create a new stack from our GitHub repo to see what the result is.
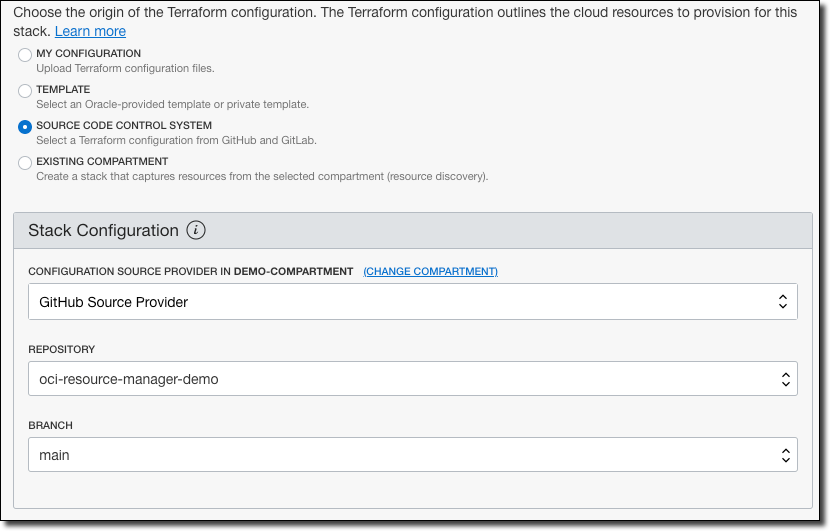
Click ’Next’ and we’ll see the form that is rendered as a result of our schema definitions.
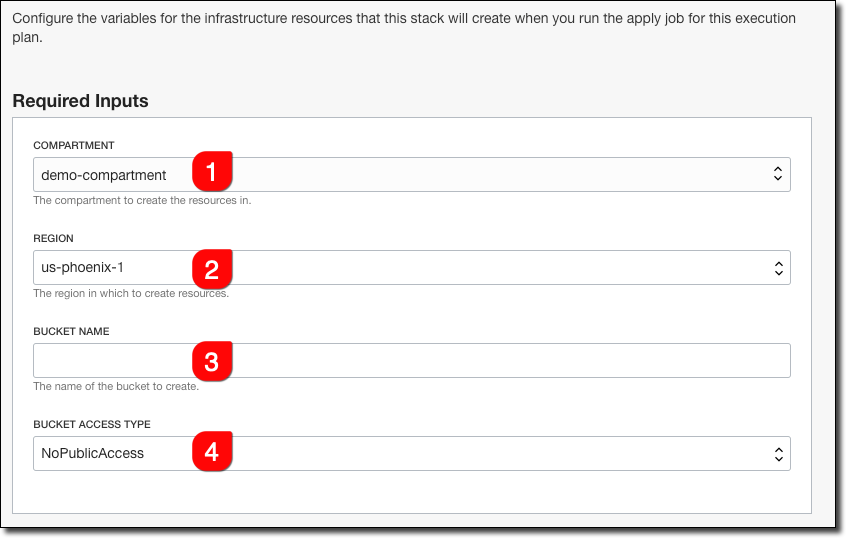
Nice!! The compartment variable now presents a dropdown with all of our compartments, the region is a dropdown as well. Bucket name is a text input and the Bucket Access Type is another dropdown, defaulted to ’NoPublicAccess’. Let’s try to create an invalid bucket name:
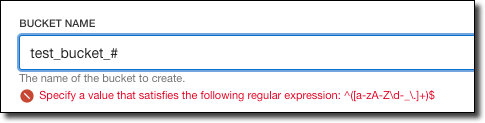
On one hand, it’s nice that we can specify the pattern to be validated, but on the other hand, the validation message isn’t very friendly at all. I’m working with our internal engineering team to enhance the schema document to support custom validation error messages, so stay tuned on that. Until then, perhaps include the validation rules in your field description!
Summary
As you can see, it’s easy to provide a schema document to Resource Manager to allow for dynamic data input into your Terraform scripts that run in the Oracle Cloud. Of course, there are many ways this can be helpful for more complex stacks - from providing users the ability to choose instance shapes, virtual cloud networks, subnets, etc. Hopefully you can see how this feature would make it easy to create and distribute your Terraform infrastructure definitions to others on your team or in the open source world to get started deploying your applications on the Oracle Cloud.
Photo by Francesco Ungaro on Unsplash
Related Posts

Querying Autonomous Database from an Oracle Function (The Quick, Easy & Completely Secure Way)
I've written many blog posts about connecting to an Autonomous DB instance in the past. Best practices evolve as tools, services, and frameworks become...

Brain to the Cloud - Part III - Examining the Relationship Between Brain Activity and Video Game Performance
In my last post, we looked at the technical aspects of my Brain to the Cloud project including much of the code that was used to collect and analyze the...

Brain to the Cloud - Part II - How I Uploaded My Brain to the Cloud
In my last post, we went over the inspiration, objectives, and architecture for my Brain to the Cloud project. In this post, we'll look in-depth at the...