Project GreenThumb Part 4 - Reporting Queries and WebSockets
Posted By: Todd Sharp on 3/29/2021 12:00 GMT
Tagged: Cloud, Cloud, Java, Java, Open Source, Open Source

In the last post in this series, we looked at the database schema behind the scenes, how I created the Micronaut application and consumed the sensor readings and set up the application for sensor reading persistence with Micronaut Data. In this post, we’ll look at reporting and how that’s accomplished as well as how I added WebSocket support to the application to push the sensor readings to the front-end in real-time. We’ll wrap things up in the next post with the front-end and a look at the current progress for Project GreenThumb.
Reporting Queries
In addition to the interface based repository for basic CRUD operations that we looked at in the last post, I created an abstract class for Reading that gives me the ability to inject an EntityManager so that I can create and run native SQL queries against my GREENTHUMB_READINGS table for use in some of the advanced reports that I wanted to include in the application.
I mentioned above that storing the reading JSON in a column would still allow us to query against the JSON data using familiar SQL. This was especially important as I really wanted the ability to view the aggregate data from different viewpoints. For example, I wanted to view the aggregate data by hour of the day, or day of the month. Also, I wanted to be able to compare periods like night vs. day to see if I was meeting the stated goals of the project.
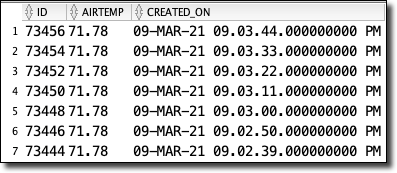
Viewing all of the data was easy:
Which gives me:

If I need to pull elements out of the JSON, I can do that:

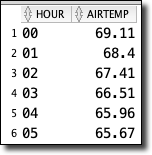
Which means I can start aggregating and grouping the output:

For performance, I turned this into a materialized view that refreshes itself every 5 minutes (there’s no real need for “live” data for these reports).
As you can see, this gives me the ability to construct all of the queries that I need to view the sensor data from multiple dimensions. Plugging these queries into the Micronaut application is a matter of creating an AbstractReadingRepository, injecting an EntityManager, and running native queries that are mapped to DTOs. Essentially, like this:
WebSockets
Right out-of-the-box, Micronaut includes full support for WebSocket clients and servers. Adding a WebSocket server is a matter of creating a class annotated with @ServerWebSocket which accepts a URI argument that will represent the server endpoint. Methods of the server class are then annotated with @OnOpen, @OnMessage, or @OnClose to represent the handlers called for the appropriate server action. A WebSocketBroadcaster is injected (and available to be injected elsewhere in the application) that is used to broadcast messages to connected clients. The broadcaster has methods for both blocking (broadcastSync) and non-blocking (broadcastAsync).
For this project, I wanted a way to be able to push the sensor data to the front-end in real-time, so I added a WebSocket server endpoint.
With the WebSocket server and persistence tier now in place, I could finally modify the MQTT consumer to persist the message to the DB and broadcast it to any WebSocket clients. For this, I edited the GreenThumbConsumer.
At this point, the application was ready for a front-end that would consume the real-time data, chart it, and present a few reports.
Summary
In this post, we looked at the SQL queries used for reporting on the collected sensor data and pushed it in real-time to clients connected to the WebSocket endpoint that I established. In the next post, we’ll look at the front-end, the automated build process, push notifications, and talk about the current progress of Project GreenThumb!
Photo by Christopher Robin Ebbinghaus on Unsplash
Related Posts

Querying Autonomous Database from an Oracle Function (The Quick, Easy & Completely Secure Way)
I've written many blog posts about connecting to an Autonomous DB instance in the past. Best practices evolve as tools, services, and frameworks become...

Sending Email With OCI Email Delivery From Micronaut
Email delivery is a critical function of most web applications in the world today. I've managed an email server in the past - and trust me - it's not fun...

Brain to the Cloud - Part III - Examining the Relationship Between Brain Activity and Video Game Performance
In my last post, we looked at the technical aspects of my Brain to the Cloud project including much of the code that was used to collect and analyze the...