Cloud Deck: Automating and Retrieving Info From Your Cloud Tenancy With a Simple Microcontroller
Posted By: Todd Sharp on 4/30/2021 12:00 GMT
Tagged: APIs, APIs, Cloud, Cloud
Last month, I discovered a really cool project called Stream Cheap that is an inexpensive, DIY version of the wildly popular Stream Deck by Elgato. If you’re not familiar, the Stream Deck is a nifty macro keyboard that connects to your PC or laptop that lets you map keyboard commands to the buttons on the deck. Gaming streamers use these a lot for quick access to actions like switching between scenes in their stream, muting their microphone, add comments, annotate their stream, etc. Ever since my son and I built his gaming computer last Christmas, he’s been asking for a Stream Deck so he can use it when he streams games on his YouTube channel, but the $150 price tag has kept the device out of reach - until I discovered the stream cheap. So, on a Saturday last month, I 3d printed the case and put together his very own stream deck by following the instructions in the tutorial linked above. I have to say, it came out really well and it works just as you’d expect it to. And it ended up being much cheaper than buying a stream deck after paying about $30 for parts and materials!
It was a fun project to tinker with, and it inspired me to think of how I’d use a similar device myself in my daily job. My first thought was to build a similar device, but instead of using it as a macro keyboard, I wondered if it might be possible to use it to control my Oracle Cloud tenancy by interacting with the OCI REST APIs to perform tasks and provide notifications as a result of those tasks. Of course, this led me to first question whether or not it was even possible to invoke the OCI REST APIs directly from a WiFi-enabled microcontroller. Once I answered that question, it was on to assembling the parts and printing out my own case to use in the project that I would ultimately call “Cloud Deck”. In this post, I’ll show you how I built the device and programmed it to perform small bits of automation against my OCI tenancy. If you’d like to build your own Cloud Deck, I’d highly suggest that you first become familiar with the process laid out in the Stream Cheap tutorial before reading on.
Overview
The purpose of this project was to build a macro keyboard to perform automation tasks and retrieve common bits of information from my Oracle Cloud Infrastructure (OCI) tenancy. Unlike “stream deck” type macro keyboards, the Cloud Deck works independently of my laptop. It just needs USB power and it will connect to my WiFi network and perform the REST calls directly from the internal microcontroller without the need for any other dependencies or service instances in the cloud. I started out by 3d printing a custom case that could contain the ESP32 board and 8 switches (Cherry MX keys, actually). Once the case was printed, I installed the keys and soldered them to a right-angle header connector which connects directly to the header pins on the ESP32. Next, I programmed the microcontroller, uploaded the sketch, and screwed everything together.
Let's dig into the materials and build process a bit further, shall we?
Bill of Materials
Following the “Stream Cheap” bill of materials, I used all of the same components with the notable substitution of the ESP32 for the original Pro Micro ATmega32U4 board. Since the Cloud Deck would be calling REST APIs, of course, it needed internet connectivity and the ESP32’s onboard WiFi would give me the connection that I needed.
-
ESP-32 Microcontroller (Link)
-
Cherry MX Blue Key Switches (Link)
-
Relegendable Key Caps (Link)
-
M3 0.50 x 10mm Bolts (Link)
-
Right Angle Header (Link)
-
24ga wire, Solder
Printing and Assembling the Case
The original case for the Stream Cheap was too shallow to fit the ESP-32. I found an alternative that I liked called Teensy StreamDeck (Mini Macro Keyboard) on Thingiverse, so I downloaded it and pulled it into TinkerCad to modify slightly for my needs. It ended up being much taller, but it’s still small enough to not look out of place on my desk. Here’s my version of the base. If you’re going to play along at home and are using the ESP-32, print the base from my version and the plate (file name “stream_deck_plate”) from the Teensy StreamDeck. Once my design was complete, I printed it out on my Ender 3.
Printing the KeyCap Icons
Since I really don’t have much artistic ability, I used some free icons (thanks to FreePik from Flaticon) for the keycaps. I downloaded the icons, scaled them down to about 15mm X 15mm, and printed them out. I trimmed them to fit the keycaps and inserted them as the deck was being assembled.
Assembling the Cloud Deck
Connecting the keys to the ESP32 followed the same exact process as the Stream Cheap tutorial. One lead from each key was connected in series and then to a ground pin, and the other lead from each key was connected to a separate GPIO pin on the ESP32.
Programming the ESP32
Since I wanted to make the Cloud Deck a completely self-sufficient and standalone device, I needed to first find a way to invoke the OCI REST APIs directly from a microcontroller device. There isn’t an official SDK for Arduino/C++, so I had to start from scratch. This ended up being a bit of a task, so it became its own project. If you’re going to build your own Cloud Deck, make sure you first read about that project and become familiar with that library.
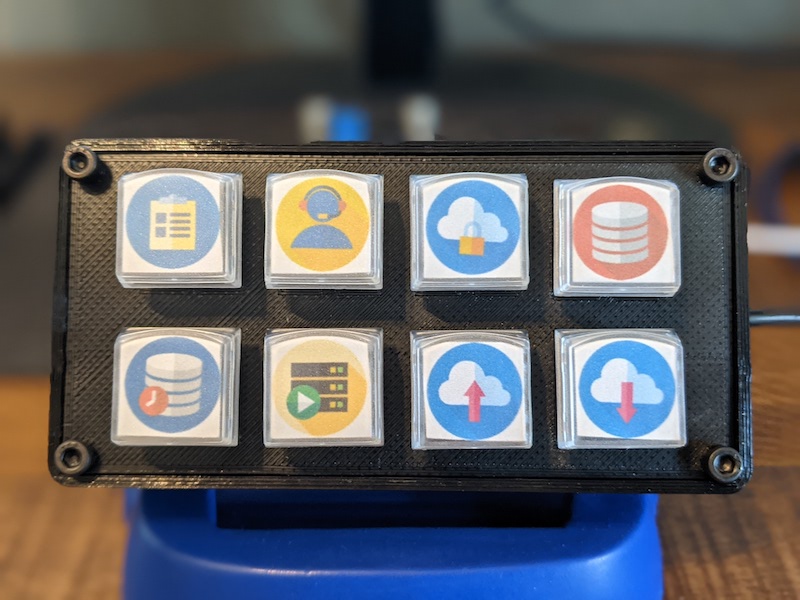
Once I had a library that I could use to directly invoke the OCI REST APIs, it was simply a matter of deciding what functionality I wanted to include in my Cloud Deck and creating a sketch that would respond to the key presses and call the necessary REST APIs (see Using OCI REST APIs and REST API Endpoints in the docs). I decided upon the following tasks for my Cloud Deck:
1. List tenancy details
2. List a user's detailed profile info
3. List a user's registered API keys
4. List a DB instance details
5. Get info about a DB instance’s most recent backup
6. Launch a brand new VM
7. Start a QA/Test environment (both a VM & DB instance)
8. Stop a QA/Test environment (both a VM & DB instance)
Of course, this meant that I would need a way to print out any information retrieved and provide feedback on the completion of automated tasks. For this, I decided that OCI Notifications was the best option since it would give me an easy way to distribute that information. A custom Slack app that posted to a dedicated channel seemed to be a great option, but I also could have used an email subscription or even initiated a call to a serverless Oracle Function if I wanted to.
Since it would quickly become redundant, I won’t cover every single API call in this post. Essentially, the code contains some variables necessary to create an instance of the OCI API object, creating functions to call the necessary REST APIs, parsing the returned data (using ArduinoJson), and then calling the notification API to send the notification (which has a custom Slack app subscribed to the notification topic). As stated above, the process for invoking the OCI REST APIs is laid out in detail in my previous post, so you should certainly read that to become more familiar with the library!
Notifications Rule! You should check out the Complete Developer's Guide to the Oracle Notifications Service!
Here’s how I called the REST API to get information about my tenancy when the first key is pressed.
As you can see, I construct the API request and response objects, call the apiCall() method of the OCI library and then handle the response. If the call was successful, I call a sendNotification() method and pass it a string that contains the results from the API call.
I think that it’s really quite simple to invoke the REST APIs using the library that I created. Just a basic library to sign and make the necessary HTTP calls and all you have to do is tell it which endpoint you want to call!
Testing the Cloud Deck
Once the Cloud Deck was assembled, and the sketch was uploaded, I powered it up and gave it a test. Here’s a video overview showing it in action.
Summary
In this post, I showed you how I built a handy standalone device to retrieve information from and automate tasks within my OCI tenancy. The possibilities for such a device are endless. What else could you do?
-
Check alarms
-
Monitor tenancy billing and send billing summaries
-
Launch/Start/Stop anything in your cloud
-
Invoke serverless functions
-
Get insight into your running database(s)
-
Publish to/Consume from an Oracle Stream
I’d encourage you to build your own Cloud Deck to automate your own tenancy and make your life just a little bit easier! If you do build one, please leave a comment below or share it with me on Twitter. I’d love to share your creation, so let me know what you come up with!
Show Me The Code! If you’d like to see all of the code behind my Cloud Deck, check out the repository on GitHub: https://github.com/recursivecodes/cloud-deck
Related Posts

Querying Autonomous Database from an Oracle Function (The Quick, Easy & Completely Secure Way)
I've written many blog posts about connecting to an Autonomous DB instance in the past. Best practices evolve as tools, services, and frameworks become...

Brain to the Cloud - Part III - Examining the Relationship Between Brain Activity and Video Game Performance
In my last post, we looked at the technical aspects of my Brain to the Cloud project including much of the code that was used to collect and analyze the...

Brain to the Cloud - Part II - How I Uploaded My Brain to the Cloud
In my last post, we went over the inspiration, objectives, and architecture for my Brain to the Cloud project. In this post, we'll look in-depth at the...