Send and Receive Messages via REST with Advanced Queuing and ORDS
Posted By: Todd Sharp on 9/8/2021 8:00 GMT
Tagged: Cloud, Database, Oracle

A while back, I blogged about using Oracle Advanced Queuing (AQ) for messaging within your applications. It's a great option for durable and reliable messaging and can be used via straight PL/SQL (with triggers or scheduled jobs in the DB, for example). As I showed in my last post, it can also integrate easily with a Java application via JMS. There are other options for connectivity (ODP.NET, and OCI to name a few), but if you're using something without native support, things can get...trickier. In this post, I'll show you an option that will make AQ accessible and easy to use from pretty much anywhere. If you can make an HTTP call, then you can send and receive messages with AQ.
If you can make an HTTP call, then you can send and receive messages with Advanced Queuing.
When might you use this? Perhaps you have a need to use messaging, but you don't want to install and manage yet another messaging broker (or pay for a cloud-based solution). If you're using Autonomous DB, AQ is already there, just waiting for you to use it, but as I said earlier there isn't support for all languages and frameworks. IoT is another area where this solution would come in handy. Most microcontrollers and single-board computers can make a simple HTTP call, so this approach would make it non-trivial to publish sensor data to a queue that can be consumed by an analytic app, serverless function, or no-code/low-code application.
The key to this approach is to create and expose a few REST endpoints to enqueue and dequeue messages. Support for creating REST endpoints is also built-in to your Autonomous DB instances (and is also free!). In this post, we'll walk through enabling REST support on the schema as well as creating and testing the endpoints. If you haven't read it yet, it would probably be a good idea to read my last post so that you understand how to create the queue topic that we'll be working with.
Free!!! Autonomous DB instances include free messaging with AQ and free REST endpoints with ORDS. That means that the Autonomous DB instance must be pretty expensive, right? Wrong! You can get 2 instances (with 1 OCPU and up to 10GB each) absolutely free, forever.
Here are the steps that we'll cover in this post:
REST Enable the Schema
It may seem like there are a lot of steps here, but honestly, once you get the schema REST enabled and set up a few necessary bits, adding endpoints becomes a matter of running a single query in your favorite SQL editor. The first step in this process is to REST enable your schema. That can be accomplished with the following query, where AQDEMOUSER is the name of the schema/user that you want to enable and the p_url_mapping_pattern will be the "base" path for all of your URLs.
By default, all endpoints for this schema will be protected (anonymous calls will return a 401 Unauthorized). Pessimistic security is a good thing, but that means we'll have to create REST and OAuth clients and generate some credentials.
Create REST Client
Here's how to create the REST client. Notice that I'm specifying /* as the patterns, which means that this REST client applies to all paths in this schema. You shouldn't have to change anything here, just run it as is.
Create OAuth Client
Next, we'll create the OAuth client that is specific to the application that we'll use to call the REST endpoints. You can create as many as you need, just give each a unique name and enter the owner, description, and support email as applicable. Make sure to leave the p_grant_type and p_privilege_names the same.
Grant SQL Developer Role to Client
Now we need to grant the SQL Developer role to the newly created OAuth client. Use the same name that you specified as p_name in the previous query.
Obtain the Client Credentials
That's it. Our schema is enabled, and our clients are created. The only thing we need to grab at this point is our OAuth client_id and client_secret which is what we'll use when we make our HTTP calls to generate a Bearer token to pass along as our Authorization with calls to the REST endpoints that we're about to create. To grab the credentials:
Which should produce something that looks similar to this:

Heads Up! Make sure to copy and paste the client_id and client_secret fully (don't forget the dots at the end of your values if it has them - they are not ellipses!).
Before we can make calls, we need to figure out our base URL. The easy way is to use the OCI CLI (if you have it installed) and then deleting /apex from the end of the 'apex-url'.
This gives me:
https://[redacted]-DEMODB.adb.us-phoenix-1.oraclecloudapps.com/ords/apex
So my base URL (after deleting /apex) is:
https://[redacted]-DEMODB.adb.us-phoenix-1.oraclecloudapps.com/ords
Another option is to log in to the OCI Console and navigate to your Autonomous DB instance. From the instance details page, click on 'Service Console'.
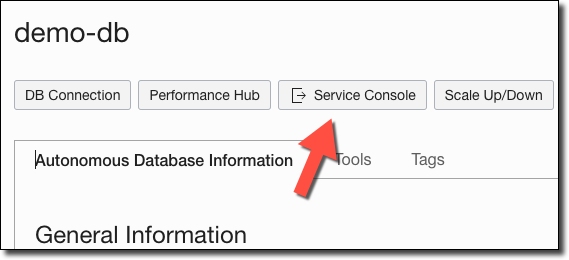
Within the Service Console, click on 'Development' in the left sidebar and find and copy your RESTful services URL.
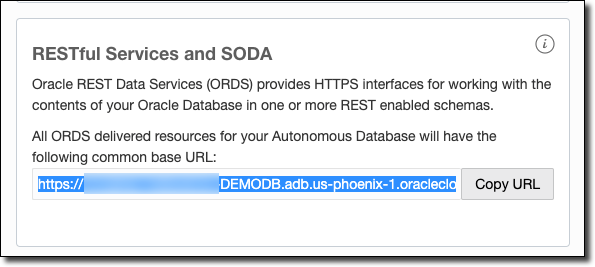
Your REST base URL will be this URL, plus the value you specified as p_url_mapping_pattern when you enabled REST for the schema in step 1 above. Here's how mine would look:
https://[redacted]-DEMODB.adb.us-phoenix-1.oraclecloudapps.com/ords/aqdemo
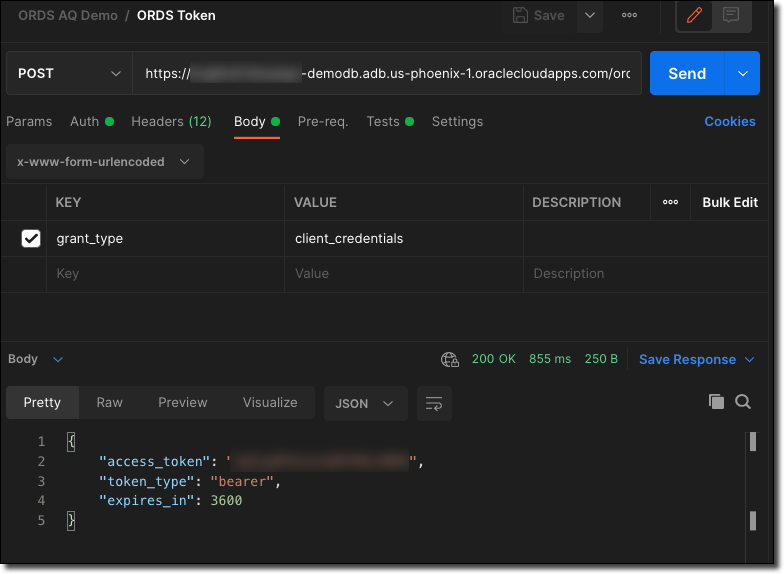
Now we can generate our OAuth token by making a POST to the /oauth/token endpoint, using the client_id as the username and the client_secret as the password using Basic Auth. The body should be x-www-form-urlencoded with a value of grant_type=client_credentials. Here's an example of making this call in Postman:
Or, if you prefer cURL (the Authorization header when retrieving an OAuth token is a base64 encoded version of the client_id:client_secret value).
We'll use the access_token going forward (but notice that it expires in 3600 seconds or 60 minutes).
Create AQ Endpoints
So far we've REST enabled our schema, created the OAuth client, and obtained a Bearer token. Now we can create the actual REST endpoints that will be used to send (enqueue) and receive (dequeue) messages on our topic. We'll create these endpoints by using the ORDS.DEFINE_SERVICE function (docs) which will take care of creating all of the necessary bits behind the scenes for us (resource module, template, and handler).
Create and Test 'Send Message' Endpoint
The ORDS.DEFINE_SERVICE function has a few parameters that are used to define the HTTP method, the URL pattern that the endpoint will be available at, etc. To define what action we actually want to be taken when the endpoint is called, we use the p_source parameter. In this case, we'll pass it a block of PL/SQL code to execute (indicated by setting p_source_type to ORDS.source_type_plsql). The PL/SQL code that we pass will handle sending a message to our queue using the DBMS_AQ.ENQUEUE function (see the last post for more information on that).
Once we run this, we'll have an endpoint available at:
https://[redacted]-DEMODB.adb.us-phoenix-1.oraclecloudapps.com/ords/aqdemo/aqdemo/queue
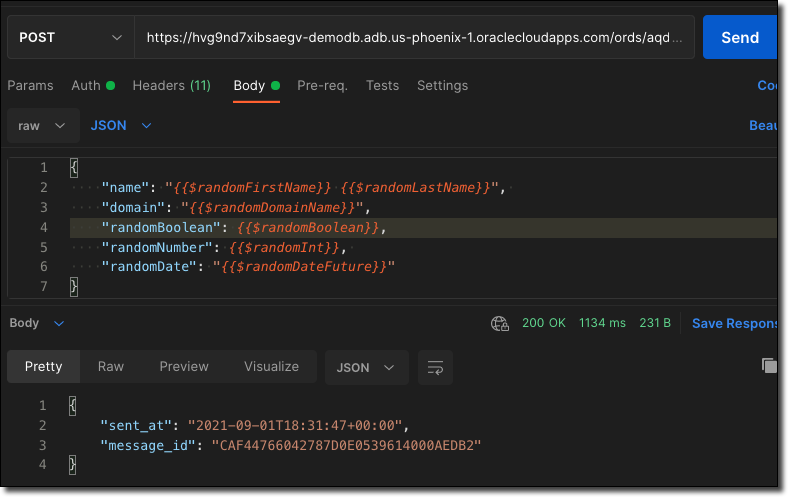
We'll need to add our queue name as a path variable ("/aqdemoadmin.event_queue") and then we're ready to POST a message to the queue by sending it in raw JSON as the POST body. Don't forget to set the access_token into the header (Authorization Bearer [access_token]). Here's how a sample call looks in Postman.
The cURL version looks like this:
How About a Batch? You can also enqueue an array of messages using DBMS_AQ.ENQUEUE_ARRAY. Check the docs for more info.
Create and Test 'Get Message' Endpoint
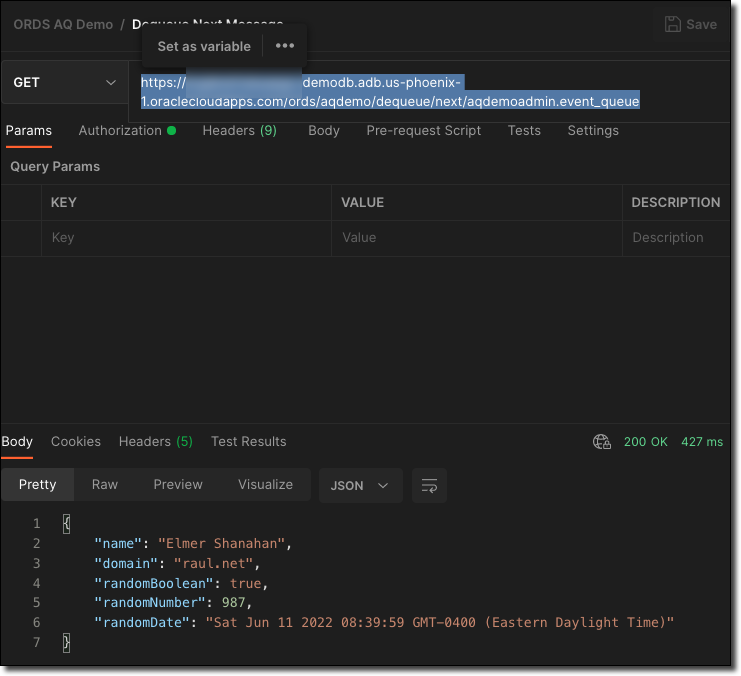
So now that we can successfully send (or enqueue) messages to our queue, it makes sense that we'd want an endpoint to retrieve the latest message from the queue. To do this, we'll use ORDS.DEFINE_SERVICE again, but this time our p_source code will utilize the DBMS_AQ.DEQUEUE function.
This will create an endpoint at:
https://[redacted]-demodb.adb.us-phoenix-1.oraclecloudapps.com/ords/aqdemo/dequeue/next/[queue_name]
That will accept HTTP GET requests. No other parameters are required. Calling this method will look like so in Postman:
The cURL version:
Create and Test 'Get Message Batch' Endpoint
Getting the 'next' message is handy, but sometimes you want to get a batch of messages. To do that, we can create another endpoint, but this time use the DBMS_AQ.DEQUEUE_ARRAY function.
We'll first need to create a custom table of AQ$_JMS_TEXT_MESSAGE that will be used to store the result.
The code to create the endpoint looks pretty close to the previous endpoint:
Clearly, it would be a bad idea to retrieve all pending messages in the queue. With this endpoint, I'm limiting it to the 25 most recent messages by setting l_array_size to 25. Feel free to adjust to meet your requirements. Let's call the new endpoint with Postman:

Or cURL:
Summary
In this post, we created and exposed secure REST endpoints that allow us to send and receive messages to and from Oracle Advanced Queueing. This method allows us to work with a messaging queue from anywhere we can use HTTP instead of relying on a dedicated SDK.
Related Posts

Querying Autonomous Database from an Oracle Function (The Quick, Easy & Completely Secure Way)
I've written many blog posts about connecting to an Autonomous DB instance in the past. Best practices evolve as tools, services, and frameworks become...

Brain to the Cloud - Part III - Examining the Relationship Between Brain Activity and Video Game Performance
In my last post, we looked at the technical aspects of my Brain to the Cloud project including much of the code that was used to collect and analyze the...

Brain to the Cloud - Part II - How I Uploaded My Brain to the Cloud
In my last post, we went over the inspiration, objectives, and architecture for my Brain to the Cloud project. In this post, we'll look in-depth at the...