Getting Started With RabbitMQ In The Oracle Cloud
Posted By: Todd Sharp on 1/27/2020 1:00 GMT
Tagged: Cloud
In this post I'm going to walk you through the steps that it takes to get RabbitMQ up and running for lightweight messaging in the Oracle Cloud. You're probably asking yourself why you might consider using RabbitMQ for messaging when we already have the amazing Oracle Streaming Service (OSS) available in the Oracle Cloud and that's a fantastic question - I'm glad you asked it! The reason is quite simple really, while OSS is completely awesome and powerful it, it's definitely made to fulfill a more "enterprise" role in the problems it aims to solve. And there are plenty of uses for that, but OSS is not the perfect solution when it comes to the kind of lightweight pub/sub style messaging that is useful for IoT devices and other use cases. And since one of my goals for this year is to spend more time highlighting the role that cloud connected IoT devices can play in the enterprise, it's a foundational need to get something like RabbitMQ up and running.
Don't worry if you're new to messaging - we'll take it one step at a time and there are even some videos down below to help explain things.
Why RabbitMQ?
When it comes to lightweight messaging, there are a number of options to choose from. So why RabbitMQ? Again, I'm really glad you asked! RabbitMQ has support for multiple protocols (either directly, or through plugins) like AMQP, STOMP and MQTT. MQTT is an open protocol for lightweight pub/sub messaging and there is quite a bit of support for it in the world of microcontrollers and single board computers so support for MQTT is a must. The additional protocols mean we can always use it for other use cases. It's also got a pretty large community of users so support for issues you might come across will probably be easier to find. Cool - RabbitMQ it is then.
Getting Started
The first thing we ought to do is create a VM. If you've got a cloud tenancy then you probably already know how to create an instance. If you're new to Oracle Cloud - first of all, welcome! Don't worry, you'll love our cloud and it's quite literally free to try it out. Also, if you give me 60 seconds of your time I can show you how to create an "always free" VM by signing up at https://cloud.oracle.com/free:
Next Steps
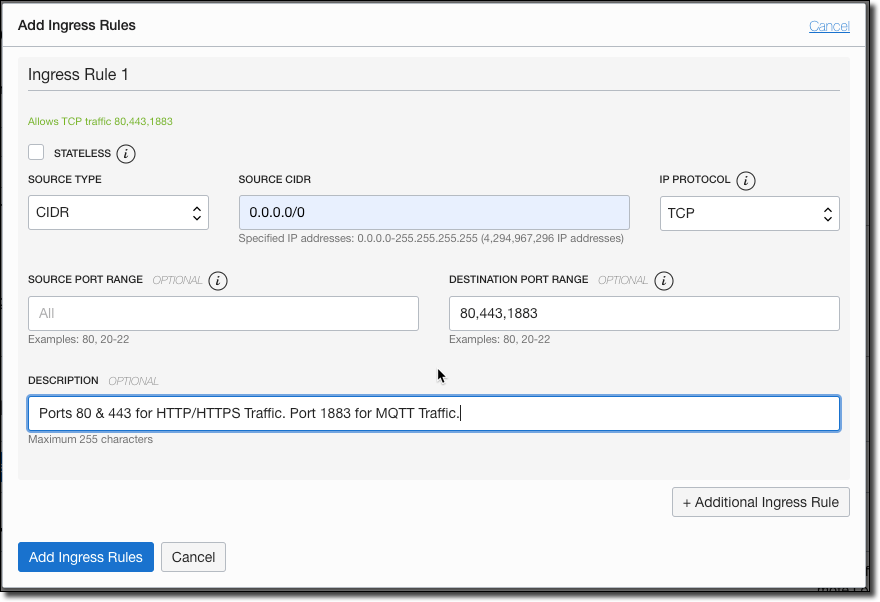
Now that you have an instance up and running, you'll need to point a domain name (or subdomain) at the public IP for your instance. Next, in preparation for RabbitMQ you'll need to make sure that you have the proper ingress rules in your security list to allow HTTP, HTTPS and MQTT traffic. Here's what that looks like:
We're At A Virtual Crossroads...
If you're the visual type you can watch the following video that will walk you through the install process...
Otherwise, continue on below.
Install Docker
SSH into the machine and get ready for the install. We're going to run RabbitMQ as a Docker container, so we'll need to install Docker in our instance first. It only takes a few commands:
Next, run the following commands so that we can use Docker as a non-root user:
Log out, and log back in before and we're ready to run docker commands as the opc user.
Launch RabbitMQ Container
We need to create a directory to store the RabbitMQ database and config files so they are persisted across container restarts. We also need to create a config file to tell RabbitMQ which plugins to install so create the directory and the file with the following commands:
Populate the enabled_plugins file with the following (take note of the dot (.) at the end of the file - this is important!):
[rabbitmq_management,rabbitmq_mqtt].
We need to change the permissions on this file so that there aren't errors reading it inside the Docker container:
sudo chmod 777 enabled_plugins
Finally, install RabbitMQ with the following command:
Take note of a few things: we need to pass the hostname, a default username and password and mount the enabled_plugins file and the directory for storing the config/db files from RabbitMQ. After about a minute check the logs with docker logs rabbitmq and you should see a message that the server is up and running. You can now visit the management UI via your configured domain/subdomain and test the MQTT support with something like Mosquitto:
And that's all it takes to get RabbitMQ running in the Oracle Cloud. Stay tuned for more posts about using MQTT for lightweight messaging with your IoT devices and how you can access that data and integrate it into your enterprise cloud.
Photo by TaiLi Samson on Unsplash
Related Posts

Querying Autonomous Database from an Oracle Function (The Quick, Easy & Completely Secure Way)
I've written many blog posts about connecting to an Autonomous DB instance in the past. Best practices evolve as tools, services, and frameworks become...

Brain to the Cloud - Part III - Examining the Relationship Between Brain Activity and Video Game Performance
In my last post, we looked at the technical aspects of my Brain to the Cloud project including much of the code that was used to collect and analyze the...

Brain to the Cloud - Part II - How I Uploaded My Brain to the Cloud
In my last post, we went over the inspiration, objectives, and architecture for my Brain to the Cloud project. In this post, we'll look in-depth at the...