Back To The Database - Part 2: Persisting Data From A Stream
Posted By: Todd Sharp on 3/18/2020 11:00 GMT
Tagged: Cloud, Containers, Microservices, APIs, Database

Welcome back to this series of blog posts where we look at the mighty RDBMS and learn how to take advantage of some of the powerful capabilities available to us to make better microservices and service driven applications. In the last post, we tackled quite a bit - from creating cloud credentials in our DB to learning about how to write and invoke a stored procedure. The goal is to ultimately consume a message stream in the Oracle Cloud and manipulate tables in our database as a result of those messages (AKA a “data sink”). Let’s not waste any more time and dig in to continue where we left off.
So now that we know a bit more about stored procedures, let’s create one to encapsulate our logic to check the Oracle Streaming Service stream that we created in the last post for new messages. Then we'll parse the incoming messages and determine the action (if any) to take on each message. This stored proc will allow us to reuse the functionality by either calling it directly on demand in our application or by scheduling the execution on a regular basis to make sure we’re always consuming the stream messages and keeping our table up to date. Here’s the basic structure of our stored proc, we’ll fill in the blanks as we move forward in this post:
Our proc accepts three inputs: the OCI region that your OSS stream was created in, the OCID of the stream and the name of the credentials object that we created above. Let’s build out the body of the procedure, focusing on this workflow:
Let’s work these step by step. Before we can get a cursor, we’ll need to know the last offset that we used to read from our partition. Since we created a table to store this value, we can easily query that table and store the value into a variable. We’ll also declare a max_offset variable that we’ll increment as we loop over the message results and then update the meta table with the new offset so it’s ready to go the next time the procedure is run.
I’m showing you what the entire proc looks like at this step, but going forward in this post I will just show the relevant piece to add to the proc. I just want to make sure those who are new to stored procedures have a feel for the structure - things like variable declarations, etc. The entire procedure will be pasted at the bottom of the post for a full reference.
The first thing we need to do to read from our stream is to is grab a cursor, which if you remember from the video above is a pointer to a location in a stream that could be a specific offset or a point in time. In our case, we’ll use the offset that we retrieved from the meta table (defaulting to zero or the beginning of the partition). We’ll need to create a “cursor request” object, which is just a JSON object with two (or three) keys depending on the type of request. The code below is pretty heavily commented, so I’ll let it speak for itself this time. Also, not shown is the variable declarations (see the entire proc below!).
We’re using DMBC_CLOUD.SEND_REQUEST to make our request to the proper REST endpoint to obtain a cursor.
Note: I’ve hardcoded the partition to be “0” (or zero) in this proc. If your stream has multiple partitions the code would need to accommodate that!
The request will return a JSON string containing the cursor value. We’ll pass this along with in the next step to get our messages. Let’s parse the cursor response into a JSON object and retrieve the value:
The call to retrieve messages will return a JSON string containing an array of messages. We’ll parse it, then loop over it and inspect the message to determine the action to take on the message object. I’ve chosen the following format to represent the actions to take with this procedure and stream so we can expect that each incoming message will contain a “type” key that tells us what type of transaction is occurring and a value key to tell us the value incoming state of the entity.
So let’s parse the response and loop over the array. In each iteration, we’ll figure out what needs to be done and perform the necessary action. We’ll also update the max_offset and catch any errors that may arise. How you would deal with those errors is up to you - you could insert them into another table, publish a message to a different stream - there are many options. This block is rather long, but again is heavily commented.
The completed proc looks like this:
Call Stored Procedure
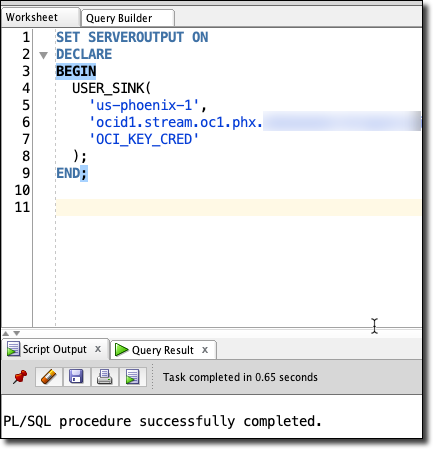
To call our stored procedure, we’ll use the following format (substitute your proper values for region, stream OCID and credential name):
If we were to manually run the procedure using the statement above before we have published any messages to our stream, it would run, but it would not result in any changes in our table. We’ll have to publish some messages to our stream in order to test that.
Publish Messages To Stream
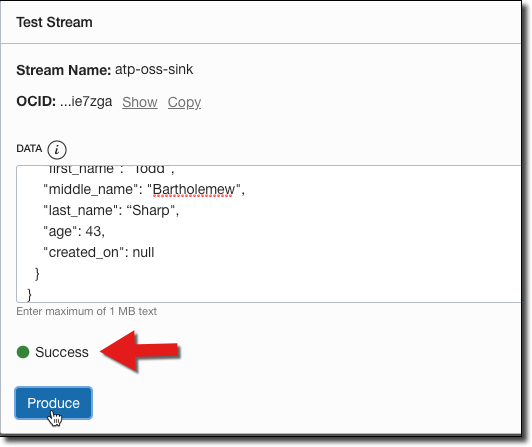
Luckily, there’s an easy way to produce some test messages directly from our OCI console dashboard. Let’s try out an insert, update and a delete:
Publish A Few Messages To Insert Several Records
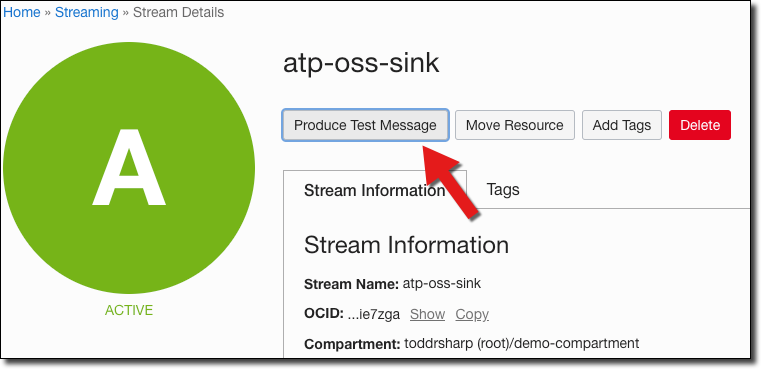
We can publish these via the CLI or by using an SDK, but the easy way for test purposes is to login to our console dashboard and go into the details page for our stream.
Paste the JSON in the ‘Produce Test Message’ dialog and click ‘Produce’ which will result in a success confirmation:
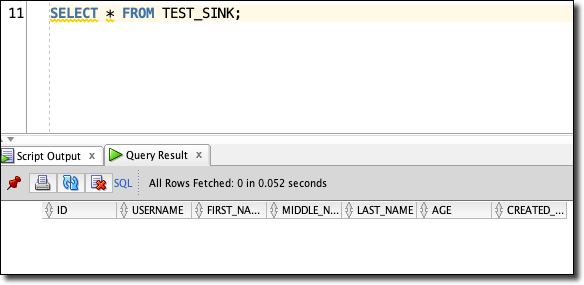
Before we run our procedure, double check that there are no records in the TEST_SINK table:
Now we can run our proc:
And check the table again:
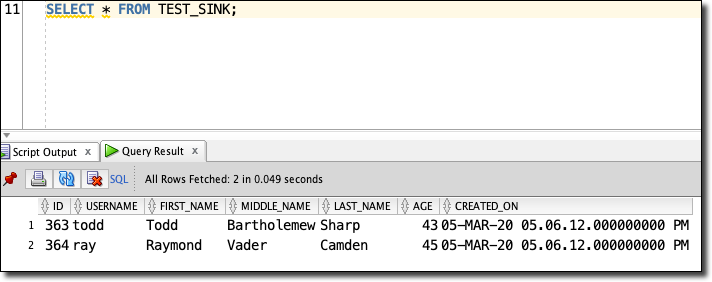
We’ll see our 2 new records!
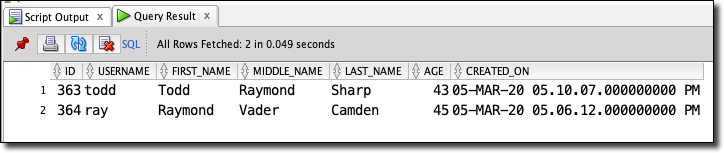
Publish A Message To Update A Record
We can also update an existing record:
Publish A Message To Delete A Record
To delete we only need the ID:

Next Steps
We’ve covered a ton so far - we’ve created cloud credentials in our DB, learned about streams and how to get started with streaming in the Oracle Cloud, learned about stored procedures and implemented a procedure to read from a stream and insert data into a table from that stream. The natural next step would be to use the scheduler in Oracle DB to schedule the execution of this procedure (or you could certainly invoke it via your application code).
Also, you’d want to enhance the exception handling capabilities to properly handle errors. I’ll use the blogger's favorite cop out and say that I’m leaving that “as an exercise for the reader” when I really just want to end the post at this point.
Ricardo 清介 屋宜 / CC BY_-_Back_to_the_Future_(20232614198).jpg)
Edit me...
Related Posts

Querying Autonomous Database from an Oracle Function (The Quick, Easy & Completely Secure Way)
I've written many blog posts about connecting to an Autonomous DB instance in the past. Best practices evolve as tools, services, and frameworks become...

Brain to the Cloud - Part III - Examining the Relationship Between Brain Activity and Video Game Performance
In my last post, we looked at the technical aspects of my Brain to the Cloud project including much of the code that was used to collect and analyze the...

Brain to the Cloud - Part II - How I Uploaded My Brain to the Cloud
In my last post, we went over the inspiration, objectives, and architecture for my Brain to the Cloud project. In this post, we'll look in-depth at the...