Backing Up Your Always Free VMs In The Oracle Cloud
Posted By: Todd Sharp on 12/10/2019 1:00 GMT
Tagged: Cloud

I have blogged quite a bit lately about the always free tier on the Oracle Cloud, and if you haven't signed up for your free account yet you should definitely do that. Why? Here are a few examples of projects you can deploy on the always free tier:
- Stand Up A Free Blog In 15 Minutes With Ghost In The Oracle Cloud
- Blast Off To The Cloud: Free Team Chat With Rocket.Chat In The Oracle Cloud
- Install & Run Discourse For Free In The Oracle Cloud
- Installing Node-RED In An Always Free VM On Oracle Cloud
- How To Setup And Run A Free Minecraft Server In The Cloud
I've had a lot of excellent feedback on the posts above, but the one question that I've heard over and over is "how can I backup my data with the 'always free' tier". And that's perfectly understandable, because nobody likes to lose data no matter how "small" the project that they are working on is. There are, however, several answers to the question "how can I backup my data" and each of those answers depend on the actual data that we are talking about. But for this blog post I'm going to focus solely on the data contained on the actual boot volume for your always free VMs.
Boot Volume Backups
Backups of your boot volume (the block volume that contains your OS) in the Oracle Cloud work similarly to many other cloud providers. You can perform full, or incremental backups either manually or based on a custom or Oracle defined backup policy (which specifies the type, frequency and retention). With the always free tier, you are allowed to create up to 5 backups of your block volumes, which should give you enough piece of mind to deploy a small workload to the tier and not worry about what might happen if the boot volume were to somehow become corrupted. The unfortunate news is that we can't take advantage of backup policies for the always free tier, but that doesn't mean we can't create a regularly scheduled backup of our boot volume. We just have to get a bit creative!
Creating A Manual Backup
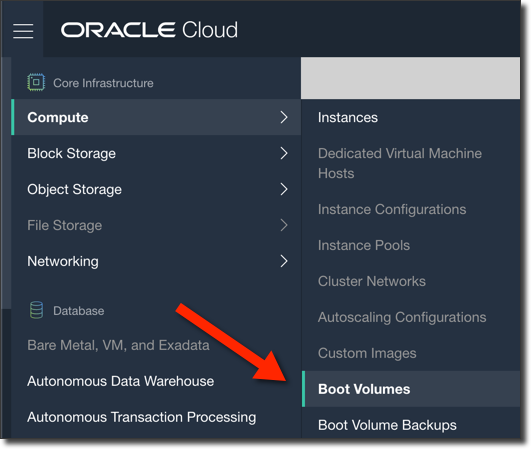
The first thing we should do is create a manual backup of our boot volume so that we have a base to work from going forward and are familiar with the UI and how to manually create one. Log in to your Oracle Cloud account and head to the sidebar menu and select 'Compute' -> 'Boot Volumes':
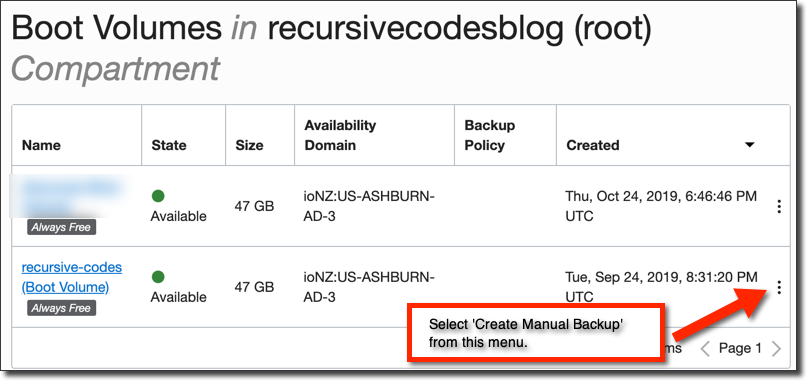
Next, find your boot volume and select 'Create Manual Backup':
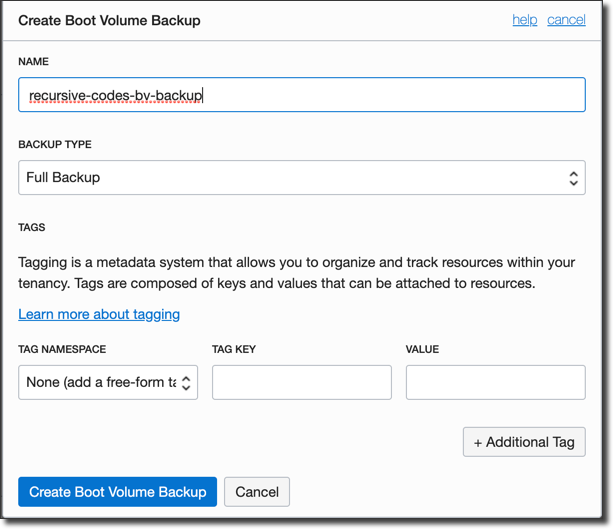
Give your backup a name in the dialog and click 'Create Boot Volume Backup':
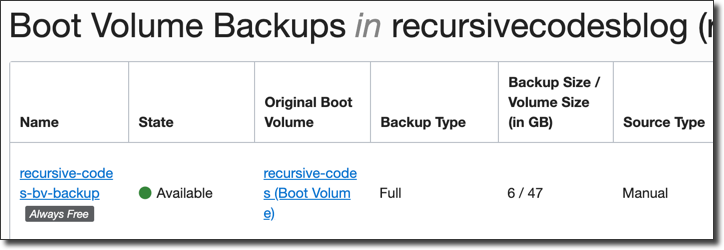
After a few minutes, your backup will be created and available:
If you were to ever need to create a new instance from a backup you would need to view the backup details and create a boot volume from the backup. Once the boot volume is created you can launch a new instance from that boot volume.
Creating A Backup Script
Since we can't use backup policies, we'll have to create a simple script to schedule the backup ourselves. The script will utilize the OCI CLI (install it if you haven't done so yet) and will perform the following tasks:
- Get info about the latest backup
- Create a new backup
- Delete the old backup
- Rename the new backup to the original backup name
If the creation of the new backup fails for whatever reason, the script will exit (to avoid deleting an existing backup before a new one is created). Once we create this script, we can schedule it on our local machine using cron to run however often we would like. Since it creates a new, full backup every time it runs it is not the most ideal scenario, but it will give you a level of comfort that your VM boot volume is backed up and you won't lose your data in the case of a rare failure.
So let's take a look at the bash script I've created to perform the work required. This was created on a Mac, but should work on Linux easily (perhaps with minor modifications). As stated above, please make sure you have the OCI CLI installed before trying to run this script. You'll need to plug in a few variable values at the top of the script - the name of your manually created backup from earlier and the name of the OCI CLI profile that you want to use for the CLI calls (leave as DEFAULT if applicable). You'll also need jq installed on your machine - modify the path to jq if necessary in the script (the reason the full path is used is because when the script is run as a cron task it will be run as root and the root user will not have jq on its PATH). Also modify the call to source your local profile as necessary on line 1. Again, this is necessary to make sure the script runs properly as a scheduled task.
You can run this script manually and you'll get output similar to the following:
You can now schedule the script execution and rest easy that your always free boot volumes will be backed up on a regular basis!
Photo by Sven van der Pluijm on Unsplash
Related Posts

Querying Autonomous Database from an Oracle Function (The Quick, Easy & Completely Secure Way)
I've written many blog posts about connecting to an Autonomous DB instance in the past. Best practices evolve as tools, services, and frameworks become...

Brain to the Cloud - Part III - Examining the Relationship Between Brain Activity and Video Game Performance
In my last post, we looked at the technical aspects of my Brain to the Cloud project including much of the code that was used to collect and analyze the...

Brain to the Cloud - Part II - How I Uploaded My Brain to the Cloud
In my last post, we went over the inspiration, objectives, and architecture for my Brain to the Cloud project. In this post, we'll look in-depth at the...