Adventures in CI/CD [#6]: Adding A Persistence Tier To Our Microservice
Posted By: Todd Sharp on 5/8/2020 12:00 GMT
Tagged: Cloud, Containers, Microservices, APIs, Integration, Java, Open Source

Welcome back to this ongoing saga where we continue to look intensely at the wonderful world of CI/CD and how we can build, test and deploy a microservice application to the Oracle Cloud. We’ve covered the following topics so far:
- Adventures In CI/CD [#1]: Intro & Getting Started With GitHub Actions
- Adventures in CI/CD [#2]: Building & Publishing A JAR
- Adventures in CI/CD [#3]: Running Tests & Publishing Test Reports
- Adventures in CI/CD [#4]: Deploying A Microservice To The Oracle Cloud With GitHub Actions [OCI CLI Edition]
- Adventures in CI/CD [#5]: Deploying A Microservice To The Oracle Cloud With GitHub Actions [Gradle Plugin Edition]
The logical path to take from here would be to add some database interactivity to our microservice application since that is certainly something that you’d need to do in any real-world project. We’ll focus on adding a very simple persistence tier to the application that will store and retrieve user data to Oracle DB. Locally, we’ll test against an instance of Oracle XE running in a Docker container and we’ll use Liquibase to handle our schema creation and migrations. This will make life much easier as our project grows larger, especially as we move on to testing and deploying the microservice with the persistence tier in place.
Managing Schema Modifications
It’s pretty easy to track changes to our application code and share those changes with our distributed teams via source control. But tracking, managing and applying changes to our database schemas is something that can be extremely challenging if your team does not use some sort of tool to help out with this sort of thing. Thankfully we have several tools available to us to help with this task, and one of my favorite such tools is called Liquibase. Liquibase is an open-source library that works with just about every DB system you can imagine. It gives you the ability to define your schema changes in a specific XML file called a changelog that can then be executed against a DB to perform the necessary DDL operations to modify the schema or DML operations to modify data. This means your schema modifications can all be scripted and you never have to worry about manually running a query to modify a DB schema ever again. If you’re not familiar with Liquibase, you can probably already see why it is a valuable tool to have in your toolbox.
Spin Up A DB
As we move forward in this series we’ll address the DB requirements for both test and production, but for now we’re going to need a DB running locally to test against. My favorite method is to spin up Oracle XE in a Docker Container, but you can follow your own favorite method to get a development DB spun up and ready to test your local instance against.
Tip! Gerald Venzl has a great blog post that shows 5 ways to get an Oracle DB instance!
Liquibase Micronaut Integration
Adding Liquibase support to our microservice is pretty easy. We’ll start off by adding a few dependencies to our build.gradle file. It’s necessary in our case to override the version of Liquibase provided by the Micronaut configuration to bypass a bug related to Oracle DB, so we’ll use the latest version of Liquibase by manually adding the dependency.
We’ll also need to add some configuration to our application.yml file to tell Micronaut about our Liquibase integration so that it knows which file describes our changeset operations.
The next step is to create that changelog, so create a file called liquibase-changelog.xml within the src/main/resources/db directory (which you’ll need to create). This file is a “master list” of your DB changes which you will define in separate files as your schema evolves. Populate the changelog like so:
Note the <include> tag - we’ll use one of these for each changeset as we move forward. Let’s create that first one now. Create another directory, this one at src/main/resources/db/changelog and add a file called 01-create-user-table.xml. This is the actual file that will tell Liquibase what exact changes we’re looking to make against the database. There are commands to perform just about any operation that you can imagine - adding, dropping, modifying of tables, views, sequences, constraints - whatever you need to do it can be described in the XML format which is interpreted and executed against your DB at runtime. And if you can’t figure out the exact XML to define your change you can always simply drop in raw SQL as needed!
Note: Liquibase also supports YAML, JSON, SQL formats and there is also a Groovy DSL and Clojure wrapper.
Here’s how our first changeset looks. This file will result in the creation of a new table in our DB called users with an autonumber ID column and columns for first_name, last_name, email and age.
Important! Don’t modify changelog/changeset files after they have been run! If you need to change an action taken (perhaps delete a column that was created in error). You’ll need to add another changeset to undo previously executed schema modification.
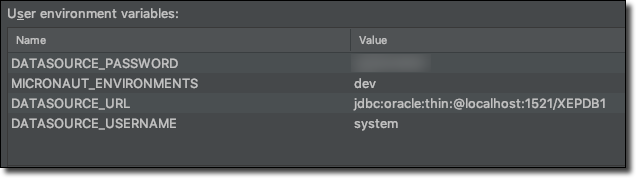
If we were to run our application at this point we wouldn’t yet see any DB modifications. Why? Because we haven’t yet created any datasources! Let’s start working on that now by adding a configuration for our development environment. We’ll create a new file next to our application.yml file and call it application-dev.yml. This file will contain a datasource that will be associated with the “dev” profile that we can activate by passing in an environment variable called MICRONAUT_ENVIRONMENTS.
Micronaut supports injecting configuration via environment variables using the ${} syntax which also supports a default value after the colon in the declaration (IE: ${FOO:bar}). Let’s set these environment variables in our IDE so they’ll be properly injected at runtime when we test locally:
Next, we’ll add some database interactions.
Add Micronaut Data
Following the ongoing theme of this blog series, we’re going to keep things very simple for the persistence tier itself by utilizing Micronaut Data. What’s Micronaut Data? Well, according to the documentation:
Micronaut Data is a database access toolkit that uses Ahead of Time (AoT) compilation to pre-compute queries for repository interfaces that are then executed by a thin, lightweight runtime layer.
Essentially it is a very easy way to add persistence operations to a microservice. It will take your domain model objects and data repository interfaces that you create and annotate and automatically implement the necessary SQL for persistence operations. It’s my favorite toolkit at the moment since it integrates so nicely with the Micronaut framework that we’re already using and it means I don’t have to write a single line of SQL to get full CRUD operations in my microservice.
Add Dependencies
We’ll need a few dependencies, so add them to our `build.gradle` file. These are the necessary libraries for Micronaut Data, the Oracle JDBC driver and Tomcat which we’ll use for connection pooling. Finally, we’ll use the Jakarta persistence library because it contains some familiar annotations that we can apply to our model class later on.
Note: Micronaut Data comes in two flavors: JDBC and JPA. I like the simplicity of the JDBC flavor, but you can feel free to work with the JPA variety if you’d like to. Refer to the Micronaut Data documentation for more information.
Next we need to tweak a few classes. Open up Application.java and modify it as shown below. We’re adding a type hint here for the OracleDriver, setting a system property to prevent the Oracle Driver from attempting to use FAN and slightly modifying the Micronaut.run() command to change the behavior on how environment variables are loaded for better performance.
Start Application
At this point, we’ve configured our application enough that we can start it up and observe the Liquibase script execution to create our necessary table as outlined in our changelog above. Don’t forget to set the proper environment variables (see above) before launching. Your console output should look similar to the following:
As you can see, Liquibase has created a few tables to track its own operations and generated and executed the DDL to create our users table. We can confirm the creation by running a simple query:
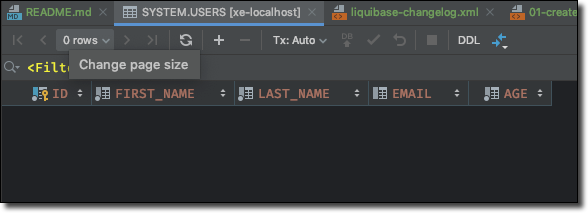
Let’s pause here to recognize just how awesome this is. We haven’t written a single line of SQL, yet we have a table created in our database in such a manner that as we move forward with our CI/CD pipeline our test and production environments will recreate this schema without us having to even think about it!
As awesome as this is, I assure you it is about to get awesome-er.
Let’s look at how to define our domain model entity and add persistence operations.
Create Model
If you’ve written a Java application in the past, you know what a POJO looks like. Our domain model is a simple POJO with few annotations to let Micronaut Data know it needs to manage this entity. I’ll leave out the constructor, setters and getters because if you’ve seen one, you’ve seen them all before. Also note the addition of a few validation annotations. These will be used by Micronaut to ensure the validity of our objects before we persist them when used in conjunction with the @Valid annotation in our controller. Finally, take note of the @Id annotation on our ID column. I hope that one is self-explanatory, but if not it indicates which column is our ID column.
Create Repository
The next step we need to take is to create a repository that will be used to expose our CRUD operations for our User object. Prepare yourself for more awesome, because this one is pretty amazing. Here we simply define an interface that extends CrudRespository with the proper annotation to define the SQL dialect and Micronaut Data will construct all of the necessary CRUD queries behind the scenes at compile time and they’ll be ready for use immediately throughout the application. Create the file at repository/UserRepository.java and populate as such:
That’s it. That’s the whole thing. At runtime we now get:
-
count()
-
delete()
-
deleteById()
-
deleteAll()
-
existsById()
-
findAll()
-
findById()
-
save()
-
saveAll()
-
update()
All free of charge.
Modify Controller
Let’s modify our controller to add two methods: one to save a new user and one to return a user by ID. We’ll first need to add a constructor and inject our repository.
Then add the endpoints:
Test Persistence
Let’s launch our app and issue a few cURL commands to test out our progress so far.
Which should return the new user object:
And the getById() method:
Which ought to return the same user object:
TL;DR
In this post, we added a lot of stuff!!! We added Liquibase for schema migrations and CRUD operations on a new domain model via a data repository and the necessary controller methods to persist data into a local Oracle DB.
Next
Next up we’re going to add some tests to ensure the quality of our persistence tier before we redeploy our application to production.
Source Code
For this post can be found at https://github.com/recursivecodes/cicd-demo/tree/part-6
Photo by Lucas Myers on Unsplash
Related Posts

Querying Autonomous Database from an Oracle Function (The Quick, Easy & Completely Secure Way)
I've written many blog posts about connecting to an Autonomous DB instance in the past. Best practices evolve as tools, services, and frameworks become...
Sending Email With OCI Email Delivery From Micronaut
Email delivery is a critical function of most web applications in the world today. I've managed an email server in the past - and trust me - it's not fun...

Brain to the Cloud - Part III - Examining the Relationship Between Brain Activity and Video Game Performance
In my last post, we looked at the technical aspects of my Brain to the Cloud project including much of the code that was used to collect and analyze the...